Feeds:
Posts
Comments

Archive for the ‘Sulfur’ Category

Urizun Japanese Winged Bean Baker Creek

This great image from Baker Creek Rare Seeds gives you a quick idea about the day neutral Urizun Japanese Winged Beans, a popular summer veggie on the island of Okinawa. It is native to Asia, has a unique configuration yielding little star like crosscuts, the flowers are blue and purple, the little pods are tender fresh crunchy eating from the vine. The large pods are for harvesting green edible seeds. When the pods dry and turn dark, the seeds are saved to cook and/or grow more plants! Baker Creek always has free shipping and gives you a free seed packet with every order!!! You can donate if you care to.

Urizun Japanese Winged Bean 2 Days old Baker Creek

April 2021 My first Urizun Japanese Winged Bean was given to me by an adventurous fellow gardener! This little tyke was 2 days old. Long story. For several months it went back and forth between living and dying, growing slower and slowly, finally making about 6″ tall. My friend gave up way sooner, composted hers, disappointed. Mine grew to about a foot tall and made a few small pods. I had planted it in a shady area. Well. We found out it is a tropical full sun humid heat lover. It was a heroic little plant trying to do what I asked it to. However. I have found that ‘Because the early growth of winged bean is slow, it is important to maintain weeds.’ Well Hallelujah! I am slightly vindicated after all! Apparently, they, and some other legumes, are naturally slow in the beginning! 

2022  But I was hooked. Me, curious and determined, got some seeds from Baker Creek and tried again. I didn’t know it at the time, but much to their favor, the Urizuns are a Day Neutral variety. More below. I planted in April again, but in a sunny spot sheltered between Long Red Beans tall on the side the cooling wind comes from and Cucumbers low to the ground on the sunrise side. I hoped to keep them warmer and for a little humidity. I gave them a 6′ tall cage and told them my expectations.

Planting! I gave them (four!) super soil – they like well draining rich sandy loam. Their required soil pH ranges from 4.3 to 7.5. Since a tropical water lover, I built a big basin. They need to have a good amount of moisture in the soil to produce pods. Baker Creek says Sow 1-2 inches deep, in full sun, directly in garden well after last frost. Sow 6-12 inches apart in beds. Pre-soaking for 1-2 or 24-48 hours speeds germination – some say overnight. Pick out the ones that swell. Some will double in size! They germinate best between 77 and 85°, soil temp 65°. If you are starting them indoors, a heating pad helps. The plant likes 64-86° F. Lower than that they stop producing. They are not drought or frost tolerant.

Urizun Japanese Winged Bean Seedling April 2022 Baker Creek

They must have appreciated my efforts, because they thrived, slowly at first, but in no time, compared to 2021, they were quite taller and super healthy! Huge difference! Pods arrived in August.

Urizun Japanese Winged Bean

Winged Beans have many names and are grown in many places. The winged bean (Psophocarpus tetragonolobus), also known as the Goa bean, asparagus pea, four-angled bean, four-cornered bean, Manila bean, Mauritius bean, winged pea, cigarillas, princess bean, in Vietnam dragon bean, is a tropical legume plant native to southern Asia—Papua New Guinea, Mauritius, Madagascar, and India. It grows abundantly in hot, humid equatorial countries, from the  Philippines and Indonesia to India, Burma, Thailand and Sri Lanka. They are now grown in the US – mainly in Florida, Africa, Australia and Hawaii! Success in more locations is coming due to the further development of Day Neutral varieties.

It’s a Super plant for three reasons!

  1. Wiki says: Winged bean is nutrient-rich and all parts of the plant are edible. The leaves can be eaten like spinach, flowers can be used in salads, tubers can be eaten raw or cooked, and seeds can be used in similar ways as the soybean. The winged bean is an underutilized species but has the potential to become a major multi-use food crop in the tropics of Asia, Africa, and Latin America. The winged beans are high in Protein 12%, Potassium 16% and Iron 11%. Compared with a variety of legumes, these beans contain the highest proportion of calcium which make bones strong and prevents breakage. Fresh beans contain 31% of daily vitamin-C. 100 g of fresh leaves provide 45 mg of vitamin-C (75% of recommended daily value) and 8090 IU of vitamin-A (270 % of RDA)! The bean seeds are similar to soybeans in both use and nutritional content (being 29.8% to 39% protein). For some fascinating detailed research based info see ScienceDirect.
    .
    Per Elen Khachatrain raw winged beans: have a high level of Vitamin B1, which allows the body to use carbohydrates for energy. Winged beans have incredibly high amounts of potassium and copper. These beans contain more potassium than 90% of foods. The glycemic index of winged beans is low. The pH value of winged beans, in general, has been calculated to be equal to -6, which makes these beans an alkaline food. They are very high in net carbs, so check your diet to see if they are allowed. Thanks to Elen for her super post!
  2. Winged beans are a perennial, but can be, and usually are, grown as an annual! In areas and times of extended drought, perennials use less water in general and don’t have to be replanted each year, using more water to establish them. But winged bean are not considered drought tolerant! Perennials can produce 10 months of the year, a much longer production period than most veggies, produce more veggies, and you don’t have to wait for another crop to grow. They produce right up to first frosts! If you have space and decide to let them die back in fall/winter, they will come back in spring!
  3. The plants are legumes! That means two good things! Like other legumes they can feed themselves by fixing their own Nitrogen from the air and depositing it in nodules on their roots. 1) When the plant dies it releases the Nitrogen into the soil. 2) They use less fertilizer while they are alive. The only necessity is to be sure to use an inoculant when you plant your seeds, the right inoculant, a Rhizobium. If you don’t use it, no nodules are formed. You can get it at any nursery.
    .
    This also makes Winged Beans an effective soil restorative cover crop – and you get beans! Plants for a Future states: A very good green manure with exceptional nitrogen-fixing properties, producing a greater weight of nodules per plant than any other member of the Leguminosae! William Woys Weaver says their nitrogen-fixing ability helped secure their role as a cover crop on banana plantations, both to enrich the soil and to provide an alternative source of income when bananas are not producing!

Urizun Japanese Winged Bean Blossom Baker Creek

The large flower is white, pink, or light blue. My beautiful Urizuns are lavender with a touch of yellow!

Varieties depending on genotype!

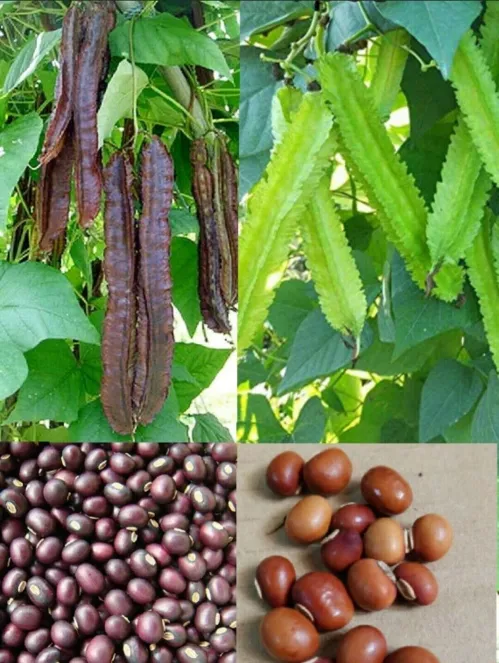
My experience is as the images, with green rectangular Winged Beans, but they can also appear flat. Per World Wide Vegetables: Pod color can vary from shades of cream, green, pink, red or purple! Stem color is commonly green, but can vary from shades of green to shades of purple. Leaves vary a lot in shape and are different shades of green. The surface of the pod can be smooth or rough. When the pod is fully ripe, it turns an ash-brown color and splits open to release the seeds. Seed shape is often round, but oval and rectangular seeds are also found. Seed color changes based on environmental factors and storage conditions. Seeds may appear white, cream, brown or dark tan in appearance.

William Woys Weaver tells us: Due to the Bean’s adaptability, today there are hundreds of varieties, many developed in China. Of the varieties developed by Chinese gardeners, the ‘Hunan’ winged bean is credited for making cultivation possible in North America. Most winged beans grown in the United States are raised in south Florida and planted for winter cropping, because the plants do not flower unless the day length is short. ‘Hunan,’ however, can be grown anywhere with at least two months of warm nighttime temperatures (70 degrees or more). It will begin to flower in the latter part of the summer and then crop heavily in September until frost.

Evergreen Seeds says ‘Gardeners in most parts of the United States may see lots of vegetative growth throughout the summer, but no seed pods until late summer or fall.’

Per Echonet: Most varieties of this jungle plant from Borneo only bloom and set fruit when the days become very short, so they are planted in early fall. The variety ‘chimbu’ produces longer pods than most and is a striking deep red color. For pods in a summer garden in Florida or “up north,” be sure to purchase a “day neutral” or “long day” variety. See more about Day Length/Photoperiodism

❤Companions  They don’t mind growing near corn or tomatoes. Perhaps like Peas, another legume, the Onion family stunt the bean’s growth. Carrots are a great plant that enhance peas! Maybe try them at the base of the Winged Beans… But the plants often grow so full, there would be no space to stand to harvest them along a row. Some plant WBs on both sides of heavy gauge cattle panels! The beans do well inter-cropped with banana, sugar cane, taro, coconut, banana, oil palm, rubber, and cacao.

Planting  Winged Beans are a tropical plant, will only flower when the day length is less than 12 hours, though there are varieties, like Hunan and Urizun, that are day-length neutral. If your area has day lengths over 12 hours, do your planting timing accordingly. REPEAT: The only necessity is to be sure to use an INOCULANT when you plant your seeds, the right inoculant, Rhizobium leguminosarum. Unless your soil already has the Rhizobium, if you don’t use it, no Nitrogen nodules, that feed your plant, are formed on the roots. They suffer.

Actually, the bacteria ‘infect’ your plants and cause them to make the nodules. If there is none in the soil, seeds may even be unable to germinate. Even if you presprout to start your seedlings, they will live, but not have the ability to fix the N they need, are feeble, struggle and produce little. Even if you fertilize it is not the same.

Inoculant, living Rhizobium leguminosera, has a short life. Last year’s left over is likely not viable. Get fresh, LOL! You can get it at any nursery. It’s inexpensive. It’s important to know that in addition to the Rhizobium, available nutrients and soil pH matter as well.

Urizun Japanese Winged Bean Well Up the Cage Baker Creek

Give them a place to live, plenty of space! All varieties of winged bean are vines and need support. Without it they grow into heaps of tangled intertwined stems that produce few pods or seeds. That, however, is good if you are growing for tubers! Trellised plants produce twice the seed of unstaked plants. 10-13′ Vines will grow right over a shed if you let them! Growing vertically saves space to grow other plants.

My four beans preferred the morning side of the cage and by August they were near the top! They did make it to the top! Due to a coolish summer, they didn’t make that 10′. At the upper right you can glimpse that the four Long Red Beans also made it to the top and did their job sheltering the Winged Beans from cooling winds.

Maintenance  Weed carefully while they are young.

Super tip from William Woys Weaver! Several growers have told me they prune the vines after about the 12th leaf appears. This causes the vines to send out as many as six side shoots, much like a grapevine, so you get a huge increase in pod production. A large pod harvest is most important for those of us who do not live in tropical climates, because frost is likely to ruin any chance of enjoying the tubers. – If you do this and you have a good hot climate, allow plenty of room because they can get really big and bushy! However, see the 4th image above! Varieties must vary, because my Urizun immediately put out plenty of side shoots on its own!

Otherwise, they are not drought tolerant! Maintenance is pretty much giving generous amounts of water for both the Long Red Beans and the Wings. The raccoons loved all that moisture and the worms that went with it, so there were diggings by them and recovering the roots by me. Thank goodness the Wings and Reds have strong long deep roots. Yellow or brown droopy leaves on the winged bean vine are a sign of overwatering, while dry brown crunchy leaves are a sign of underwatering.

Pests-Disease  The Long Reds attracted ants/aphids and a few got on the Wings but didn’t stay long. I think they don’t like the Wings. I sprayed them off and the Reds did better this year too. There were NO diseases on the Wings, but there were on the Reds when they were near finishing. Winged Beans are noted for disease resistance. However, Texas Real Food farmers report leaf spot and powdery mildew. They recommend to treat powdery mildew, use copper fungicide or sulfur plant fungicide. For leaf spot, use sulfur sprays or copper-based fungicides to prevent the spores from germinating. In Florida Nematodes can be a problem and in some areas, mites.

Urizun Japanese Winged Bean Picking Size Baker Creek

Ladies and Gentlemen! August brought Baby Urizuns and delicious eating size ones. I harvested up to 6″ long ones that were tender. Help the baby beans by pulling the dead flowers off the tip of the bean.

Harvests, plural!  The beans themselves can break just before the point where they are attached to the plant. Generally mine just popped off when I pulled them, but you will learn from your own plant what works best. There are still two last harvests! At the end of the season, flower production stops, seeds are saved, dig up your plant to see if there are any tubers! Note that some varieties of winged bean do not produce tubers. If your variety does make tubers and you want them more than the pods, remove the flowers!

Storage is simple. Fresh is best. On the counter they go limp quickly. In the fridge is better. Better to eat them right away or the little wings start turning black along the edge. They have a short shelf life, and fresh winged beans are very delicate, difficult to ship. Probably why they aren’t a commercial success. Freeze them if you need to store them longer.

Urizun Japanese Winged Beans Saving Seeds Baker Creek

October giants, 7-8″ long are hard as can be, no flex whatsoever, definitely not edible! They are doing a perfect job protecting ripening seeds inside. I cut one open, not an easy task, and the tender seeds are a good 1/4″ diameter, still green. They still have to form a protective covering and dry. November we had some early morning frosts and by the end of November pod production stopped.

SeedSaving  If your growing season is short, you may get plenty of pods for eating, but not many seeds.

Other timing can be a bit tricky too! When I thought I better leave a few pods to dry for seeds I stopped watering. I’m guessing these pups have long strong roots partly because even the raccoons couldn’t dig them up, but also because they kept right on producing when I stopped watering them. Then it rained. Twice. A few weeks apart. They are still as green as can be though there are fewer new ones. The plant stops making pods when there isn’t enough moisture. We want them to dry and darken. Still having to wait and it is the end of November now. They are a Perennial and with those long strong roots somewhat drought tolerant and they are proving it, LOL! And, rain is predicted again in a couple days…

Instead, do this! In short season areas, 1) immediately leave some pods on the vine and let to dry and turn dark colored or 2) start some plants separately for seed saving and let them run to seed right away. When the pods turn black and dry out, they’re ready to pick. Store your seeds in an airtight jar in a cool dark place. Harvesting is super easy. Split the pod open and remove the seeds!

Winged Beans Dried in Pods for SeedSaving

Winged Bean Red Green Pods Seeds

Winged bean is a self-pollinating plant but mutations and occasional outcrossing may produce variations in the species. Nothing is ever 100% predictable, thank goodness!

Medicinal Benefits too! Winged Beans are loaded with healthfulness! Health Benefits Times says: Helps Prevent Premature Aging, Reduces Headaches and Migraines, Ensures a Healthy Pregnancy, Inflammation and Sprains, Helps Prevent Vision Problems, Weight loss, Weakness, Can Help Prevent Diabetes, Prevents Asthma, Increases Immunity and Fights Colds. Practical Health and Wellness Solutions cites 18 benefits, including some of the above, and more! They are a terrific bean, and not just for eating. Check the net!


Nutrition and You cautions:

Winged beans and plant parts can be safely consumed by all healthy persons without any reservations. However, individuals with known immune-allergy to legumes and in G6PD-enzyme deficiency disease should avoid them.

Winged beans carry oxalic acid, a naturally occurring substance found in some vegetables which may crystallize as oxalate stones in the urinary tract in some people. Therefore, individuals with known oxalate urinary tract stones are advised to avoid eating vegetables that belong to Brassica and Fabaceae family. Adequate intake of water is therefore advised to maintain normal urine output in these individuals to minimize the stone risk.

Also, mature seeds must be cooked for 2-3 hours to destroy the trypsin inhibitor and hemagglutinins that inhibit digestion.


Culinary Treats! WBs are often referred to as a ‘supermarket on a stalk!’

  • The beans are one of the commonly featured ingredients in Indonesian, Malaysia, Vietnam, and Cambodian cooking.
  • I eat the beans raw off the vine! For longer keeping and tasty eating, pickle them!
  • Finely chopped beans added in salads, stir-fries, and sambal.
  • Whole immature pods may be grilled and seasoned with oil, salt, and pepper, served with a dipping sauce. In Sri Lanka winged bean recipes include various fried and curry dishes. I personally enjoyed pods cut on the diagonal in my omelets!
  • The tender leafy greens and shoots cooked in stews and stir-fries.
  • Flowers are lovely scattered over salad. The flowers of the winged bean are used to color rice and pastry.
  • Fresh green winged beans seeds can be eaten like fresh peas! They can be roasted or added to stews. Sautéed or steamed, they can be served as a side dish with fish, seafood, and poultry. Generally, they are used in the same manner as peas.
  • Dried and roasted, seeds can be ground into flour, make high protein bread. When brewed, it can be used to make a drink similar to coffee.
  • Winged beans can also be made into milk, similar to soy milk.
  • In Indonesia they make a popular Tempeh from the dried beans. Legumes can also be turned into curd by sprouting it, similar to tofu. Miso.
  • Oil! Like soy beans, the seeds produce oil, used for cooking, illumination and soap. Expressed oil cakes are fed to livestock.
  • Roots of winged beans can be eaten like potatoes.
  • Tubers are eaten raw or cooked, have a nutty flavor due to their high protein content. Boil, steam, bake or fry them thoroughly. Evergreen Seeds says: They are significantly higher protein than potatoes or yams. Certain varieties of winged bean plants produce larger and better-tasting tubers, usually at the expense of seed pod production. Not all varieties produce tubers… Depending on varieties, tubers are harvested at 5 to 12 months.
  • In addition, winged beans are used as animal feed for cattle, poultry, fish, and other livestock.

What a versatile plant! Though it is slow to start, it is worth waiting for! It is super nutritious, a somewhat drought tolerant perennial legume, a soil restorative! From a permaculture standpoint it IS a super plant! From an artistic point of view, it is pretty crazy and wild! Just plain fun ~ The freshest place to buy it and try it is likely your local Asian market, the farmers market or if you are lucky a friend will gift you! You don’t really have to have an adventurous palate or a strong gut because it is neither oddly flavored nor spicy hot! It has a subtle flavor like asparagus or peas! It’s distinctive shape is most certainly a conversation starter! Please enjoy this Baker Creek mini Vid!

See about more valuable Perennials

Highland tribesmen in Papua New Guinea esteem it so highly that they hold winged bean sing-sings (feasts) at harvest time. I hope your plantings bring you such happiness!

Bon Appétit, Dear Gardeners!

Updated 3.3.23


Love your Mother! Plant bird & bee food! Think grey water! Grow organic! Bless you for being such a wonderful Earth Steward!

The Green Bean Connection started as correspondence for the Santa Barbara CA USA Pilgrim Terrace Community Garden. Both remaining Santa Barbara City’s community gardens are very coastal. During late spring/summer we are often in a fog belt/marine layer most years, locally referred to as the May grays, June glooms and August fogusts. Keep that in mind compared to the microclimate niche where your veggie garden is. Bless you for being such a wonderful Earth Steward!

SUBSCRIBE to the entire newsletter!    Friend on Facebook! 

 ^Top

Read Full Post »

Soil Makes a Difference, Abundance

In Warrenville, IL, Shawna Coronado transformed her front yard to edible landscaping!

Super Soil Makes all the Difference! Great soil grows healthy plant roots and powerful veggies! Here are important seasonal soil care tips…first let’s consider your land.

The Lay of your Land! The shape of your land has a lot to do with the condition of your soil. If you are on a slope, do a little terracing to preserve your precious topsoil from erosion. Use the water saving principles, Slow, Spread, Sink! In lower areas, berms, raised borders, are a simple way to keep your water where it is best used. The berms also allow airflow to go over an area rather than drying the soil there. See Zuni Waffle Gardening! So shape your space! Plant according to what your land can support. Put drought tolerant heat lover plants in drier hotter places. Put water needing veggies in partial shade, in lower water collecting areas, by a spigot. Plant tall heat lovers in the West so not so heat tolerant shorter plants can be shaded from the hottest afternoon sun. If they all like Sun, plant tall to the east and north.

SEASONS

Fall – Put Summer to Bed – Clean up! Remove debris, any infested habitat. Clear places where unwanted pests or diseases might overwinter. Remove mulch so the soil can warm up when the sun is low and there is less day length. In Southern areas, amend your soil for winter planting. See how to prep your soil for super winter growing! SoCal Fall/Winter Veggie Soil Tips for Delicious Returns!

WinterIn SoCal, feed 1/2 strength during cooler weather when uptake is slower. Raise Green Manures/Living Mulch, soil feeding cover crops to restore your soil. See also Living Mulch! Cultivate after rains! It’s an age old technique to aerate soil, let it dry out, kill off soil fungi. It is also called Dust Mulching. Simply cultivate about 2 or 3 inches deep. This disturbs the soil surface, interrupting the wicking of soil moisture from below to the surface and losing it to evaporation. See more at Rainy Day Tactics for Spectacular Veggies!

In SoCal End of Winter, Early Spring

Compost well. Compost has excellent water holding capacity and your seeds need to be kept moist for germination. Homemade compost especially thrives with living organisms. Worms are happy and make castings! Add other amendments you prefer at the same time.

Some plants need slightly acidic soil. When their soil is right, they fend off diseases better and produce like crazy. They like to be moist, so get the right compost, the kind for shade plants, and dig it in. For short rooted plants, shovel-depth deep is plenty.

Now, before you go compost crazy, in Nature, organic matter, our equivalent is compost, only makes up a small fraction of the soil (normally 5 to 10 percent), yet organic matter is absolutely essential. Veggies need a bit more because they are working hard growing fruits! There is various thinking about what the right amount of compost is to use in a veggie garden that is pumping out those veggies! Cornell University says use 3 inches over the surface worked into the top 3-6 inches of soil! Research shows ideal soil contains 5% organic matter by weight, 10% by volume. Like with a lot of gardening, more is not always better, nor necessary, and can even harm your plants!

Depending on what you are planting where, add well aged manure. Hard working leaf crops like lettuces love manure, so do peppers. Heavy feeders like large plants, indeterminate tomatoes, might like a little more. Just be careful not to add so much your crop goes to leaf and no fruits! If you do, there are remedies for that, but you lose production time when that happens. Peas and beans draw their own Nitrogen from the air, and carrots will grow hairy and fork if their soil is too rich. No additional manure is needed for them.

Preparing Planting Beds for Growing Seeds

In addition to the above, incorporate Worm Castings for all your plantings, but, seeds benefit a lot! They germinate more quickly, seedlings grow faster! Leaves grow bigger, more flowers, fruits or vegetables are produced. Vermicompost suppresses several diseases of cucumbers, radishes, strawberries, grapes, tomatoes and peppers, and it also significantly reduces parasitic nematodes, aphids, mealybugs and mites! Who could ask for more?! These effects are greatest when a smaller amount of vermicompost is used—just 10-40% of the total volume of the plant growth medium is all that is needed, 25% is ideal!

See more at Soil Care for Spring Planting! 

At Planting Time – Using these specific ingredients below may not be your personal choice, but consider adding equivalent goodies. Every plant has different needs. Planting holes are truly plant specific spots!

Planting Hole Amendments for Transplants

  • Nonfat powdered milk is a natural germicide and immediately boosts plant immune systems. A handful does the job.
  • Worm Castings for rapid growth, disease suppression, reduce insect pests! 25% is ideal.
  • Bone Meal is high in P, Phosphorus – blooms! Uptake takes about two months, right at bloom time. It is also high in calcium, which helps prevent blossom end rot in tomatoes. I plop in a generous handful.
  • Adding Seabird guano high in P, Phosphorus, at planting time helps your plants continue to bloom LATE in the season! Its NPK ratio is 1-10-0.2, takes 4 months to become available to your plants.
  • Well aged Manure to boost Nitrogen – especially for manure lovers like eggplant, melons, peppers, big indeterminate tomatoes, winter squash and hard working leaf plants like lettuces.
  • Mycorrhizal fungi – Brassicas don’t dance with it, but other plants thrive. It links your plants’ roots with the soil, increases uptake of nutrients. Just sprinkle it on the roots of your transplant and give it a pat so it will stick. The roots and the fungi need to be in contact!
  • Compost if your soil needs a little boost right where you are planting. Remember, your plant has a circle of tiny feeder roots out to the mature dripline and sometimes beyond. That’s where the majority of feeding takes place when your plant gets big. Be sure to compost far enough out for them to be well nourished. Your plant will do better longer.
  • If your soil has fungi problems, wilts, blights, add a tiny tad of coffee grounds. A 1/2 a percent does the job. Yes, you read right, that is a 1/2 a %!
  • Add Green Sand or some such for a long term mineral boost if you think your soil needs it. Kelp works quickly.

In soil with fungi, plant high so the soil drains and dries, the fungi dies. Make basins so the bottom of the basin is above the general soil level. If a plant with a lot of large leaves, put a stake in the center of the basin so you know where to water. Make the basin large enough so the edges don’t degrade from the watering and your large plant is sure to get enough water to its dripline, where the lateral surface roots feed. Many plants uptake more food from these lateral roots than the central deep roots.
Special Soil Berm Basin Level for Tomatoes and Cucumbers

Summertime!

When Your Soil Heats Up, Mulch! A two-to-four inch layer of mulch decreases evaporation from the soil by 70 percent or more! Mulch prevents light germinating weed seeds from sprouting. You save your soil nutrients and time in the garden weeding! Nutrients are not leached away by repeated waterings. Water well before applying the mulch, or you will insulate dry soil rather than moist soil. Be garden smart – when possible use a mulch that decomposes and feeds your soil. But if all you have is gravel, use it!

SideDressing – Between summer watering and keeping up with harvesting, sidedressing often is neglected. But your plants work hard and need some chow! Feed your plants at bloom time. They are just about to go into their maximum production. Liquid fertilizers are easy for them to uptake. Teas – compost, worm, manure, fish/kelp – are terrific. Foliar feeding, sprinkling the leaves, upper and undersides, with some Epsom Salts/sulfur mix is super for Solanaceae – eggplant, pepper, tomato, tomatillo, and roses, but especially peppers! This care increases your bounty, extends your growing season.  

High to Late Summer – Replenish low mulch. Remove and trash mulch where plants have had pests or disease; replace with clean mulch. Keep your soil consistently moist. If you are off on vacation, choose a dependable person to tend your plants. Be sure to have them keep your plants harvested so your plants don’t quit producing. Late summer feed your plants if they aren’t looking so perky and if you still want crop. But if your plant is done, no amount of feeding will matter. They know when the days are getting shorter… Late Summer, as cooling starts, remove mulch so the soil is again warmed by the Sun. 

Words on Watering from water challenged Los Angeles! This is written by Master Gardeners representing the University of California Cooperative Extension:

  • Use the shovel test to know when to water: soil should be moist to the base of the shovel when inserted into the soil.
  • Deep watering is important. Water is not getting deep enough if you sprinkle your garden every day. It is best to water to the point of run-off, and water as frequently as needed to meet the shovel test. Also, with too much run-off, you are wasting water.
  • Teach your plants to grow deeply for moisture. In spring, for average soils, water deeply only every 2-3 weeks. By the time that summer’s heat arrives, plant feeder roots will be growing deeply for moisture, and the plants won’t need watering more frequently than once a week during very hot spells.
  • One inch of irrigated water will soak down to different depths, depending on how heavy your soil is: 12″ deep in sandy soil, 9″ deep in loamy soil, but only 3″ deep in clay soil. Plant root zones generally reach from 2-12″ down, but larger plants like tomatoes may reach 3′ down. Clay soil, because it is so compact, can be watered a little each day for two to three days to allow absorption down that far, rather than a lot of runoff by watering once for a long time.
  • The ideal time to water is in the morning before the sun is high. This avoids evaporation and also gives the plants time to dry off before sunset, which deters mildews.
  • Refrain from overhead watering when the evenings remain warm, especially when leaves can’t dry off by sunset. Fungal diseases thrive when temperatures remain between 70 and 80 degrees; and they need only 2-4 hours of moist, warm conditions to develop. Overwatering is the cause of most plants dying. Too much water drowns the roots.
  • Occasionally you should overhead water in order to clean both sides of leaves.
  • Avoid walking in your garden after watering so that you do not compact the soil. Use stepping stones, boards, or straw or mulch paths. Never step into raised beds. Healthy living soil is 25% air, 25% water. It needs to breathe and be moist for the soil organisms to do their work.

In general, here are some tips for watering in Drought/Desert Conditions: Growing Super Veggies in HOT, Drought, Desert Areas! Convert some of these tips to your situation.

ALL Year Make Compost! It is your single most bestest amendment of all! If you could choose only one, this would be it. It’s nutritious, has super water holding capacity, and steadily releases nutrition to your soil! Composting Methods, Make it Your Way! Especially read the Note!

When your soil looks good enough to eat, you probably have it right! 

Updated 6.25.23

Top^


Love your Mother! Plant bird & bee food! Think grey water! Grow organic! Bless you for being such a wonderful Earth Steward!

The Green Bean Connection started as correspondence for the Santa Barbara CA USA Pilgrim Terrace Community Garden. Both of Santa Barbara City’s remaining community gardens are very coastal. During late spring/summer we are often in a fog belt/marine layer most years, locally referred to as the May grays, June glooms and August fogusts. Keep that in mind compared to the microclimate niche where your veggie garden is.

Read Full Post »

July basket of tasty summer veggies!

Thanks to Grow Veg for this delicious image! See their great post on ‘How to Tell When Fruits and Vegetables are Ready for Harvest’

Happy 4th of July to you all! Henry David Thoreau says ‘Gardening is civil and social, but it wants the vigor and freedom of the forest and the outlaw.’ That’s us, growing the freshest, most nutritious, organic food there is! Enjoy your luscious tomatoes!

July is maintaining and feeding, harvesting, seedsaving, storage, share Month, the beginnings of fall planting preparations for late August!

July is Tomato month! Bush and cherry toms turned red in May and June, but the big indeterminate all-summer-long tomatoes come in July in big numbers! Super salads on the way!

July usually brings your greatest variety of table fresh veggies and herbs! It’s colorful and full of great textures. This is giveaway time if you don’t can. It’s giveaway time if you have so much there is enough canned and/or frozen for you and your family and then some! Some of us SoCal gardeners don’t can at all because our fall, winter crops are so nutritious and freshly abundant there is no need! Some feel eating with the seasons is the most natural and best for your body.

Sharing is a blessing to people who don’t have access to fresh organic food. Fresh foods last so much longer than store bought, and have so much better taste! Start with family, friends, neighbors. Give to senior communities and those who prepare food for them. Remember they often have special dietary needs and more fragile teeth. Less spicy and less crunchy. Give to any organization that helps people in need, the FoodBank, maybe your local women’s shelter. When we eat better we think more clearly, our body heals, our Soul mends. Thank you and bless you for caring so much.

Sidedressing is important now while plants are working hard!

General sidedressing, during season feeding times, are when baby plants are just up 5, 6 inches tall, when vines start to run, at bud time, and first fruiting. From then on it varies per plant! Late July when some plants are near the end of production, extend their fruiting with a good feed – in the ground, or foliar, preferably both, but foliar tops ground feeding for several reasons! See more!

  • Manure feeds are especially great for lettuce, and all others except for beans, beets, carrots, parsnips, sweet and white potatoes, and tomatoes, or there’ll be more foliage than fruit! Lettuce loves chicken manure but only about a 1/4 inch gently dug in. No teas with manure on foliage you will be eating.
  • Give your peppers and Solanaceae, tomatoes, eggplant, potatoes, Epsom Salt/Magnesium foliar treatments.
  • Every couple of weeks your strawberries would love a light fish emulsion/kelp drench.
  • Or you can foliar feed everyone some tea! Make a super duper mixed tea – no compost is needed in that mix for plants whose soil was well composted before planting. First make your tea. When it is ready, make your spade fork holes and apply a good compost/worm castings mix, then foliar feed with your tea! Less holes are better because you don’t want to damage too many of the lateral surface feeder foots. Drippings will help moisten your mulch and compost/castings on the ground below! Last, water well with a low flow water wand underneath your plant so everything stays where you put it and you don’t wash away your foliar feed. Do that before the sun gets on your plants or while it is still cool in the day and plants have plenty of time to dry during the day. Low flow also lets water and tea and compost/castings drippings drizzle down into the spade fork holes! THAT is a super feed!Mixed teas feed and help prevent pests and diseases. They serve up beneficial living microbes to your plant and provide trace minerals it may need. Use foliar tea more frequently for plants that are ailing or in recovery. On an immediate basis, foliar feeding is 8 to 20 times more potent than ground feeding, and your plant takes it up in as little as an hour! Plants in immediate need can be helped right away! Compost supplies the organic matter that tea doesn’t supply, so it is critical in and of itself, plus it has many times more nutrients than a diluted tea. On and in the ground it decomposes slowly, feeds your plant steadily. It and castings have great water holding capacity. Do both whenever you can!
  • Compost is always super. Remember to use acidic compost for strawberries and some other veggies that don’t mind a slight acidity! Pull back the mulch. Grab your spade fork, insert it, rock it gently, remove the fork leaving the holes. Stay 8″ away from the central stem, go out to the dripline. Gently scratch up only one or two separate areas around your plant out to the dripline, even a little further to encourage roots to extend, and to feed the feeder roots that are in progress growing out further. Avoid breaking a substantial number of tiny surface feeder roots, otherwise your plant will be slowed down by being in recovery for lack of food and ability to uptake water. Mix in your compost and lay on a 1/2″ to an inch of compost on top of areas you didn’t dig up. While you are at it, be sure your basins are retaining their shape out to the dripline. Put your mulch back, add more (straw) if it needs replenishing, replace it if it’s by a plant that has had pests or disease. Gently water well. Keep the area moist for a few days so soil organisms can multiply! See Composting Methods, Make it Your Way!
  • Save yourself some time by adding 25% Worm castings, and for plants that need it, a bit of manure, to your compost and apply them all together. Especially apply that mix to any ailing plants or plants in recovery. Castings help our plants uptake soil nutrients and boost your plant’s immune system. When your plant is taxed producing fruit in great summer conditions, it also is peaking out for the season and fighting pests and diseases are harder for it. Adding compost and castings may prolong and up the quantity and quality of late summer fruits. However, sometimes a plant is just done. No amount of coaxing will have effect. It worked hard. Thank it. Let it produce its seeds for seedsaving, or take it to the compost altar.

If you prefer organic granulated fertilizer sprinkle it around evenly per instructions, and water in well. Just know you will have to do that more frequently, and it doesn’t provide the water holding capacity that compost and castings do. 

Feeding your plants can be plant specific or in general. For example, Tomatoes and Peppers (and Roses – edible petals), do well with a little sulfur. It is easily applied – a Tablespoon of Epsom salts, and a 1/2 teaspoon liquid dish soap as a surfactant (so your application sticks to the leaves), in a gallon watering can is all it takes. If the nozzle turns up to get under those leaves, all the better. Apply before the sun hits your plants or while it is still cool.

If any of your plants are looking puny, have yellowing leaves, might give them a bit of blood meal for a quick Nitrogen pick me up. Add compost, castings and a tad of manure too so your plant has steady food after the blood meal (an expensive feed) is used. If you have predators creatures, especially skunks or raccoons, forgo stinky fish emulsions and blood meal.
Zucchini Squash Zoodles Kale Pesto Edamame RecipeLate July, gardeners are starting to want new ways to enjoy their Zucchini! ZOODLES! Zucchini Zoodles Kale Pesto Edamame Recipe! Here are 28 cool summer variations on how to include this common veggie in a unique way!

Take care of pests and diseases asap! You don’t want them to spread or increase, lose the fruit of all your efforts and time. July brings hot weather, water stress, the stress of continued production. Though you may be a bit tired with all your tending and harvesting, this is not the time to interrupt your care. The heat will bring hatchings; tired plants may get overwhelmed by diseases. Be consistent with your watering. Stay on it with your harvest to keep your plants in production, sidedress (feed) as needed. Mercilessly squash the cucumber beetles, the green/yellow and black striped jobs. They give your plants, especially cucumbers, deathly systemic diseases. Put down pellets for slugs & snails, use sulfur and soap in foliar feeds to keep back aphids. See more! Keep plants susceptible to Whiteflies free from dust and Ants, and well supplied with worm castings. Hose the flies away, and remove infected leaves or the whole plant if it gets them repeatedly. Insecticidal soaps or Neem oil can reduce populations.

The old one, two! If your area has Fusarium/Verticillium wilts or Mosaic Virus, first foliarly apply 1/4 C bleach to a gallon of water. Be sure to apply to both under and upper sides of the leaves, and the stems. The next day give your plants a boost with the immune booster/mildew prevention mix: 1/4 C nonfat powdered milk, 1 regular crushed aspirin, heaping tablespoon Baking Soda, 1/2 teaspoon dish soap, to a gallon of water.

I found refraining from watering my strawberries but once a week, more in exceptionally hot or windy weather, and not mulching under my strawberries keeps the slugs and snails at bay. They don’t like dry soil. Do put down organic slug/snail bait where you will be sprouting seeds and while the seedlings are coming up. Aphids don’t thrive in a dryer environment either. Water the plants susceptible to them a little less. Remove yellowing leaves asap. Yellow attracts whiteflies. Leafminers love temps in the 70s! Remove damaged areas of leaves immediately so they don’t spread. Plant so mature plant leaves don’t touch each other so pests and disease don’t go plant to plant. Mice and rats love tomato nibbles and they are well equipped to climb! A garden kitty who loves to hunt is a good helper. Keep your compost turned so mice don’t nest in it; remove debris piles and ground shrub or hidey habitat. Please don’t use rodenticides that in turn kill birds, pets, or animals that would feed on a poisoned animal. That includes Gophers. For gophers, install wire barriersSee more about pests! 

Watering in July is vital, along with Compost & Mulch. Compost increases water holding capacity. Mulch shades soil, keeps it and your plant’s roots cooler, keeps soil more moist longer, less water needed. Melons in cooler coastal areas don’t need mulch! They self shade and hot soil helps them produce better. Give them a good sized basin so tiny lateral feeder roots can fully supply that big plant with water and nutrients. Put a stake in the center of the basin so you know where to water when the area is covered with those big leaves! Replenish tired or missing mulch the birds might have scratched away. Steady water is a must to produce good looking fruits. Some water then none makes misshapen strawberries, called catfaced, curled beans and cukes, carrots lose their consistent shape. Tomatoes have more flavor when they are watered a tad less just before harvest. You can do that with bush varieties, determinates, but with indeterminate vining types you just have to see how it goes. Lots of tasty flavor tests may be in order! They have deep tap roots, so usually watering nearby plants is sufficient. Short rooted plants like beans, beets, lettuces need frequent watering to keep moist. Some plants just need a lot of water, like celery.

Don’t be fooled by Temporary High Temps! Non heat resistant or tolerant tomatoes, peppers, eggplant, stop flowering and fruiting when temps rise above 85 to 90 degrees F for an extended time depending on humidity. Humidity causes pollen to stick and not fall to pollinate. Dry heat causes the pollen to fall and not stick! When weather cools, you will have blooms again and be back in production. Rattlesnake beans, on the other hand, keep right on producing at 100 degree temps! So choose heat tolerant veggie varieties, like Heatmaster and Solar tomatoes, from locales with hot weather. Wonderful heat tolerant varieties are out there!
Zucchini Lasagna! Eat it hot or cold on a summer evening!

Cool summer evenings enjoy Zucchini Lasagna! You can even eat it cold, and for breakfast!

Though July is more a maintenance and harvest month, Yes you can plant more! At this point, transplants are best, but many plants will not still be available at nurseries, and it is a tad late to plant many plants from seed. What you can plant is beans! They grow quickly and if you grow bush beans and quickly maturing heat tolerant varieties you will still be eating beans in Sept and Oct if it doesn’t get cold early! Get patio container types of quick growing heat tolerant determinate tomatoes if you can find them. Previously planted tomatoes may be done producing, or bit the dust for one reason or another – likely a blight or wilt. Remove the old plants to reduce further spread of disease – do NOT compost them. Beef up the soil and plant your late tomatoes in an entirely different spot.

More lettuces! In summer you want heat tolerant, slow bolting, tip burn resistant lettuce! Lettuce Leaf and Red Sails and Outredgeous are great. Jericho from Israel is great. Sierra, Nevada. Nevada is a Green Crisp/Batavian that grows BIG, doesn’t bolt, and is totally crispy! Green Star is ruffly, grows big around! Parris Island Romaine is slow bolting. Green Towers Romaine tolerates moderate summer heat and has some resistance to tipburn and bolting.

Transplant basil, celery, chard, cucumbers, dill, kale, leeks, summer lettuce, green onions, white potatoes, summer savory, New Zealand spinach. In our hot foothills and further south, go for more melons, okra, pumpkins, summer & winter squash. I’ve seen tomato transplants and bean seeds started in August produce plentiful crops into October! Rattlesnake pole beans do as they are supposed to, make beans in up to 100 degree weather! Yard long beans tolerate late summer weather and make magnificent beans! And some varieties of those don’t get mildew!

Corn is an exception – late plantings often develop smut. But. That smut, from a fungus called Ustilago maydis, is considered a delicacy by many. It’s insanely delicious and luxurious, like black truffles.’ In Mexico it is known as huitlacoche. – weet-la-COH-cheh. Your neighboring gardeners may especially not be pleased, however. See more!  

Fall transplants need babying! Transplant late afternoon or evening so plants have the whole night to begin to recover before they’re hit with a full day of sun and heat. Water well and provide shade from intense mid-day sun. Prop up and secure some of those plastic plant flats that have the finer grid pattern to filter the light. Keep your transplants moist for at least a month or until they’re well established. Mulch to save water unless they thrive on hot soil.

Harvesting has special little techniques and storage varies considerably from veggie to veggie! See more for details!

Be really patient with your big Bells and sweet roasting Peppers. Both like to wait until the nights are longer and cooler in late summer before fruiting and plumping up – making their thick walls. Peppers need time on the plant to absorb nutrients and water and plump up their flesh. Some will still be needing to change color.

>> At the end of the month, SoCal gardeners start your winter crops! Sow Carrots (they  do best from seed), celery and Brassicas. Brassicas are arugula, Broccoli, Brussels sprouts, cabbage (especially red and savoy types, which resist frost better), cauliflower, and kohlrabi, mizuna, mustard, pak choi, radish, rutabaga, turnip.

Mid to late July start preparing by clearing areas for late July first fall plantings. Remove finishing weakened plants that attract pests and get diseases. Remove debris insects live in. Remove and trash mulch from under plants that were diseased and replace with clean mulch. Decide where you will plant your green manure patches. Add worm castings to mini nursery areas you will be planting seedlings in. Castings speed germination and add water holding capacity to help keep the soil moist. Leave space so the seedlings can be removed by a narrow trowel to their permanent place when they become big enough and space becomes available. Keep the soil moist and shaded until they’re up, and then gradually allow them more sun over a week’s time.

It’s time to get seeds if you don’t already have them! If seeds and mini nurseries aren’t your thing, wait until your local nursery starts having the transplants that make you happy! Late August they might start trickling in. Labor Day weekend is a favorite planting time for some gardeners depending on how hot it still is. October is just fine too! One year it stayed so hot we all planted the first couple weeks of November!

Delicious Healthy Recipe Zucchini Rolls

Tasty Zucchini Rolls made with Sunflower Seeds Pate, Sun Dried Tomatoes and Spinach! See complete recipe by Chris at Tales of a Kitchen!

If you are just starting, just got your first plot at one of the community gardens, first, prepare your soil! While waiting for fall planting time, plant a few patches of fast growing, less water needing, heat lovers, lots of summer heat tolerant lettuces for your salads! They may need a little shade cloth protection. Plan out your fall/winter layout, remembering tall to the north, short to the south. Winter plants don’t take up as much food in cooler weather, so use less compost and manure. Remember, nature’s soil is naturally only 5% organic matter, but we are growing veggies, so a little more than that is perfect. Too much food and plants go to all leaf, but then a lot of winter veggies are just that, all leaf! Cabbage, Chard, Kale, Lettuces. Oh, lettuces thrive with manures, so put more in the lettuce patch areas, but none where the carrots or peas will grow. They don’t need it.

Important Habitat! As plants finish, let some of them grow out to save seeds. A carrot, celery and cilantro produce masses of seeds! Besides being food for pollinators and beneficial predator insects, they are beautiful! Birds will have seeds for food and scour your plants for juicy cabbage worms, whiteflies, aphids, earwigs, grasshoppers, cucumber beetles and grubs! Chickadees even eat ants!

Seedsaving is really a no-nonsense game! Besides being our second harvest, it insures the purity of your line! They are from a plant that grew well at your place! It’s important to our world community, as Thomas Rainer says, to preserve our garden heritage & biodiversity! Besides, it’s fun! Keep some for you – some as spices & others for planting. Package as gifts, and reserve some to take to the Seed Swap in January!

Let some beans go until they are completely dry in their pods; let corn dry until the kernels are hard on the cob. Let a cucumber turn yellow and tough. Save some seeds from your favorite and best tomatoes. Dry them further in home. When ready, put in an envelope, label with their name/variety, date/year, any other info you think you would be helpful. See more about SeedSaving!

Be ready for winter rain! If you garden at home, please look into water capture and gray water systems – shower to flower, super attractive bioswale catchments. In Santa Barbara County there are rebates available! Call (805) 564-5460 today to schedule a FREE water system checkup! Check out the Elmer Ave retrofit!

Gardening is cheaper than therapy and you get tomatoes. ~ Author Unknown

Back to Top


See the entire July Newsletter!

Check out the Japanese Red Kuri Squash Adventure! Please enjoy these lively summer images at two of Santa Barbara CA’s community gardens, Pilgrim Terrace and Rancheria! Happy gardening!

The Green Bean Connection newsletter started as correspondence for the Santa Barbara CA USA, Pilgrim Terrace Community Garden. All three of Santa Barbara city community gardens are very coastal. During late spring/summer we are in a fog belt/marine layer area most years, locally referred to as the May grays, June glooms and August fogusts. Keep that in mind compared to the microclimate niche where your veggie garden is. Bless you for being such a wonderful Earth Steward!

Love your Mother! Plant bird & bee food! Think grey water! Grow organic!

Read Full Post »

July basket of tasty summer veggies!

Thanks to GrowVeg for this delicious image! See their great post on ‘How to Tell When Fruits and Vegetables are Ready for Harvest’

Happy 4th of July to you all! Henry David Thoreau says ‘Gardening is civil and social, but it wants the vigor and freedom of the forest and the outlaw.’ That’s us, growing the freshest, most nutritious, organic food there is! Enjoy your luscious tomatoes!

July is maintaining and feeding, harvesting, seedsaving, storage, share Month, the beginnings of fall planting preparations for late August!

July is Tomato month! A few turned red, their mature colors, in late June, especially those tasty little cherry toms! Even some of the bigger varieties, but by the 4th, they will definitely be coming in good numbers! Super salads on the way!

July usually brings your greatest variety of table fresh veggies and herbs! It’s colorful and full of great textures. This is giveaway time if you don’t can. It’s giveaway time if you have so much there is enough canned and/or frozen for you and your family and then some! Some of us SoCal gardeners don’t can at all because our fall, winter crops are so nutritious and freshly abundant there is no need!

Sharing is a blessing to people who don’t have access to fresh organic food. Fresh foods last so much longer than store bought, and have so much better taste! Start with family, friends, neighbors. Give to senior communities and those who prepare food for them. Give to any organization that helps people in need, the FoodBank, maybe your local women’s shelter. When we eat better we think more clearly, our body heals, our Soul mends. Thank you and bless you for caring so much.

Sidedressing is important now while plants are working hard!

General sidedressing, during season feeding times, are when baby plants are just up 5, 6 inches tall, when vines start to run, at bud time, and first fruiting. From then on it varies per plant! Late July when some plants are near the end of production, extend their fruiting with a good feed – in the ground, or foliar, preferably both, but foliar tops ground feeding for several reasons! See more!

  • Manure feeds are especially great for lettuce, and all others except for beans, beets, carrots, parsnips, sweet and white potatoes, and tomatoes, or there’ll be more foliage than fruit! Lettuce loves chicken manure but only about a 1/4 inch gently dug in.
  • Give your peppers and solanaceas, tomatoes, eggplant, potatoes, Epsom Salt/Magnesium foliar treatments.
  • Every couple of weeks your strawberries would love a light fish emulsion/kelp drench.
  • Or you can foliar feed everyone some tea! Make a super duper mixed tea – no compost is needed in that mix for plants whose soil was well composted before planting. First make your tea. When it is ready, make your spade fork holes and apply a good compost/worm castings mix, then foliar feed with your tea! Drippings will help moisten your mulch and compost/castings on the ground below! Last, water well with a low flow water wand underneath your plant so everything stays where you put it and you don’t wash away your foliar feed. Do that before the sun gets on your plants or while it is still cool in the day and plants have plenty of time to dry during the day. Low flow also lets water and tea and compost/castings drippings drizzle down into the spade fork holes! THAT is a super feed!Mixed teasfeed and help prevent pests and diseases. They serve up beneficial living microbes to your plant and provide trace minerals it may need. Use foliar tea more frequently for plants that are ailing or in recovery. On an immediate basis, foliar feeding is 8 to 20 times more potent than ground feeding, and your plant takes it up in as little as an hour! Plants in immediate need can be helped right away! Compost supplies the organic matter that tea doesn’t supply, so it is critical in and of itself, plus it has many times more nutrients than a diluted tea. On and in the ground it decomposes slowly, feeds your plant steadily. It and castings have great water holding capacity. Do both whenever you can!
  • Compost is always super, remember to use acidic compost for strawberries! Pull back the mulch. Grab your spade fork, insert it, rock it gently, remove the fork leaving the holes. Stay 8″ away from the central stem, go out to the dripline. Gently scratch up only one or two separate areas around your plant out to the dripline, even a little further to encourage roots to extend, and to feed the feeder roots that are in progress growing out further. Avoid breaking a substantial number of tiny surface feeder roots, otherwise your plant will be slowed down by being in recovery for lack of food due to its inability to uptake it. Mix in your compost and lay on a 1/2″ to an inch of compost on top of areas you didn’t dig up. While you are at it, be sure your basins are retaining their shape out to the dripline. Put your mulch back, add more (straw) if it needs replenishing. Gently water well. Keep the area moist for a few days so soil organisms can multiply! See Composting Methods, Make it Your Way!
  • Save yourself some time by adding 25% Worm castings, and for plants that need it, a bit of manure, to your compost and apply them all together. Especially apply that mix to any ailing plants or plants in recovery. Castings help our plants uptake soil nutrients and boost your plant’s immune system. When your plant is taxed producing fruit in great summer conditions, it also is peaking out for the season and fighting pests and diseases are harder for it. Adding compost and castings may prolong and up the quantity and quality of late summer fruits. However, sometimes a plant is just done. No amount of coaxing will have effect. It worked hard. Thank it. Let it produce its seeds for seedsaving, or take it to the compost altar.

If you prefer organic granulated fertilizer sprinkle it around evenly per instructions, and water in well. Just know you will have to do that more frequently, and it doesn’t provide the water holding capacity that compost and castings do.

Feeding your plants can be plant specific or in general. For example, Tomatoes and Peppers (and Roses – edible petals), do well with a little sulfur. It is easily applied – a Tablespoon of Epsom salts, and a 1/2 teaspoon liquid dish soap as a surfactant (so your application sticks to the leaves), in a gallon watering can is all it takes. If the nozzle turns up to get under those leaves, all the better. Apply before the sun hits your plants or while it is still cool.

If any of your plants are looking puny, have yellowing leaves, might give them a bit of blood meal for a quick Nitrogen pick me up. Add compost, castings and a tad of manure too so your plant has steady food after the blood meal (an expensive feed) is used. If you have predators creatures, especially skunks or raccoons, forgo stinky fish emulsions and blood meal.

Zucchini Squash Zoodles Kale Pesto Edamame RecipeLate July, gardeners are starting to want new ways to enjoy their Zucchini! ZOODLES! Zucchini Zoodles Kale Pesto Edamame Recipe! Here are 28 cool summer variations on how to include this common veggie in a unique way!

Take care of pests and diseases asap! You don’t want them to spread or increase, lose the fruit of all your efforts and time. July brings hot weather, water stress, the stress of continued production. Though you may be a bit tired with all your tending and harvesting, this is not the time to interrupt your care. The heat will bring hatchings; tired plants may get overwhelmed by diseases. Be consistent with your watering. Stay on it with your harvest to keep your plants in production, sidedress (feed) as needed. Mercilessly squash the cucumber beetles, the green/yellow and black striped jobs. They give your plants, especially cucumbers, deathly systemic diseases. Put down pellets for slugs & snails, use sulfur and soap in foliar feeds to keep back aphids. See more! Keep plants susceptible to Whiteflies free from dust and Ants, and well supplied with worm castings. Hose the flies away, and remove infected leaves or the whole plant if it gets them repeatedly. Insecticidal soaps or Neem oil can reduce populations.

I found refraining from watering my strawberries but once a week, more in exceptionally hot or windy weather, and not mulching under my strawberries keeps the slugs and snails at bay. They don’t like dry soil. I’m growing the Seascape variety that has deep roots, so it works well. Do put down organic slug/snail bait where you will be sprouting seeds and while the seedlings are coming up. Aphids don’t thrive in a dryer environment either. Water the plants susceptible to them a little less. Remove yellowing leaves asap. Yellow attracts whitefliesLeafminers love temps in the 70s! Remove damaged areas of leaves immediately so they don’t spread.Plant so mature plant leaves don’t touch each other so pests and disease don’t go plant to plant. Mice and rats love tomato nibbles and they are well equipped to climb! A garden kitty who loves to hunt is a good helper. Keep your compost turned so mice don’t nest in it; remove debris piles and ground shrub or hidey habitat. Please don’t use baits that will in turn kill birds, or kitties or animals that would feed on a poisoned animal. That includes Gophers. For gophers, install wire barriers. See more about pests!

Watering in July is vital, along with Compost & Mulch. Compost increases water holding capacity. Mulch shades soil, keeps it and your plant’s roots cooler, keeps soil more moist longer, less water needed. Replenish tired or missing mulch the birds might have scratched away. Steady water is a must to produce good looking fruits. Some water then none makes misshapen strawberries, called catfaced, curled beans and cukes, carrots lose their consistent shape. Tomatoes have more flavor when they are watered a tad less just before harvest. You can do that with bush varieties, determinates, but with indeterminate vining types you just have to see how it goes. Lots of tasty flavor tests may be in order! They have deep tap roots, so usually watering nearby plants is sufficient. Melons in cooler coastal areas don’t need mulch! They self shade and hot soil helps them produce better. Give them a good sized basin so tiny lateral feeder roots can fully supply that big plant with water and nutrients. Put a stake in the center of the basin so you know where to water! Short rooted plants like beans, beets, lettuces need frequent watering to keep moist. Some plants just need a lot of water, like celery.

Don’t be fooled by Temporary High Temps! Non heat resistant or tolerant tomatoes, peppers, eggplant, stop flowering and fruiting when temps rise above 85 to 90 degrees F for an extended time depending on humidity. Humidity causes pollen to stick and not fall to pollinate. Dry heat causes the pollen to fall and not stick! When weather cools, you will have blooms again and be back in production. Rattlesnake beans, on the other hand, keep right on producing at 100 degree temps! So choose heat tolerant veggie varieties, like Heatmaster and Solar tomatoes, from locales with hot weather. Wonderful heat tolerant varieties are out there!

Zucchini Lasagna! Eat it hot or cold on a summer evening!Cool summer evenings enjoy Zucchini Lasagna! You can even eat it cold, and for breakfast!

Though July is more a maintenance and harvest month, Yes you can plant more! At this point, transplants are best, but many plants will not still be available at nurseries, and it is a tad late to plant many plants from seed. What you can plant is beans! They grow quickly and if you grow bush beans and quickly maturing heat tolerant varieties you will still be eating beans in Sept and Oct if it doesn’t get cold early! Get patio container types of quick

growing heat tolerant determinate tomatoes if you can find them. Previously planted tomatoes may be done producing, or bit the dust for one reason or another – likely a blight or wilt. Remove the old plants to reduce further spread of disease – do NOT compost them. Beef up the soil and plant your late tomatoes in an entirely different spot.

More lettuces! In summer you want heat tolerant & slow bolting lettuce! Lettuce Leaf and Red Sails and Outredgeous are great. Jericho from Israel is great. Sierra, Nevada. Nevada is a Green Crisp/Batavian that grows BIG, doesn’t bolt, and is totally crispy! Green Star is roughly, grows big around! Parris Island Romaine is slow bolting. Green Towers Romaine tolerates moderate summer heat and has some resistance to tipburn and bolting.

Transplant basil, celery, chard, cucumbers, dill, kale, leeks, summer lettuce, green onions, white potatoes, summer savory, New Zealand spinach. In our hot foothills and further south, go for more melons, okra, pumpkins, summer & winter squash. I’ve seen tomato transplants and bean seeds started in August produce plentiful crops into October! Rattlesnake pole beans do as they are supposed to, make beans in up to 100 degree weat

her! Yard long beans tolerate late summer weather and make magnificent beans! And some varieties of those don’t get mildew!

Corn is an exception – late plantings often develop smut. But. That smut, from a fungus called Ustilago maydis, is considered a delicacy by many. ‘It’s insanely delicious and luxurious, like black truffles.’ In Mexico it is known as huitlacoche. – weet-la-COH-cheh. Your neighboring gardeners may especially not be pleased, however. See more!  

Fall transplants need babying! Transplant late afternoon or evening so plants have the whole night to begin to recover before they’re hit with a full day of sun and heat. Water well and provide shade from intense mid-day sun. Prop up and secure some of those plastic plant flats that have the finer grid pattern to filter the light. Keep your transplants moist for at least a month or until they’re well established. Mulch to save water unless they thrive on hot soil.

Harvesting has special little techniques and storage varies considerably from veggie to veggie! See more for details!

Be really patient with your big Bells and sweet roasting Peppers. Both like to wait until the nights are longer and cooler in late summer before fruiting and plumping up. Peppers need time on the plant to absorb nutrients and water and plump up their flesh. Some will still be needing to change color.

>>>> At the end of the month, SoCal gardeners start your winter crops! Sow carrots (they do best from seed), celery and Brassicas. Brassicas are arugula, Broccoli, Brussels sprouts, cabbage (especially red and savoy types, which resist frost better), cauliflower, and kohlrabi, mizuna, mustard, pak choi, radish, rutabaga, turnip.

Mid to late July start preparing by clearing areas for late July first fall plantings. Remove finishing weakened plants that attract pests and get diseases. Remove debris insects live in. Remove mulch from under plants that were diseased and replace with clean mulch. Trash that mulch, don’t compost it. Decide where you will plant your green manure patches. Add worm castings to mini nursery areas you will be planting seedlings in. Castings speed germination. Leave space so the seedlings can be removed by a narrow trowel to their permanent place when they become big enough and space becomes available. Keep the soil moist and shaded until they’re up, and then gradually allow them more sun over a week’s time.

It’s time to get seeds if you don’t already have them! If seeds and mini nurseries aren’t your thing, wait until your local nursery starts having the transplants that make you happy! Late August they might start trickling in. Labor Day weekend is a favorite planting time for some gardeners depending on how hot it still is. October is just fine too! One year it stayed so hot we all planted the first couple weeks of November!

Delicious Healthy Recipe Zucchini RollsTasty Zucchini Rolls made with Sunflower Seeds Pate, Sun Dried Tomatoes and Spinach! See complete recipe by Chris at Tales of a Kitchen!

If you are just starting, just got your first plot at one of the community gardens, first, prepare your soil! While waiting for fall planting time, plant a few patches of fast growing, less water needing, heat lovers, lots of summer heat tolerant lettuces for your salads! They may need a little shade cloth protection. Plan out your fall/winter layout, remembering tall to the north, short to the south. Winter plants don’t take up as much food in cooler weather, so use less compost and manure. Remember, nature’s soil is naturally only 5% organic matter, but we are growing veggies, so a little more than that is perfect. Too much food and plants go to all leaf, but then a lot of winter veggies are just that, all leaf! Cabbage, Chard, Kale, Lettuces. Oh, lettuces thrive with manures, so put more in the lettuce patch areas, but none where the carrots or peas will grow. They don’t need it.

Important Habitat!
 As plants finish, let some of them grow out to save seeds. A carrot, celery and cilantro produce masses of seeds! Besides being food for pollinators and beneficial predator insects, they are beautiful! Birds will have seeds for food and scour your plants for juicy cabbage worms, whiteflies, aphids, earwigs, grasshoppers, cucumber beetles and grubs fresh for their hatchlings! Chickadees even eat ants!

Seedsaving is really a no-nonsense game! Besides being our second harvest, it insures the purity of your line! It’s important to our world community, as Thomas Rainer says, to preserve our garden heritage & biodiversity! Besides, it’s fun! Keep some for you – some as spices & others for planting. Package as gifts, and reserve some to take to the Seed Swap in January!

Let some beans go until they are completely dry in their pods; let corn dry until the kernels are hard on the cob. Let a cucumber turn yellow and tough. Save some seeds from your favorite and best tomatoes. Dry them further in home. When ready, put in an envelope, label with their name/variety,  date/year, any other info you think you would be helpful. See more about SeedSaving!

Be ready for winter rain! If you garden at home, please look into water capture and gray water systems – shower to flower, super attractive bioswale catchments. In Santa Barbara County there are rebates available! Call (805) 564-5460 today to schedule a FREE water system checkup! Check out the Elmer Ave retrofit!

Gardening is cheaper than therapy and you get tomatoes. ~ Author Unknown 


See the entire July 2018 GBC Newsletter!

Please enjoy these happy, and some unusual, June images at two of Santa Barbara’s community gardens, Pilgrim Terrace and Rancheria! Happy harvesting!

July ~ Happy Harvests!

Harvesting and Storage Tips for Our Summer Favorites!
SeedSaving!
An Easy Annual Ritual & Celebration!

Upcoming Gardener Events! Mesa Harmony Crop Swap! National Heirloom Expo, Soil Not Oil, American Community Gardening Assn 39th Annual Conference!

Love your Mother! Plant bird & bee food! Think grey water! Grow organic!

Back to top


The Green Bean Connection newsletter started as correspondence for the Santa Barbara CA USA, Pilgrim Terrace Community Garden. All three of Santa Barbara city community gardens are very coastal. During late spring/summer we are in a fog belt/marine layer area most years, locally referred to as the May grays, June glooms and August fogusts. Keep that in mind compared to the microclimate niche where your veggie garden is. Bless you for being such a wonderful Earth Steward!

Read Full Post »

Earth Day Green Gear Boots Kids

Green gear in honor of Earth Day 2018! Plant a garden. Grab the kids, a shovel and some seeds and hit the dirt with your family. Whether you plant one tomato plant in a pot or a large garden of fruits and veggies, gardening with your kids will teach them about the cycles of nature and the beauty of growing your own food. ~ Mother Nature Network

Soil Thermometer for Veggies!The soil is warming, soon it will be the ideal time to start Peppers!

Recently Santa Barbara area night air temps have been steadily in the early 50s. Soil temps in the sun are now just 51° – 56°. 60° to 65° are what we are looking for. PEPPERS especially need warmer temps, nighttime temps above 55°F and soil temps above 65°F. If planted too soon, sometimes they miss their natural sequence of production, and never produce. Check out the Quick Guide to Summer Veggie Soil & Temp Preferences!

APRIL through June Planting Timing

APRIL is true heat lovers time! Start MORE seedlings indoors NOW for successive June plantings. Sow seeds. If seeds and tending seedlings aren’t for you, get transplants and pop them in the ground per their right times! April 1 or as close to it as you can, start your Jicama seeds! Winter squash for sure. It needs time to grow big and harden for winter storage. MAY for cantaloupe, peppers, pumpkins and squash! Wait until the soil has warmed to 70°F before planting squash and melons. Many wait until May, some even June, to plant tomatoes to avoid soil fungi. Some gardeners wait until JUNE to plant okra. Okra really likes heat and grows quickly when happy. Choose faster maturing varieties for coastal SoCal. Long beans need warm temps to start from seeds. If YOU anticipate a HOT summer, plant a tad earlier, but be prepared to deal with it if summer is overcast as often is the case after all.

While we are waiting for the right temps, do soil preps that may still be needed. Weed out plants that won’t help your summer lovers. Make your soil fluffy with water holding compost, only 5 to 10%, while also adding tasty well aged manure!

Keep COMPOSTING! Soil building is the single-most important thing you can do for your garden. Compost keeps your soil aerated, has great water holding capacity, feeds slowly just perfectly! And if you made it, you know what’s in it! Make it HOT, Cold, or In place! In place takes the least time, is the most efficient, is a worm buffet! Move the top 6″+ of soil to the side, put in your ingredients, chop fine, sprinkle with well aged manure, mix in some soil so the chopped bits don’t form an impervious mat, cover with the remaining soil you removed. Give it 2 to 3 weeks and you are ready to plant! Dry is dead, so be sure it is always slightly moist. Giving back to Mama Earth is nature’s natural way! And, like Will Allen says ….there is something very Spiritual about touching the soil, that’s where life begins.

Put in last minute amendments, soil preps for May plantings of cantaloupe, okra, more tomatoes. About Manures

Heat lovers are eggplant, limas, okra and peppers, pumpkins! Transplant early-maturing varieties of beans, cucumbers, eggplant, melons, peppers, squash, and tomatoes. Sow and/or transplant asparagus, beets, carrots, celery, chard, corn, herbs, kale, kohlrabi, leeks, heat-tolerant leaf lettuce, okra, summer-maturing onions, parsley, peanuts, the last peas (choose a heat-tolerant variety such as Wando), white potatoes with zucchini, radishes (with cukes to repel cuke beetles, and with eggplant to repel flea beetles), rhubarb, and spinach.

Choose heat and drought tolerant varieties when you can. For example, why wait when it gets HOT and your tomato stops setting fruit?! Get heat tolerant varieties the heat doesn’t bother! Check out this nifty page of options at Bonnie Plants!  See Tomatoes are the Fireworks of Your Summer Garden!

Tomatoes! Heirlooms are particularly susceptible to the wilts, Fusarium and Verticillium. Instead, get varieties that have VFN or VF on the tag at the nursery. The V is for Verticillium, the F Fusarium wilt, N nematodes. Ace, Early Girl, Champion, Celebrity, are some that are wilt resistant/tolerant. In Santa Barbara area continued drought conditions, consider getting only indeterminates. In the Mother Earth News tomato survey, they found gardeners chose heirlooms over hybrids if their soil is wilt/blight free. Otherwise, the longer the gardener has gardened, they more they chose wilt resistant toms if their soil has fungi. La Sumida has the largest tomato selection in the Santa Barbara area! See Special Planting and growing tips for your Tomatoes and Cucumbers! If you are interested in the Indigo family of tomatoes, Terra Sol will be having them again this year! Call ahead to see when they will arrive – save space for them!

Time for heat-resistant, bolt-resistant lettuces of all kinds! Sierra, Nevada, Jericho, Black Seeded Simpson are some. Green Star wins the beauty award! Tips for super Successful Transplanting!

Alyssum Garden Companion Flower Yellow Chard Border repels Cabbage Butterfly

Strengthen your garden! Remember, plant your Companions! Keep the biodiversity rolling! Plant pest deterring plants first so they will be up and working when you put in your seeds or transplants!

  • Alyssum, in the image, is a great old fashioned pretty border plant, an understory living mulch. And white Alyssum repels the cabbage butterfly.
  • Basil repels several unwanted insects, is great near tomatoes but not in the basin with the tom. The tom needs less water.
  • Beans, Cukes, Dill, Radish Combo! Cukes and Beans are great on the trellis, one high, one low. Dill to go with pickling cukes. Radishes to deter Cucumber beetles.
  • WHITE Potatoes with Zucchini to repel squash bugs.
  • Radish with eggplant, cukes & zukes as trap plants for flea beetles and to repel cucumber beetles.
  • Carrots love being with cilantro and chamomile, and chamomile improves the flavor of any neighboring herb!
  • Calendula traps aphids, whiteflies, and thrips!
  • Marigolds are brilliant and called the workhorse of pest deterrents!
  • Lettuce and carrots make a great understory below larger plants like peppers, eggplant. They act as living mulch! If you already have enough lettuce and carrots, scatter a living mulch, soil feeding legume seed mix under those plants. At the end of the season you can turn it all under – aka Green Manure. Or remove the larger plants, open up spots and put in winter plants! See much more – Living Mulch/Green Manure!

Keep ’em coming! If you have already done some planting, mid to late April, schedule to pop in another round! Poke in some bean seeds where your very last peas are finishing, add cucumber seeds or transplants between the beans, plus dill at each end of the trellis to be there when you pickle those cukes! Plant more radishes to deter the Cucumber beetles, repel flea beetles. Fill in spots that could use a helper companion plant like calendula or chamomile. Succession planting makes such good sense. Put your seeds and transplants in at the same time. Seedlings will come along 6 to 8 weeks behind your transplants so you have a steady supply of yummy veggies! But, again, if tending seedlings isn’t your cup of tea, just leave space and put in more transplants in 6 to 8 weeks after your first planting.

It is perfect to put in fast growers like lettuce, beets, turnips, arugula, to hold space until you are ready to plant bigger plants. When it’s time for the bigger ones, clear a space/harvest, pop in your seeds or transplants and let them grow up among the littles. As the bigger plants start to shade out the littles, remove strategic lower leaves of the big plant so the littles get light too! If you anticipate a HOT summer, plant littles on the morning light side of larger plants.

Put in borders of slow but low growers like carrots, mini cabbages, in more permanent placements, like on what will become the morning side of taller backdrop plants like peppers and eggplant.

Natural Disease & Pest Prevention!

  1. Be wise and pick the right plant varieties for your temps and conditions! Get heat tolerant, bolt resistant, drought tolerant, disease tolerant/resistant. If you are just starting, just start! You will learn as you go. Our climate is changing, so we are all adjusting and plants will be being hybridized, and hybridize naturally, for new climates. We can get varieties from other areas that are already used to conditions we will be having. Together we will do this. Locally, save seeds from plants that do the best with the heat and share some of those seeds at the Seed Swap and with other gardeners.
  2. Think biodiversity! Plant companion plants that repel pests, enhance each other’s growth so they are strong and pest and disease resistant. Mix it up! Less planting in rows, more understories and intermingling. Split up groups so pests won’t go from one plant to the next, and the next. Allow enough room for air space between, no leaves of mature plants touching each other. That breaks up micro pest and disease habitats.
  3. Make top notch soil!
  4. In planting holes
    – Add worm castings for your plants’ excellent health. 25% is best; 10% will do if that’s all you got.
    – Add a tad more tasty properly aged manure mixes where manure lovers will be planted.
    – Add non-fat powdered milk for immediate immune system support at planting time
    – Put in a finely ground bone meal for 2 months later uptake when your plant gets to flowering time.
    – Add Jamaican guano high in P, Phosphorus, at planting time. It helps your plants continue to bloom LATE in the season! Its NPK ratio is 1-10-0.2, takes 4 months to become available to your plants. Other quanos don’t have this particular NPK ratio.
    – Add an eency tad of coffee grounds (a 1/2 of a %) if you have wilts in your soil
    – Sprinkle mycorrhizae fungi directly on transplant roots, all but Brassicas, at planting time to increase their uptake of nutrients and water.
    – Use acidic compost in strawberry patches and work in a little where you will be planting celery and string beans.
  5. Immediately drench your transplants, foliar feed, with a non-fat powdered milk, baking soda, aspirin, soap mix to jazz up their immune systems. Specially give your peppers an Epsom salt and soap mix bath for a taste of sulfur. More details and all the recipes.
  6. Maintenance! Keep your plants strong while they are working hard! Be ready to do a little cultivating composts and manures in during the season (called sidedressing), or adding fish/kelp emulsion mixes if you don’t have predator pests like skunks! Keep your plants watered and vibrant, but not so much as to make their leaves soft and inviting to munching insect pests like aphids. Trap gophers immediately if you are able.
  7. Harvest promptly. Insects and diseases know when plants are softening and losing strength as they age. Insects are nature’s cleaner uppers, and they and disease organisms are hungry! If leaves are yellowing or not looking up to par, remove them. Whiteflies are attracted to yellow.
  8. Prevention A frustrating typical spring disease is Powdery mildew. It’s common on late peas, Curly Leaf kales, broccoli, cucumbers and zucchini. Plant leaving plenty of space for air circulation. Apply your baking soda mix. Drench under and upper sides of the foliage of young plants to get them off to a great start! Do this the same or next day if transplanting. A super combo is 1 regular Aspirin dissolved, a 1/4 cup nonfat powdered milk, heaping tablespoon of baking soda, a half teaspoon liquid dish soap per gallon/watering can. Reapply every 10 days or so, and after significant rains. Not only is prevention so much better than after mildew has set in, but this mix stimulates your plant’s growth! See Aspirin Solution.

Water wise veggie garden practices!

Water Wise Practices!

  • Please always be building compost. Compost increases your soil’s water holding capacity.
  • In California drought conditions consider planting IN furrows, where the moisture settles. Plant crosswise to the Sun’s arc so the plants’ root areas will be slightly shaded by the depth of the furrow in early AM and late afternoon. If you still want your plants on top of the furrow, make the raised part of your furrows wide enough that you can put a mini trench on top of it! That holds the water up at your plants’ feeder roots area and if you water carefully, your furrow won’t degrade from water washing the sides away.
  • Make mounds with basins on top. For virus sensitive plants like toms and cukes, make sure the bottom of the basin is higher than the level of the surrounding soil level. Rather than losing water to evaporation from overhead watering, put the water right where it will do the most good and nowhere else. Make the mound to the dripline of your plant so small surface feeder roots get moisture for food uptake. For larger leaved plants, put a stake in the center of the basin so you know where to water. With a long watering wand you can water under the leaves rather than on them ~ unless they need a bath to remove dust. Fuzzy leaved plants like tomatoes and eggplant don’t like wet leaves.
  • And, once your soil is heated up, PLEASE MULCH! Straw, Self Mulch or plant soil feeding living mulch. It keeps your soil cooler, more moist, less water needed. And it stops light germinating weed seeds! See more on Mulching right for each plant!Straw is dead, but has its advantages. It gets fruits up off the ground and keeps soil from splashing up on lettuce leaves! Straw mulch can help reduce cucumber beetles 3+ different ways. 1) Mulch might directly slow beetle movement from one plant to another. 2) The mulch provides refuge for wolf spiders, daddy long legs and other predators from hot and dry conditions, helping predator conservation. 3) The straw mulch is food for springtails and other insects that eat decaying plant material; these decomposers are important non-pest prey for spiders, helping to further build spider numbers!Living Mulch, Self mulching, planting closely enough so your plants self shade, is tasty and uses your soil nutrients. It’s most efficient space use is planting effective smaller companion plants under, beside, among, around larger plants.Soil feeding Living Mulch You can up the amps by tossing a mix of legume seeds under your plants to feed your soil as well! You may decide to do both. Plant the small plants you need, grow legumes under the rest along with the right companion plants per the crop there.
  • Sprinkle and pat on Mycorrhiza fungi right on the roots of your transplants when you put them in the ground. It increases uptake of nutrients, water, and phosphorus that helps roots and flowers grow and develop. Ask for it bulk at Island Seed & Feed in Goleta.
  • Dust Mulching, cultivation, weeding, is perfect to break up exposed soil surface. That keeps the water from wicking to the surface and evaporating. Do it especially after rains. If you use a hula hoe you do two things at once! Just a half to one inch depth cuts off weed sprouts that use water. Indeed, it turns the soil a tad, all that’s needed. More weeds will follow, but it’s quick and easy to repeat the process. Two, three times, a few days apart, and there will be few weeds after that for awhile. Get ’em while they are small and easy to do. Smart gardening.

Plant Bee Food, Herbs and Flowers! Sow or transplant basil, borage, chervil, chamomile, chives, cilantro, comfrey, dill, fennel, lavender, marjoram, mint, oregano, rosemary, sage, savory, tarragon, and thyme. Be mindful where you plant them… Mediterranean herbs from southern France, like lavender, marjoram, rosemary, sage, savory, and thyme, do well in hot summer sun and poor but well-drained soil with minimal fertilizer. On the other hand, basil, chives, coriander (cilantro), and parsley thrive in richer soil with more frequent watering. Wise planting puts chives by your broccoli, kale, but away from peas if you are still growing some. Cilantro, a carrot family workhorse, discourages harmful insects such as aphids, potato beetles and spider mites, attracts beneficial insects when in bloom. Dill is a natural right next to the cucumbers since you will use the dill if you make pickles. They mature about the same time. Let some of your arugula, carrots, lettuces, cilantro bloom! Bees, and insect eating birds and beneficial insect predators and pollinators love them and you will get some seeds – some for the birds, some for you, some to take to the seed swap! Grow beauty – cosmos, marigolds, white sweet alyssum – all benefit your garden in their own way! See Stripes of Wildflowers!

…each a miracle of seed and sun, I’ve always been one to enjoy tomato or cucumber right off the vine, with never a trip into the house—one magical wipe down a shirt-front and they’re ready.. ~ commenter Rachel


See the entire April 2018 GBC Newsletter!

April! Time for those Luscious Heat Lovers!
Quick Guide to Summer Veggie Soil & Temp Preferences!
Use Cover Crops to Improve Soil!
Virtuous Veggies Alkalize Your Body for Top Health!

Upcoming Gardener Events! Santa Barbara Botanic Garden Spring SALE! 48th Annual EARTH DAY Santa Barbara! SBCC ANNUAL PLANT SALE!

Love your Mother! Plant bird & bee food! Think grey water! Grow organic!

Back to top


The Green Bean Connection newsletter started as correspondence for the Santa Barbara CA USA, Pilgrim Terrace Community Garden. All three of Santa Barbara city community gardens are very coastal. During late spring/summer we are in a fog belt/marine layer area most years, locally referred to as the May grays, June glooms and August fogusts. Keep that in mind compared to the microclimate niche where your veggie garden is. Bless you for being such a wonderful Earth Steward!

Read Full Post »

SideDressing your veggie garden with Ewe Poo and Pea Straw in Australia!

It’s mid-season now, so this weekend I’m giving the garden a boost by side dressing everything with some ewe poo and topping it off with fresh pea straw… [I think this is in Australia. It took a moment before I got it that it is female sheep poo!]x

May, June, starts feeding time! First let’s go over some general considerations and methods of sidedressing, then we’ll go through the summer favorites Feeding Schedule, in detail, plant by plant. 

Local Conditions  Super soil, short summer, no feeding necessary. But if you have a long growing season of heat tolerant varieties like here in SoCal, plants making big leaves and lots of fruits, or plants that are harvested for their leaves, like summer lettuces, they need food! And that all depends on your micro niche where you are growing at home – some spots are hotter than others, maybe get more sun. Your plant produces more or less, needing more or less feeding. If your soil is not the best, feeding more frequently makes sense. And, so, give the best kinds of feeding you can – quality compost you made yourself if possible. If you plant densely, your plants are competing for nutrients, they will likely need more fuel, more frequently!

Varieties make a difference too! Long season indeterminate tomatoes, will likely do better with late season feeding. Early varieties, determinate tomatoes or bush beans, may not need feeding at all. Heavily and continuously producing pole beans make their own Nitrogen, but that may not be quite enough near their end of season or in very poor soil. If they start to slow down, the leaves yellow a bit, try a feed and see if they perk up. Near the end of the season feeding may not help.

Seasonal Timing Classic times to feed are at transplanting, blooming and just after fruit sets. Baby plants need more Nitrogen. They need to grow big, have a strong body to support all that fruit and make leaves! When it comes to blooming and fruiting your plant is beginning to work hard. We don’t need a lot of leaves now. Lay back on N and give your plants a good feed of more PK, Phosphorus for blooms and Potassium for disease resistance. NPK needs to be highest in P now.

Later in the season, if/when your plants are looking tired, slowing down, a feed can perk them up, extending their production time. Be sure other factors are well tended. Keep plants weeded so weeds don’t siphon off your plants’ food, especially when your plants are babies. Separate or thin young plants so they aren’t struggling for the same food. Early on use dark mulch to warm your soil, keep the soil moist, prevent light germinating weed seeds from starting. Weed out what does come up. Later in the season lay down reflective mulch like straw so your plants’ roots stay cool. See Mulch – Some Like it Hot!

Your plants need adequate soil moisture so their roots can take up nutrients. Water after you feed and keep your soil as moist as that plant needs.

Feeding Methods aka Sidedressing

There are a couple ways to feed. Feeding your soil feeds your plants. Here are some equivalents: One handful of good compost per plant. That is equal to about one tablespoon of 5-10-10 fertilizer. Liquid fertilizer, ie fish emulsion, in your watering can is an easy way to side dress. Compost tea is redundant, since you already put compost in your soil, but a cupful of a mixed tea adds all sorts of things your compost doesn’t have.

Foliar feeding garden tea blends is a super enrichment that offers more options of trace factors. Even if proper nutrients are present in the soil, some nutrients cannot be absorbed by plants if the soil pH is too high or too low. Compost corrects soil pH issues and is one of the best ways to maintain the 6.5 ideal. Foliar feeding saves your plants while compost is doing its job. Foliar feeding is an immediate way to revive and stimulate stressed, tired, or diseased plants. If you have an ailing plant, repeated treatments can get your plant up to par soonest! Feed before sunlight gets on your plants if possible, on a non windy day. You want the leaves to stay wet long enough for the nutrients to be absorbed. See Teas! Compost, Manure, Worm Castings Brews!

Foliar Feeding Facts per Planet Natural:

• Tests have shown that foliar feeding can be 8 to 10 times more effective than soil feeding.
• Up to 90% of a foliar-fed solution can be found in the roots of a plant within 1-hour of application.
• Foliar supplements are an effective way to compensate for soil deficiencies and poor soil’s inability to transfer nutrients to the plant.

Sidedressing during the growing season happens well after your plants are in the ground. It is not a time to be digging up the area around your plant and adding amendments. Do very little to disturb the majority of the soil out to the dripline of your plant. Digging breaks the surface feeder roots that contribute the most to your plant’s nutrition. Your plant goes hungry and sometimes doesn’t produce much, or stops producing. The best way to feed your soil at this point is to pull back any mulch, put on a 1-2″ layer of compost, 1/4-1/2″ layer of composted manure, 1″ or more of worm castings! Cover with 1-2″ mulch, to hold it all in place, keeping the distribution equal. Water well. That also acts as a tea effect as the nutrients drizzle into the soil. DO NOT dig up the soil. That’s the whole point. The surface feeding roots will have a grand time, your plant will perk up, recover from diseases as possible. Keep that soil moist unless it harbors bacterial diseases. If so, let it dry some between waterings. Totally dry roots can’t uptake nutrients.

It makes sense to improve your soil base, AND do foliar feedings that feed well when soil is poor and your plants have trouble with nutrient uptake due to unbalanced soil, your soil lacks water holding capacity, your plants are diseased and need immediate help while the soil is being improved.

Foliar Feeding - rose upturnedIf you are container gardening, or have seedlings, use a spray bottle. If you are growing in the ground, get a watering can with a nozzle that rotates to spray UP under your plants’ leaves where some pests live. What goes up between the leaves will fall down and do the tops of the leaves at the same time! In other words, foliar feed your whole plant!

Applying granular fertilizers:  Scatter 8 inches away from the base of the plant on the side of the row or around the plant to just beyond the plant’s drip line to encourage root growth. Apply evenly. Raking the fertilizer into the soil is better than just applying on top of the soil, but rake very gently and not deeply to avoid breaking tiny surface feeder roots.

Some say most granular fertilizers leach from the soil rather quickly due to watering. That is why the instructions say you should reapply periodically throughout the season. Time release pellets do better. But adding organic material to your soil not only adds nutrients, it loosens the soil, attracts worms and other soil building critters and helps your soil retain moisture and nutrients.x

Summer Feeding Schedule Details for Your Favorites!

Beans   Cucumbers   Eggplant   Lettuces   Melons   Peppers
Squash – Summer/Winter   Strawberries   Tomatoes

Vegetable Gardening Gone Vertical - Trellis of beans and cucumbers!

Beans

Beans make their own Nitrogen, though sometimes not enough when they are in heavy production and it is toward the end of summer. They don’t make their own Phosphorous or Potassium. They make a huge plant from a small short set of roots. A light balanced feed may be in order for them to keep their perk and production up as summer goes on. 

Yellowing, mildew, white flies, ants and aphids? Pests may set in when a plant is stressed or weakened, but pests also like plants in peak condition! Do Aspirin and powdered milk sprays to up their immune system. Add baking soda to alkalize their leaves for mildew prevention. Best to do these treatments every couple of weeks, after significant rains and before trouble arrives! See more!

Tea mixes are good for improving their general health. Just imagine, with all those leaves, what foliar feeding can do! Same for those cucumbers below the beans in the image!

Cucumbers Space Saving Easy Harvesting Overhead TrellisCucumbers

Some gardeners prepare their cukes, melons, squash, peppers and tomato soil well in advance, in fall for spring! Compost in place – pile on manure, chopped leaves and grass, sprinkle on coffee grounds and kitchen scraps, wood ashes from winter fires, etc. In spring dig a foot square hole, fill with your luscious compost, plant your seed right in that compost! Lasts all season if you live in a short season area, and no compost is wasted where no plant is planted! As long as you get that compost out to just beyond the feeder root area your mature plant will have, it’s good.

You can use granular fertilizers, but cucumbers are generally short rooted needing constant 2-3 day waterings. The fertilizers are leached away. Time release pellets might do better. Instead, nearby, not right at the roots (you don’t want to damage them), add castings plus a tad of composted manure, cover with compost to feed and retain moisture. Then cover your amendments with a layer of moisture retaining mulch. Research shows, for cucumbers, straw mulch might slow cucumber beetle movement from one plant to another! Plus, it is great shelter for wolf spiders, daddy long legs and other predators. The more spidies, the more healthy your garden!

Additionally, a quick uptake Foliar feeding mixed teas feeds the whole plant with no harm to the roots at all! If your soil is poor, this can help a lot. Near the roots you can install a little 2-3″ deep trench to hold some extra water for your big vines. 

Feed your cukes when they first begin to run (form vines and sprawl); again when blossoms set. A big vined short rooted, long fruited variety of cucumber, in a long summer is a heavy feeder, so some gardeners recommend to fertilize once a week! A small fruited, small leaved patio type container cucumber may need little to no feeding.

Cucumbers are quite susceptible to mildews so do the Mildew Mix as well – Powdered Milk, Baking Soda, Aspirin, Soap – add liquid fertilizer if you like, maybe fish/kelp emulsion. Do both the compost and foliar feeding – alternate the Tea with the Mildew Mix every other week or so! If you use fish/kelp be sure to protect your plant from being dug up by raccoons, possums or skunks. A strong deeply anchored enclosure may be called for. Plant far enough away from the edge of the enclosure so your plant can’t be dug up from under the edge.x

Exotic Eggplant

Eggplant Purple Long Shiny Harvest Basket

Those eggplant beauties need extra compost and a bit of well-rotted manure at planting time. Dig it in! Apply a general purpose fertilizer in the spring when you till the soil. Add additional applications every three to four weeks. Side dress frequently, especially when the plant begins to bloom. Or sidedress with a Nitrogen fertilizer when the plants are half grown and again immediately after harvest of the first fruits. Or, depending on your soil, feed your eggplants 3 weeks after planting and at blossom set. Given sufficient moisture and good food, eggplant thrives in the heat of summer!

Epsom Salts, Sulfur, is a cheap home remedy that can keep plants greener and bushier, enhance production of healthier fruit later in the season, and potentially help reduce blossom-end rot. You could apply 1 tablespoon of granules around each transplant, but research has shown a foliar spray of a solution of 1 tablespoon Epsom salts per gallon of water at transplanting, first flowering, and fruit set is more effective! As a foliar spray, Epsom salts can be taken up quickly by plants, otherwise, it is sometimes hard for the plant to get it out of the soil because of calcium competition.

Sulfur, a key element in plant growth, is critical to production of vitamins, amino acids (therefore protein), and enzymes. Sulfur is probably the oldest known pesticide in current use. It can be used for disease control (e.g., powdery mildews, rusts, leaf blights, and fruit rots), and pests like mites, psyllids and thrips. Sulfur is nontoxic to mammals, but may irritate skin or especially eyes. CAUTIONS! Sulfur has the potential to damage plants in hot (90°F and above), dry weather. It is also incompatible with other pesticides. Do not use sulfur within 20 to 30 days on plants where spray oils have been applied; it reacts with the oils to make a more phytotoxic combination.

This mix is super for tomatoes, eggplant, peppers and roses!x

Cut & Come Again! Lettuce is a hard working plant!

Lettuces Tasty Varieties, Edible Flowers

It likes water and manure! Regularly. Water just about every day, even twice a day on the hottest or hot windy summer days. Hand scratch in some 1/2″ deep grooves, with one of those little 3 prong scratcher cultivator tools. Drizzle chicken manure into the grooves, cover back up and water gently. If your lettuce is planted densely that’s going to be a little challenge. A Tea Mix might work better for you. Use the spout of your watering can and get it under the leaves so the soil is moistened. DO NOT do a foliar application of any tea mix that has animal poo in it on any plant you eat the leaves of! If you have space between your plants, and no fish loving predators like raccoons or skunks, or your lettuce patch is safely enclosed, a fish emulsion/kelp feed is good – just keep it off the leaves.

Feed three weeks after germination, or transplant.
Loose-leaf after second and third cuttings for cut-and-come again crops.
If head lettuce, when the head starts forming.x

Luscious Melons

May is for planting Melons for eating all SUMMER! Goldfarb & Page-Mann Regional Fruition Seeds - Juicy Watermelon!

Unless you are planting mini Melons, container varieties, Melons are a big plant, big leaves, big fruits, on a long vine! 

Before planting large melon varieties, add in a little extra compost, and leaf mold, some well rotted manure, cow manure if you can get it.

Fertilize big melons every two to three weeks before blooming starts, using an all-purpose 5-5-5 fertilizer. If you are using mulch, pull it back, sprinkle on some worm castings and add several inches of compost to root areas monthly. Put the mulch back and water it in. If you are not using mulch, put on a light covering of mulch over your amendments to keep them moist. It’s like giving your plant compost/worm tea as the water and compost/worm juice drizzle down into your soil!

Better yet is 2 to 3 days before you sidedress, make a mixed tea sans compost! When the tea is ready, put some spade fork holes in the root zone around your plant. Fill the holes with compost/castings. Foliar feed the tea to your plant and pour tea into the spade fork holes! Of course, the very best is to do both – layers of compost and castings plus the tea and spade fork holes!! Especially sidedress melons when blooming starts and every 6 weeks after. They are hard workers!

Another method is to feed when they begin to run; again a week after blossom set; again three weeks later. This probably works well for mini melons too.

Once the first fruit ripens, stop all watering. Too much water at ripening time dilutes the fruit’s sugars and ruins the sweet flavor. The melons don’t need the water because they develop a deep root system soon after they start to flower. This means you stop fertilizing just before then. Your plants need soil moisture so their roots can take up nutrients, so there is no point in fertilizing after you stop watering.x

Peppers Varieties - Burgundy Bell, Yellow Monsters, Fish, HOT Chile Numex TwilightFabulous Peppers!

Peppers need VERY RICH SOIL, are heavy feeders! Place compost for water holding capacity, worm castings, rotted manure under them when transplanting. Mix in Maxi Crop, and Island Seed & Feed Landscape Mix if you are in Santa Barbara area. Sandy soils are preferred for the earliest plantings because they warm more rapidly in the spring. Heavier soils can be quite productive, provided they are well drained and irrigated with care.

Epsom Salts! Rather than in the soil, do foliar Epsom Salts! A cheap home remedy that can keep plants greener and bushier, enhance production of healthier fruit later in the season, and potentially help reduce blossom-end rot. You could apply 1 tablespoon of granules around each transplant, but research has shown a foliar spray of a solution of 1 tablespoon Epsom salts + a 1/2 teaspoon of liquid dish soap (Dawn) per gallon of water at transplanting, first flowering, and fruit set is quite effective! As a foliar spray, Epsom salts can be taken up quickly by plants, otherwise, it is sometimes hard for the plant to get it out of the soil because of calcium competition. See Eggplant above

Sidedressing  Peppers need fertilizer in small doses, a rich organic fertilizer when blooms appear. If you scratch in some compost, be careful not to damage near-the-surface lateral feeder roots. Liquid chicken manure is high in nitrogen and potassium for heavy feeders like peppers. Big, sweet peppers require a continual source of nutrition. The easiest way to fertilize them is to incorporate gradual-release fertilizer in the ground at planting. Fish-meal pellets, alfalfa pellets or cottonseed meal are all good organic choices. You also can foliar feed plants every week or two with a fish/seaweed soluble fertilizer, spraying the tops and bottoms of leaves, or water the ground with the same mixture.

At least, feed at three weeks after transplant; again after first fruit set.x

Super Squash

Zucchini Costata Romanesco Kelly Armful Harvest Annie's AnnualsAnother vining plant, like melons, huge leaves and vine, or patio minis! Big squash plants have the biggest leaves in the garden. They aren’t shy about growing 30′ or more!

Summer – Soft, Zucchini types, Chilacayote

We all know how prolific Zucchini is! That is a hard working plant! Some varieties make more fruit than others. Costata Romanesco, in the image, makes a zuke at every leaf join! Huge Chilacayote vines don’t quit! Even patio container varieties work their little hearts out!

Feed them when plants are about 6 inches tall; again when they bloom. That’s standard, but later in the season, if you still want more fruit, feed them again. If you are so tired of summer squash, never mind.

Like Cucumbers and Melons, summer and winter squash are also susceptible to mildew, so do the Mildew Mix  for them too – Powdered Milk, Baking Soda, Aspirin, Soap – add liquid fertilizer if you like, maybe fish/kelp emulsion. Alternate the Tea with the Mildew Mix every other week or so!

See also Cucumbers and Melons above

Winter – Hard, Butternut, Acorn, Pumpkins

Give them a fat start with soil amended with well-rotted manure and compost prior to planting. These babies run all summer long, first making the dense fruits, then hardening the fruits. A healthy plant will make a lot of fruits, an ample supply for all winter long!

Feed them when the vine starts to run; again at blossom set.

See also Cucumbers and Melons abovex

Strawberries

Sidedressing Strawberries Tricia Peaceful Valley Farm Supply

Perfectly adorable image by Tricia was at Peaceful Valley Farm Supply

It’s just as the image says! At Pilgrim Terrace Community Garden we had a first time gardener that fed exactly that mix to his strawberries every 2 weeks and he was so proud to tell us he was harvesting strawberries by the shoebox full! His patch was not so big, but it was prolific with good sized berries! He later went on to sell his fine famed strawberries at Farmers Markets!

Be sure to protect your strawberries from predators – birds and furry animals! They both like the berries, but the animals are also attracted to fish emulsion. They dig up your plants looking for the fish! Bird, Animal, Insect Pests Above Ground Protection!

Juicy Luscious TOMATO!
Tomatoes

Another heavy feeder, making zillions of tomatoes! If your plant is indeterminate, it will make fruit all summer long!

Before planting add plenty of well-rotted manure/compost.

AFTER planting, add a weak solution of complete fertilizer or fish emulsion to the soil around them. Continue to feed them two to three weeks after transplant; blossom time, again before first picking; again two weeks after first picking. Blossom time and after, go light on nitrogen or you will have a lot of leaf, no fruit!

Leaves curled lengthwise with patches of brown on them? Wilts or blights? Foliar feed with potent Tea Mix!!! When plant surfaces are occupied by beneficial microbes, there simply is no room for pathogens! The plant will suffer little or no blight, mold, fungus or wilt! That’s a huge claim! But even if it doesn’t entirely work, your plant will likely have a much improved existence for a longer period of time. Beneficial microbes compete with disease causing microbes. Go tigers! The live microbes enhance your soil and in turn, up the immune system of your plants.

If your plant is diseased or pest infested, you may need to apply your mixed tea every five to seven days. Otherwise, make your tea applications every two weeks until your plants start to flower. We want our plants to make fruit then, not foliage!

A dramatic treatment requiring less work than making tea is bleach once a week. It works! See about it!

This Table will help you save time! See at a glance which plants to feed at the same time with the same food. Copy and print, cover with clear waterproof tape, put it on your tool bucket for quick reference! See timing details above, plant by plant!

Summer Veggies Feeding.jpg

With any foliar feeds remember to add that 1/2 teaspoon of dish soap, surfactant, so the feed will ‘stick’ to your plant!

Stand back and take a look at your garden. See who’s the slowest, behind in production, lacks perk, and who looks vibrant, reaching for the sky! Grab a barrow of compost, make a super tea mix, go for the gusto! You could even note your feed date, then mark down about when to do it again!

To another super plentiful and most joyful summer!

Updated 5.26.23


Love your Mother! Plant bird & bee food! Think grey water! Grow organic! Bless you for being such a wonderful Earth Steward!

The Green Bean Connection started as correspondence for the Santa Barbara CA USA Pilgrim Terrace Community Garden. Both Santa Barbara’s remaining community gardens are very coastal. Climate is changing, but it has been that during late spring/summer we are often in a fog belt/marine layer most years, locally referred to as the May grays, June glooms and August fogusts. Keep that in mind compared to the microclimate niche where your veggie garden is.

Top^

Read Full Post »

Tasty Red Bell Pepper, Tomatoes, Edible Garlic Flowers!

Edible Garlic chive blossoms on beautiful thick walled red bell pepper!
Image by super gardener Kenny Point in Pennsylvania

Peppers are not just food, they are an adventure that spices your life! They are not just a veggie, but an edible garden beauty in your landscape!

Peppers Come in an Amazing Array! 

Mini to Mammoth! Tiny brain wrecking hot chilis, dainty mini to humongous sweet Bells! Early maturing thin walled, later thick walled. Short, long – pointy, round. Ones that hang down, others that point up!

Peppers come in colors you won’t believe! How about these super thick walled Jupiter Sweet Burgundy Bells?! On the right are 8″ colossal beauties Yellow Monster Peppers! Really sweet, meaty, great fresh, fried or roasted!

Peppers Varieties - Burgundy Bell, Yellow Monsters, Fish, HOT Chile Numex Twilight

Striped, one of the prettiest peppers ever, Fish Pepper, above left, is an African-American heirloom that predates the 1870s. It starts out an unusual cream color striped with green, the fruits ripen to orange with brown stripes, before turning all red. Super for containers! At right is beautiful Numex Twilight. It can produce more than 100 small pretty pods! At 100,000 Scoville Scale, it’s HOT! Respect.

SMART CHOICES!

Disease resistant If your land is moist, hybrids are probably going to do better for you than heirlooms. In coastal Santa Barbara CA we usually have a late spring/summer fog belt/marine layer, locally referred to as the May grays, June glooms and August fogusts. Choose Resistant varieties per the list below and also for Potato Yellow Mosaic Virus, Pepper Mottle Virus and  Cucumber Mosaic Virus.
x
Pepper Resistance Codes:(BLS 1-3) Bacterial Leaf Spot (Races 1-3)
(BLS 1-2) Bacterial Leaf Spot (Races 1, 2)
(PC) Phytophthora Root Rot
(PVY) Potato Virus Y
(TEV) Tobacco Etch Virus
(TM 0-2) Tobamovirus (Races 0-2)
(TM 0-3) Tobamovirus (Races 0-3)
(TMV) Tobacco Mosaic Virus Here are recommended varieties by UC Davis in California. TMV is Tobacco Mosaic Virus, PVY is Potato Virus Y. AAS is a super plus! It is an All America Selections winner!
x
Hot
Tam Mild Jalapeño (mild heat with Jalapeño flavor) PVY
Jalapeño M (very hot)
Anaheim TMR 23 (chili pepper, moderately hot) TMV
Anaheim (standard hot chill)
Cayenne Long Red Slim (hot)
Hungarian Yellow Wax (popular for canning, moderately hot)
Serrano Chili Pepper (tabasco type)

Sweet Bell
Bell Boy AAS, TMV
California Wonder TMV
Yolo Wonder TMV
Keystone Resistant Giant TMV
Jupiter TMV
Golden Summer Hybrid (yellow when fully mature) TMV
Golden Bell (yellow when fully mature)
Early Pimento (used fresh or for canning) AAS
Sweet Yellow or Cubanelle Sweet Banana AAS
Gypsy AAS, TMV
Hy-Fry
Cubanene

Every time you plant, plant the best! Cornell University’s Disease Resistant Vegetable Varieties LIST is awesome and kept up to date! Take a peek before you order seeds or buy transplants! It may take some time to make your choices, but is so worth it! A point to know is some varieties are commercial, meaning they are tough enough to last through shipping, and all it takes to process the fruits to market. If you are eating fresh from your garden, you may not prefer some of those varieties. Try two or three so you have some choices. Look up the variety online and see other home gardeners’ comments. Note if the commenters are in an area with similar planting conditions as yours. If a commercial seed company is the seed seller, sometimes they will also sell in mini quantities to home gardeners! Yay! Just call that 800# and ask! Often they really enjoy talking with a home gardener, delighted you called! They generally are very well informed because their business depends on it. They can tell you important inside things that aren’t in the catalogs and about the latest varieties that haven’t yet appeared in the catalogs!

GROWING CONDITION CHOICES

Location!
If you have a short summer season or are cooler and coastal perhaps, choose earlier smaller fruited varieties than ones that need a long hot summer to fully mature and if necessary change color too.

Cold Tolerant! 
If you love your peppers and want some early, or have a short growing season, order ones that mature quickly and are cool weather adapted! Plant those first and others more heat tolerant soon after to carry the length of the season. For sweet bell peppers, get seed for Ace, Lady Bell or King of the North! Obriy Ukrainian sweet red pepper is both cold and heat tolerant! For hotties that don’t mind cold, order up Early Jalapeño, Hungarian Hot Wax or Anaheim. Rocoto stands some cold but not a hard freeze. Manzano are reported to survive at 20°! The extraordinary feature of these two peppers, Capsicum pubescens (hairy leaves), is they grow into four-meter woody plants relatively quickly, and live up to 15 years! Truly sustainable perennials! If cold weather can happen anytime where you live, grow your peppers in pots; take them inside when it gets cold.

Heat Tolerant! Peppers are a Solanaceae like tomatoes, and like most tomatoes they produce poorly during high temperatures. Banana, ‘Gypsy’ and pimento produce very well, despite the heat. Jessie Keith says ‘super spicy classic jalapeño ‘Tula’, wonderfully flavorful pasilla-type pepper ‘Holy Molé’ (2007 AAS Winner), and classic spicy sweet red bell pepper ‘Mexibell’ (1988 AAS Winner) are great! Of the sweet bell peppers nothing beats the tough, [thick walled] disease-resistant ‘Orange Blaze’ (2011 AAS Winner) and its crisp, bright orange peppers.’ Heirloom Olympus (65 days green, 85 days red) has large bell peppers on medium-sized plants with good leaf cover. They are high-yielding plants, are heat tolerant and can set fruit under a wide range of conditions. MG Seed Stock. If you planted varieties that are more heat susceptible, put up a shade cloth cover. Depending on the density you select, shade cloth can lower the temperature by approximately 5-15 degrees. If you live in a hot area, bell pepper transplants can be planted in August for fall production when the weather cools down.

Drought tolerant Look for the terms drought tolerant, drought resistant, dry farmed when searching for the best variety for your garden. It’s important to know that drought tolerant doesn’t necessarily mean heat tolerant and vice versa, so stay alert if you need both. When you are buying seeds, consider the location of the seed company. Perhaps local seed houses will understand your needs best. Check in with local farmers, at farmers markets, to see which varieties they are growing, remembering that some of their standards are different than a home gardener. For those of you in water critical areas, one way to help the situation is to pick pepper varieties with fewer days to maturity. You get peppers, you can freeze some, your plants are done before the highest heat and driest times. The UC Sonoma County list is short, only two varieties, Jupiter Red Bell and Ordoño.

Pepper HOT Cayenne Blend Eden Brothers

❤ HAPPY COMPANIONS!

Sweet Peppers like Basil, tomato, rhubarb, eggplant, lettuce, asparagus, parsley, silver beet, spinach, carrot, onion, beans, cabbage, peas, marigold and okra.

At left, HOT Cayenne Mix at Eden Brothers Seeds, Scoville Scale: 30,000-50,000 Units

Pepper plants repel cabbage worms! Hot Pepper plants are terrific with eggplant, tomato, okra, Swiss chard, escarole, squash and cucumbers. Marlene Affeld says hot peppers ‘emit a chemical from the plant roots that helps prevent Fusarium, root rot, and a wide range of other plant diseases!’ Tomatoes have high susceptibility to Fusarium wilt. Plant biodiversely! In the same row, alternate peppers, tomatoes, eggplant and okra! If planting in neighboring rows, change the order of the plants. Plant shorter plants slightly to the sunny side of taller plants.

PLANTING

Peppers are Temp Particular! Peppers grow best in daytime air temperatures 65° to 85°F. Transplant when night time temperatures stay above 50 degrees, 55 is better. Below that plants grow very slowly, have yellowish, puckered leaves, and look sickly, often don’t recover. Night temps between 60° and 70° are best. The ideal temperature for peppers is a daytime temperature around 75°F and a nighttime temperature around 62°F.

At soil temperatures above 65 degrees, pepper growth accelerates. If either the soil or air temperature is much below 55 degrees, blossoms of transplants may drop off. The plants may survive and more blossoms will appear. But it is more likely plants will become stunted and never recover. If your plant is puny and showing no growth, best to compost it and replant when it is warmer.

  • Nighttime temperatures below 60 F or above 75 F can reduce fruit set. In daytime temperatures greater than 85°F, peppers may drop their blossoms although set fruit will ripen. When daytime temps reach 90 F and above, and stay there, just like with tomatoes, the blossoms seldom set fruit. Not to worry. Just give them some time after temps lower.
  • Plumping up! Gardeners in hot regions will need to be especially patient with big bells and sweet roasting peppers. Both of these tend to wait until the nights are longer and cooler in late summer before fruiting and plumping up. These folks may want to plant banana peppers or sweet non-bells, which will ripen in time to use with those bumper crops of tomatoes and basil. Peppers need time on the plant to absorb nutrients and water and plump up their flesh, so pack your patience.
  • Color Changes! Mother Earth News says: After reaching their maximum size, green peppers that are meant to turn red, will develop red pigments in 10 to 28 days, if daytime temperatures are between 65 degrees and 75 degrees. In southern regions where temperatures exceed that range, peppers turn yellowish and may acquire an off-color pallor that is not attractive. Below the optimum temperature range, color development slows dramatically; below 55 degrees, it stops completely. If soil temperatures drop below 68 degrees, pigment production declines and eventually ceases.

Peppers love sun, but a bit of shade is good for the fruit. I planted a Poblano between two big tomato plants. For a while I thought it was a goner, shaded out, then, it just grew and grew! It got almost 4′ tall and produced like crazy and I gave giant peppers away!

►► Peppers need VERY RICH SOIL, are heavy feeders! Place compost for water holding capacity, worm castings, rotted manure under them when transplanting. Mix in Maxi Crop and Island Seed & Feed Landscape Mix. Sandy soils are preferred for the earliest plantings because they warm more rapidly in the spring. Heavier soils can be quite productive, provided they are well drained and irrigated with care.

Epsom Salts! Rather than in the soil, do foliar Epsom Salts! A cheap home remedy that can keep plants greener and bushier, enhance production of healthier fruit later in the season, and potentially help reduce blossom-end rot. You could apply 1 tablespoon of granules around each transplant, but research has shown a foliar spray of a solution of 1 tablespoon Epsom salts + a 1/2 teaspoon of liquid dish soap (Dawn) per gallon of water at transplanting, first flowering, and fruit set is more effective! As a foliar spray, Epsom salts can be taken up quickly by plants, otherwise, it is sometimes hard for the plant to get it out of the soil because of calcium competition.

Plant your peppers about a foot to 18″ apart.  A healthy pepper will get big and top heavy with fruit! It is wise to put small tomato cages over thick wall bell pepper varieties when you plant, to support the weight when they are heavy with fruit.

Though a perennial, they are very susceptible to freeze. With Bell peppers, I have heard a lot of people say their peppers overwintered and produced just fine the following year, but I have not seen that to be true at the Santa Barbara CA community gardens. They are never as robust nor do they produce the big healthy fruits first year plants do. If you are one of the lucky ones, by all means, protect them when there are freezes.

Hot peppers are another story. They seem to do a lot better overwinter, depending on the variety, and I have seen them carry on wonderfully!

CARE

Personal Mulch! Solanaceae, that’s peppers, tomatoes, eggplants, like mulch from their own leaf litter, so just let the leaves fall and accumulate. In hot summer weather your peppers will appreciate a heavy mulch. Several inches of straw or dried grass clippings will keep the soil cooler and reduce moisture evaporation. ►► Continually moist ground is a necessity for peppers, as they, like tomatoes, suffer from blossom end rot, a physiological disease caused by a calcium deficiency. Most soils contain ample calcium, but the mineral relies on water to transport it to the plant’s root system. When the soil lacks moisture, the calcium can’t reach the plants and a tell-tale black leathery spot forms on the blossom end of developing fruit. Heavy Nitrogen fertilizer applications can also induce a transient calcium deficiency. I emphasize that you give your peppers plenty of compost for water holding capacity and keep them well mulched!

Peppers have shallow roots, need even wateringKeep the soil moist, not soggy, to encourage root development and prevent blossom wilting and bitter-tasting peppers. Moisture stress during bloom can cause substantial reduction in fruit set.

Later on, however, as a friend from Farmers Market pointed out: ‘Red & yellow peppers are green peppers that have been ripe for a while. So you are asking an already ripe fruit to stay on a vine longer to change color. Too much water, and the pepper will start to turn brown and rot. So we switched to watering a LOT less frequently and the results have been outstanding.’

Sidedressing Peppers need fertilizer in small doses, a rich organic fertilizer when blooms appear. If you scratch in some compost, be careful to not damage their surface area feeder roots as little as possible. Feed two or three segments around your plant, but not the whole circle. Feed to just beyond the dripline. Liquid chicken manure is high in nitrogen and potassium for heavy feeders like peppers. Big, sweet peppers require a continual source of nutrition. The easiest way to fertilize them is to incorporate gradual-release fertilizer in the ground at planting. Fish-meal pellets, alfalfa pellets or cottonseed meal are all good organic choices. You also can foliar-feed plants every week or two with a fish/seaweed soluble fertilizer, spraying the tops and bottoms of leaves, or water the ground with the same mixture.

Replenish mulch as needed throughout summer! You might schedule a mulch check for them and all your plants once a month.

ANNUAL OR PERENNIAL?

Technically peppers are perennials, grow year after year – in the right climate. Bell peppers are another story. Geographically, in Santa Barbara CA they are temp sensitive annuals, very susceptible to freeze. I have heard some gardeners say their peppers overwintered and produced just fine the following year, but I have never seen that happen at two of Santa Barbara CA’s community gardens. If pruned, they simply die. They are never as robust, don’t grow, nor do they produce the big healthy fruits first year plants do. If you are one of the lucky ones, by all means, protect them when there are freezes. If you want to overwinter yours, better to pot your pepper before any frosts and take it indoors by a sunny window or into your fine greenhouse! You have a couple choices. Prune it ruthlessly, or keep it growing, even producing, with lights and bloom sprays. There are many online threads about overwintering your peppers. Check out tips from several experts to make your efforts count!

Hot peppers are the other story. Some chilies overwinter well in Santa Barbara, depending on the variety, and I have seen them carry on wonderfully year after year!

Personally, there are so many tasty fresh winter foods that grow well here in our SoCal ‘winter,’ that I am more than happy to replant peppers in spring!

PESTS & DISEASES

For Blossom End Rot, see above under Care.

Early Blight and Verticillium Wilt are a problem at all the Santa Barbara Community Gardens. Please see more about them and what to do here.

See more about Pepper pests and diseases at the UC Davis IPM page.

Choose Resistant varieties!

California Wonder Peppers changing color!  Eden Brothers Seeds image.

California Wonder Peppers Changing Color - Eden Brothers imageHARVEST

Bell peppers are at their sweetest and are highest in Vitamins A, C and carotenoids when fully mature! When choosing bell peppers for eating, select those that are firm, heavy for their size with shiny, bright and vibrant richly colored skin! The bell pepper’s sweetness increases as their color changes from green to their final color if they are a color changing variety.

Their stems should be green and fresh looking. To avoid breaking branches, use a sharp knife to cut, instead of pulling.

It’s nice to know that if not optimally ripe, vitamin C and carotenoids in bell peppers will actually increase with refrigerator storage over the next 10 days!

STORAGE can be really fun with peppers! So many options!

For maximum flavor, eat peppers on the same day they are picked! Room temp is best for peppers, leave them on a kitchen counter for a day or two to ripen further. Rinse with cold water just before you use them. Bell peppers are very sensitive to ethylene gas so don’t store them with fruits and vegetables that produce ethylene gas. If you put them in the fridge, do it only 1-3 days and use immediately upon taking out of the fridge. Don’t remove their cores because they are quite susceptible to moisture loss. Peppers are warm-weather fruits that don’t store well in cold temps. If you have too many peppers, consider the following storage options.

Freezing This is the easiest storage method. Peppers freeze well without blanching. Thawed peppers still retain some crispness and can be used in cooked dishes or raw in uncooked preparations. Their flavor is retained, so use frozen peppers primarily for adding ‘spice’ to soups, stews, and sauces. If you stuff the peppers before freezing, you’ll have a ready-made dinner, perfect for the microwave.

To Tray Freeze Sweet Bell Peppers

Wash and core peppers. Chop, dice or slice according to how you plan to use them. Spread in a single layer on a tray of a cookie sheet. Place tray in the freezer for an hour or longer. Loosen pepper pieces from the tray and pour into zip closure freezer bags. Immediately place sealed bags in the freezer. The pepper pieces will remain separated for ease of measuring. Simply remove as many as you need, reseal the bag and return to the freezer. Or bag them separately in the amounts you plan to use them.

Pickling/Canning Peppers are low-acid fruits so require canning under pressure. It’s easier to pickle peppers as you would cucumbers in a crock filled with a simple brine of four cups of water, four cups of vinegar, and 1/2 cup of pickling salt. Add a clove or two of garlic and some fresh herbs for delicious added flavor.

Sweet Banana, Sweet Hungarian, Cubanelle are long, narrow tapering down to one, two or three lobes. They are thin walled, Cubanelle the thinnest. They are usually picked when light yellow or green. Because they have less water content than bells, they are perfect for frying. ‘Sweet Banana’ was the 1941 All America Selections Winner!

Pepper! Colorful Decorative Ristras!Drying This method works best with thin-walled peppers, particularly the smaller varieties that can be dried whole right on the plant. The key to drying peppers is doing it slowly to retain their color and flavors. Perfect for spicing up bland backpacking meals!

Another form of drying is in brilliant wreaths and Ristras!

You can grind chilies into culinary or medicinal powders! They retain their lovely colors! Paprika is a dried powdered form of bell pepper, and though we are used to seeing red paprika, a paprika can be made from any color of bell pepper and it will end up being that same color. Both the decorative forms and these potent powders make sensational gifts!

SEED SAVING

To prevent cross-pollination, hot pepper plants should not be planted near sweet or bell pepper plants. TRUE! Plant at least 400 feet between varieties to ensure absolute purity. That’s important info for seed savers!

Harvest mature, fully-ripe peppers for seed. Most bell peppers turn red when fully mature. If frost threatens before peppers mature, pull entire plant and hang in cool, dry location until peppers mature.

  • There are two methods to process pepper seeds, dry and wet. The dry method is adequate for small amounts. Cut the bottom off the fruit and carefully reach in to strip the seeds surrounding central cone. In many cases, seeds need no further cleaning.
  • To process the seed from large amounts of peppers, cut off the tops just under the stem, fill a blender with peppers and water and carefully blend until good seeds are separated and sink to bottom. Pepper debris and immature seeds will float to the top where they can be rinsed away. Spread clean seeds on paper towel and dry in cool location until seed is dry enough to break when folded.

FYI Birds are not sensitive to capsaicin, the heat factor in chile peppers, and are therefore the main dispersers of the seeds!

HEALTH

Pepper Hot Oil & Healing Spices

Remedies: Hot Oil! Healing Spices. The countless health benefits claimed are exciting and enormous! Cayenne is said to stop heart attacks. Hot oil works wonders on knees.

Nutrition: I’m not sure people really eat peppers for nutrition, LOL! Peppers are in a food category all their own! Choices are made according to the Scoville Scale, how hot or not they are! At the lower end of the scale, nutrition may factor in somewhat, but it is more likely a visual choice, shape and color, whether for salad or type of cooking you will use the pepper for.

Beautiful Red on Yellow striped Bell Peppers from the Netherlands!
From the Netherlands, marvelous Red on Yellow, AKA Flame, Enjoya, and Aloha!

Sweet luscious Bell Peppers have a whopping 169% of the daily value of Vitamin C we need, but who thinks of peppers as a source of Vitamin C?! More we think of low calories, but most of all, that delicious taste! But look, here’s more! Absorption of dietary iron is significantly increased when consumed with fruits or vegetables that are high in vitamin C. Eating raw bell peppers with iron-rich foods like meat or spinach, may help increase your body’s iron stores, cutting the risk of anemia. Eat peppers!

Absolute Culinary Delight!

Mexican recipes are classic! Salsa! Chile Rellenos! Add to burritos, roll-ups and tacos. Stuff and eat fresh, hot pockets! Roasted, grilled on the barbie! Pickled. Fine chopped in tuna or chicken salad! Go Cajun by sautéing with celery and onion, then mix with tempeh, chicken, seafoods. Stir fry some bits in the wok with cashews, shrimp and Oriental veggies. Puree in summer zucchini soups, hot or cold. Add color and crunch to your dip tray, make a pureed pepper dip! Pizza topping. Fresh slices in a cool Romaine, cucumber, avocado salad – add black beans for protein!

Peppers! Salsa and Rellenos

Roasted Poblano Salsa, and by chef Rick Bayliss, Grilled Shrimp Chile Rellenos in Corn Husks

Buddha Bowl with Red Peppers

Tasty Buddha Bowl with Red Peppers

To your great health and a happy palate! Stay cool when it’s hot!

Updated 5.26.23

Back to Top


Love your Mother! Plant bird & bee food! Think grey water! Grow organic! Bless you for being such a wonderful Earth Steward!

The Green Bean Connection started as correspondence for the Santa Barbara CA USA, Pilgrim Terrace Community Garden. Both remaining Santa Barbara City community gardens are very coastal. Climate is changing, but it has been that during late spring/summer we are in a fog belt/marine layer area most years, locally referred to as the May grays, June glooms and August fogusts. Keep that in mind compared to the microclimate niche where your veggie garden is.

Read Full Post »

Disease Tomato Fusarium Wilt Fungi Resistant

Tomato variety selection makes a huge difference.

You may have had your own tears, and understandably so. Late Blight of potatoes and tomatoes was the disease responsible for the Irish potato famine in the mid-nineteenth century. Spores are spread by rain/watering splash, insects, and wind, and through our hands and tools and through these mediums they can travel distances. Spore spread is most rapid during conditions of high moisture, marine layer days, and moderate temperatures, 60°-80°F.  Once established, the fungi can over-winter in your garden soil, on debris and weeds.

Fusarium Wilt is commonly found throughout the United States, is a soil and wind-borne pathogen. Plants susceptible to Fusarium Wilt are cucumber, potato, tomato, eggplant, pepper and beans. Fusarium wilt causes foliage to yellow, brown spots on leaves, leaves to curve the length of the leaf, wilt, then turn brown and die. Your plants become stunted because they can no longer function properly. Even with resistant varieties, production can be drastically reduced.

Verticillium Wilt is also a soil and wind-borne pathogen. The list of plants susceptible to Verticillium Wilt is impressive. You might have thought it was just tomatoes, but look: Peanut, Horseradish, Rutabaga, Cabbage, Brussels sprouts, Pepper, Safflower, Hemp, Watermelon, citron Cantaloupe, honey dew, Pumpkin, Cotton, Okra, Mint, Radish, Rhubarb, Castor bean, Eggplant, Potato, Spinach, New Zealand spinach, Salsify, Yard-long bean, Cowpea! Cucumber, tomatoes and strawberries are particularly susceptible.

Verticillium wilt is most active in humid climates. Cool nights and moist conditions, the kind that favors peas, tend to encourage it. It is windborne and lives in the soil, entering plants through the roots and is drawn up to stems, leaves and fruit through water uptake. At the same time, it is robbing the plant of moisture. The first symptoms of Verticillium are usually seen in wilting, yellowing and curling leaves. Discolored streaks are often seen in strawberry stems and runners, and in berry canes. Get resistant strawberry varieties like Seascape.

To determine if a plant is infected with bacterial wilt, press together two freshly cut sections of a stem and slowly pull them apart. If a “stringy” sap (bacterial growth and associated resins) extends between the cut ends, the plant has bacterial wilt.

Especially Tomatoes! And of those, Heirlooms are particularly susceptible to the wilts. Instead, get varieties that have VFN or VF on the tag at the nursery. The V is for Verticillium, the F Fusarium wilt, N nematodes. Ace, Early Girl, Champion, Celebrity, are some that are wilt resistant/tolerant. In these drought conditions, consider getting only indeterminates. In the Mother Earth News tomato survey, they found gardeners chose heirlooms over hybrids if their soil is wilt/blight free. Otherwise, the longer the gardener has gardened, the more they choose wilt resistant hybrid toms if their soil has the fungi.

Cucumber Beetle Western Striped Spotted

Western striped cucumber beetles (on right in image) are deadly to cucumbers. They are referred to as ‘plant-wounding insects’ and also transmit bacterial wilt. Feeding on blossoms and leaves, they also spread it among squash, melons, and pumpkins which in turn spread it to nearby tomatoes. Cucumber beetles also vector viruses such as cucumber mosaic but do so much less efficiently than aphids. Spiders are one of the predators that eat the beetles. Let those spiders live! A tachinid fly and a braconid parasitoid wasp parasitize them. Grow plenty of flowers for these beneficial insects!

Radish have become my new religion! Radish repel the beetles! Best to plant your radish before installing your transplants or have it up before the seedlings start growing from seed. Grow your radish companion along where you will let the vine travel, among squash and pumpkins, cucumbers and TOMATOES! The part of the vine growing up over an arch or up a trellis won’t be helped, so if you have space and uninfected soil, you may opt to keep your vines on the ground. If you do have infected soil, but choose to keep your vine on the ground, keep that area weeded and don’t lay on mulch. Weeds and mulch keep soil moist. The fungi dry and die on hot dry soil. Water only where you staked, at the planting basin. Plant enough radish so you can eat some, but as a beetle repellent, let it grow out so the whole plant is big and protecting your cukes, tomatoes and other vines.

The Mulch exception is straw.

  • Broccoli also repel cucumber beetles. Grow cucumbers on the sunny side under over summering Broccoli. Put in plenty of straw mulch, 3-6″ deep, to keep the brocs, primarily a winter plant, cool and the cukes off the ground. Whenever you see these beetles don’t fall for how cute they are. Anticipate how they drop to the ground when you reach for them, so approach from below, hand open. Catch & Squish.
  • Under tomatoes and cucumbers not with Broccoli, apply straw mulch only an inch thick! No more than that. You want light and air circulation, for the soil to warm and dry some. Washington State Extension says: Straw mulch can help reduce cucumber beetle problems in at least 3 different ways.
  1. First, mulch might directly slow beetle movement from one plant to another.
  2. Second, the mulch provides refuge for wolf spiders and other predators from hot and dry conditions, helping predator conservation.
  3. Third, the straw mulch is food for springtails and other insects that eat decaying plant material; these decomposers are important non-pest prey for spiders, helping to further build spider numbers.
  • It is important that straw mulch does not contain weed seeds and to make certain that it does not contain herbicide residues which can take years to fully break down.

Transplant rather than direct seed! Tiny seedlings are most susceptible to cucumber beetle feeding damage and to bacterial wilts.

Special Planting and Growing Tips! 

At the community gardens I have seen gardeners give up growing Toms and Cukes due to the wilts. But if you are willing, you can do it! Here’s how!

Plant later, like May or June, for warmer dryer soil.

Select the right varieties! Give your plants the best chance possible. Remember, if one plant gets the wilts, so will your others. The most important choice you will make is selecting disease and pest resistant varieties! Since pests like aphids and cucumber beetles carry diseases like the wilts, selecting varieties resistant to those diseases is essential. Cornell University has Disease Resistant Vegetable Varieties Lists! The lists are alphabetical. Not all varieties are listed, but this will give you a great start. Check on local university recommendations, cooperative extension, what Master Gardeners in your locality have to say. See what the nurseries near you carry or what the farmers market farmers are growing successfully. When researching, always look at the post date or update date to get current information.

And…  Cucumber Beetles have their preferences! Bitter is their favorite. Not interested in watermelon at all, but watermelon does get the wilts, just from other sources! Varieties make a huge difference. Long story short, less C Beetles, less Wilts = healthier Tomatoes!

The strongest cucumbers I have grown are the Natsu Fushinari longs. They produced like crazy, and the plant was healthy and lasted longer than any I have ever grown.

Regarding soil fungi like Fusarium and Verticillium wilts/fungi, how you plant and care for cukes and toms is super important! Cucumbers are even more susceptible than tomatoes to the wilts fungi, die pretty instantly, in about 3 days when they get infected. So when you plant them, treat them similarly to your tomatoes if you have wilts fungi in your garden.

  • Plant cukes and toms on a raised mound/basin with the bottom of the basin above the regular soil level. This allows good drainage. Make the basin low area as big as your tom’s feeder roots will grow to. Once planted, top the bottom of the basin with a 1/2″ of compost, cover that with only 1″ of straw to let in air flow and sun to dry the soil. If you are planting early in cool moist soil, do not add the compost and straw layers………Special Soil Berm Basin Level for Tomatoes and Cucumbers
  • Keep ALL the LEAVES OFF THE GROUND from the get go. Leaves touching the soil is the main way toms get the wilts. Remove lower leaves that might touch soil when weighted with dew or water from watering. Keep a regular watch for new foliage sprouting at ground level and remove it on sight! AVOID WATER SPLASH when watering at ground level. The fuzzy damp leaves of toms and eggplant are perfect fungi habitat.
  • When your toms are about a foot tall, water neighboring plants, but not your toms. That keeps the soil drier near your plant, so the fungi can’t thrive there. Since toms have deep roots, they will get plenty of water from what you give neighboring plants. Water near them but not at them or on them. In fact there are farmers who dry farm tomatoes! Read more!
  • If you are commingling beans with cukes lower along a trellis, plant the beans between the raised cucumber mounds. Beans don’t get the wilts, but love the water, so lower is good. They are a big plant with continuous high production and short roots that need to be kept moist. Mulch ASAP with straw. Keep lower possible ground touching leaves trimmed away. Later the straw mulch will keep fruits off the ground out of the insect zone. Put a tall enough stake in the middle of each basin so you know where to water when the leaves get big and cover the area. Water gently BELOW the leaves at ground level, no splash. Keep those leaves dry. Keep removing lower leaves as your plant grows.
    .
  • Generously plant radishes before seeding your cukes, or immediately at transplanting to repel the cucumber beetles. You can remove some radishes as they get bigger and you have enough to help the other plants. You must let them grow out to protect plants’ blossoms higher on the trellis. When they get tall you may have to tie them to keep them up in the area they are needed.
    .
  • Biodiversity is another form of companion planting. Hot peppers emit a chemical from the plant roots that helps prevent Fusarium wilt, root rot, and a wide range of other plant diseases! Eggplant releases potassium that tomatoes benefit from. A wise choice may be to alternate, zig zag, okra, peppers, eggplant and tomatoes, putting the shorter plants slightly on the sunny side. If you are growing shorter varieties of okra, maybe your tomatoes will be the tallest. You could plant a tomato, a pepper, okra, then an eggplant and pepper, okra, tomato, pepper. You get the idea, mix it up! If you are doing side by side rows, plant each row in a different order. This stops pests and diseases from going plant to plant along a row, or row to row. You are using the stars of your garden as companions!
    .
  • Tomatoes pruned to remove diseased leaves of Fusarium and Verticilllium wilts are susceptible to sunscald.Since the fungi are airborne as well as soil borne, plant in different places as far apart as possible. Plant so leaves of one plant are not touching another plant. Remove sickened foliage ASAP to reduce fungi population and slow spreading. When possible, prune on hot, dry, unwindy days, mid morning to midday, after dew has dried, so cuts can dry and heal with less chance of airborne fungi getting into them. Try not to touch the cuts after they have been made. Use clippers for a clean cut. Wash your hands often, dip your tools in alcohol. Trimming away infected leaves is a sad and tedious process. It’s practically impossible not to spread the fungi as you touch leaves that have it and try to remove them without touching any other stems or leaves. The very cuts you make are open to fungi. Then, naked stems are susceptible to sunscald – see image above. You come back a few days later and more leaves are wilting. The disease is internal, has spread out to the leaves. At some point soon after that, a lot of gardeners pull the suffering plant. It’s done. Not good to leave it and let windborne fungi infect neighboring plants. Do not compost infected plants or trimmings. The fungi has amazing survival ability and being soil borne, it is right at home in your compost. Put it in the trash, carefully bagged so as not to spread or leave any trace. Wash your hands, dip your tools in alcohol. If you can, burn the infected plants on a non windy day.
  • The wilts can’t be stopped. Sooner or later the plant leaves curl lengthwise, get the dark spots, turn brown then blacken, dry and hang sadly. Plants can produce but the fruit doesn’t ripen properly if it does produce. It’s agonizing to watch. Sometimes they somewhat recover later in the season after looking totally dead. You had stopped watering them, summer heat dries the soil and kills enough of the fungi for the plant to be able to try again. But production is so little and fruits don’t ripen properly. It’s better to pull it, reduce the fungi population that can blow to other plants. The safest bet is to remove the entire plant. Get all of the root as best you can. The root is where the wilt’s mycelium first congregate and infected roots left in the ground will start the whole process again. Replant in a different place if possible….can’t be stopped.

    That said, consider this! Per a comment by Leroy Cheuvront at Heavy Petal blog:  ‘I have had the blight and have stopped it from destroying my tomato plants. All you have to do is mix 1/4 cup of BLEACH to a gallon of water [add a 1/4 to 1/2 teaspoon dish soap as a surfactant so it will ‘stick,’ and do it as early as possible in the day] and drown the plant from top to bottom, it will not kill the plant. I do it every seven days and the blight has not returned.’  — June 18, 2010. It sounds scary, but I bet it works! I would test this principle on ONE plant to be sure it is safe to use.

    The summer of 2019 I finally got up the courage to try Leroy’s Bleach mix! IT WORKED! I started after my plants were showing wilts signs, figured I had nothing to lose ~ totally scared it would kill my tom, I tried it on one, frightened to come the next day to see how it was. Just like Leroy says, it did not kill the plant! Whew! I wasn’t religious with the weekly treatment but my plants vastly improved, there was plentiful production that other gardeners commented on, and production lasted months longer than usual!.


Preventive Foliar Mix that can help! 

Apply to newly installed transplants, and during the season every 2 to 3 weeks, so new growth will be covered. Wet both the undersides and tops of leaves. Per gallon add:

  • One dissolved regular strength aspirin
  • 1/4 Cup nonfat powdered milk
  • Heaping tablespoon baking soda
  • 1/2 Teaspoon mild liquid dish soap

After the tomatoes set, add some Nitrogen. Stressed plants are the most susceptible to the fungus. Boost your plant’s immune system with some worm castings at the same time. You don’t want to add too much nitrogen to your tomatoes before they set fruit because it leads to more leaves, less fruit. Add N only once. Water regularly and deeply. Use well-balanced, slow-release organic fertilizers that aren’t overly heavy with nitrogen. Alfalfa pellets will do the job. A healthy plant tends to fight off the spores.

Blight can also be transmitted through seed, so NO seed saving from infected plant fruits. Fresh seeds from a safe source and resistant varieties are in order.

Remove volunteer tomatoes and potatoes. If they are a not a resistant or tolerant variety, when they get sick, they increase the chances of your resistant varieties having to fight harder to live, and your good dear plants may not win the battle.

Air circulation, plant staking and no touching. Air circulation allows the wind to blow through your plants. This allows the timely drying of leaves and it helps break up micro climates. If your plants are packed too tightly together, they themselves become barriers to drying. Staking your plants to poles and using cages helps them grow upright, creates gaps between the tomato plants. Remove suckers. See the spruce! Thin growth inside the cage if the leaves get too dense. You want wind and sun to reach through and around your plants. Moisture is needed for fungi to spread. Dry is good. Tomatoes should be planted with enough distance that only minor pruning is needed to keep them from touching each other.

Spray proactively. Wettable sulfur works. It is acceptable as an organic pesticide/fungicide, is a broad spectrum poison, follow the precautions. It creates an environment on the leaves the spores don’t like. The key to spraying with wettable sulfur is to do it weekly BEFORE signs of the disease shows. Other products also help stop the spread. Whatever you select, the key is to spray early and regularly.

At the end of the season remove all infected debris, don’t compost or put in green waste containers. Bag it and trash it. Don’t leave dead tomato, eggplant or peppers in the garden to spend the winter – especially if you are in a community garden. Pull weeds because spores can over-winter on weed hosts. Many weeds, including dandelions and lambsquarters, are known to host Verticillium wilt. During our winter season, turn your soil about 10 inches deep. Let the soil dry and the fungi die. Burying the spores helps remove them, it disturbs cucumber beetle eggs and exposes snail eggs to die!

If you have space, crop rotation is an important tool in fighting wilt. If you’ve had trouble with wilt, don’t plant potatoes, eggplant, or other Solanaceous vegetables where any of them have grown for at least four years.

Practice prevention, be vigilant. If you don’t have wilts in your soil you are so blessed! 

Updated 1.26.23

^Top


Love your Mother! Plant bird & bee food! Think grey water! Grow organic! Bless you for being such a wonderful Earth Steward!

The Green Bean Connection newsletter started as correspondence for the Santa Barbara CA USA, Pilgrim Terrace Community Garden. Both of Santa Barbara City’s remaining community gardens are very coastal. During late spring/summer we are in a fog belt/marine layer area most years, locally referred to as the May grays, June glooms and August fogusts. Keep that in mind compared to the microclimate niche where your veggie garden is.

Read Full Post »

Green Cabbage after the rain at Rancheria Community Garden, Santa Barbara! Anti Cancer!

Gorgeous Cabbage, Rancheria Community Garden, Santa Barbara CA Nov 2016 after the rain.

Cabbages have high fiber content, low calories! They have terrific disease-fighting compounds – cancer prevention, are high in Vitamins C and K, and have a host of minerals. They are not a cut and come again veggie like chard, lettuce, or super Vitamin A kale or purslane with its Omega 3s. But they will sometimes grow back in mini foursomes or up to six if you cut the head off close to the bottom of the head, leaving the lower leaves. Work some rich manure into the first inch of soil, then treat your plant like you normally would! The new heads are always smaller. Perhaps it’s better to remove and compost larger lower leaves, restore the soil and plant something new. But if your growing season is too short for multiple crops, this is a way of getting just a little more cabbage, and it is super tender!

We love that cabbage makes those super heads in a glorious profusion of amazing leaves! It has its own unique crunchy texture. Consider that they do take up a fair footprint for a one time, one head crop, and it takes a while to grow that compact head. Some say cabbage is cheap, why grow it? Cause it’s organic and it tastes terrific right from the ground! To some its sulfurous scent while cooking is overpowering (see below for ways to reduce that); to others it is heaven, what their family has always done! If you love it, you love it, and you might even get used to it if it is new to you!

Cabbage is in the cruciferous family, genus Brassica. The word “brassica” translates in Latin as “cabbage.” Other brassicas are broccoli, cauliflower, kale, Brussels sprouts, collard greens.

Tasty shredded Red CabbageTantalizing Startlingly Different Cabbage VARIETIES!

As climate changes, look for heat and drought tolerant, bolt resistant varieties, like the amazing 1951 All America Selections winner 30-50 lb OS Cross, if you will be growing them over summer.

Classic gorgeous greens are garden gems!

Red cabbage by far outdoes other cabbages in its cancer prevention properties. They have a concentration of anthocyanin polyphenols, which contribute to red cabbage containing significantly more protective phytonutrients than green cabbage. Interest in anthocyanin pigments continues to intensify because of their health benefits as dietary antioxidants, as an anti-inflammatory, and their potentially protective, preventative, and therapeutic roles in a number of human diseases.

Early Maturing Minis or HUGE! Plant what you and your family can eat. Plant early and minis for soonest treats, and, at the same time, longer maturing larger varieties to come in later. A couple delightful minis that can also be grown in containers are green Pixie Baby, and Red Express – 2 to 4 lb head, relatively split tolerant, only 63 days!

Huge varieties you can grow easily are Mammoth Red Rock Cabbage, Stein’s Early Flat Dutch – 8 inch and larger heads weighing 10-12 pounds, a favored variety for kraut. If you really do want to grow giants, up to 80 lbs!, try Flatpol, Northern Giant, Giant Russian, OS Cross or Megaton!

Earth tasting Savoy Cabbage bursting with health and nutrition!Earthy tasting bumpy Savoys or Super Smooth leaved… 
Savoy cabbage in particular—turns out to be an especially good source of sinigrin. Sinigrin is one of the cabbage glucosinolates that has received special attention in bladder, colon, and prostate cancer prevention research. Savoys are quite frost tolerant, and you get a lot of cabbage per their footprint!

Check out Cornell’s Cabbages Review List! The best are listed right at the top!

Brussels Sprouts, like mini Cabbages. BrassicaBrussels Sprout Brusselberry Purple Red

Brussels sprouts are the most recent, historically, appearing on our tables by 1785. Really, they are mini cabbages growing  conveniently along a stem! Santa Barbara weather generally doesn’t get frosty enough to make B Sprouts happy, the sprouts are quite small. But if you don’t mind the harvest time per the return, and you just love them, may they grace your table! However, in the last couple years I have seen Sprouts grown successfully to a larger size. It may depend on the variety selected? Just like with artichokes, more will be hybridized to tolerate climate warming.

Surprise! Red/Purple Brusselberry sprouts – a milder, sweeter Brussels sprout! Figure 120 days to harvest from November to January here on the west coast. Harvest from the bottom of the plant upwards. Especially prized for Christmas dinners! You could serve them whole with a creamy white hollandaise sauce to take advantage of the contrasting colors.

Chinese or Napa Cabbage - GreenChinese Cabbages are another Brassica, but are not cabbages though they sure look like it! Napa cabbage is SO elegant! Very beautiful, all those long, pale leaves neatly tucked with ruffled edges. Try the beautiful, Scarlette shown just below! Scarlette seeds! Bok Choy, or pak choi, is another leafy upright cabbageish plant eaten fresh in salads, steamed delicately, stir fried. A lot of cabbage lovers love these plants too!
Chinese or Napa Cabbage Scarlette F1 Red

GROWING Your Cabbages!

Cabbages are easy to grow. Those seeds are so tiny you can hardly believe that great big plant came from one! Full sun and fat soil make them happy. In acidic soil, Red cabbage leaves grow more reddish, in neutral soils they will grow purple, while an alkaline soil will produce rather greenish-yellow colored cabbages!

Select your planting area to accommodate your cabbages and their Companions! We have lots of tasty choices!

  • Plant lettuces among your cabbages on the sunny side. Lettuces repel cabbage moths.
  • Tomatoes and celery repel cabbage worms, but many sites say not to plant cabbies with toms.
  • Nasturtium (attracts snails), onions, garlic, dill and borage act as an insect trap or repel harmful insects.
  • Mustard greens among cabbage establishes a “trap” for moths and leafwebbers.
  • Cabbage is not happy with Strawberries.
  • Plant mint near peas, cabbage or tomatoes to improve their health and flavor, and mint oil repels insects. Plant the mint in a container! It’s invasive.
  • Chamomile attracts hoverflies and wasps, both pollinators and predators that feed on aphids and other pest insects.
  • CILANTRO repels aphids, potato beetles, and spider mites and makes cabbages/Brassicas grow REALLY well, bigger, fuller!

NOTE: Dying parts of the brassica family of plants, includes cabbages, produce a poison that prevents the seeds of some plants from growing. Plants with small seeds, such as lettuce, are especially affected by the brassica poison, so use lettuce transplants among your cabbages. A professor at the University of Connecticut says brassica plants should be removed from the soil after they have produced their crop.

SOIL Prepare your soil well in advance if you are in cold challenged areas. Often soil prep is done in fall rather than losing time getting ready in spring if you have a short summer. In Alaska, long 20 hour days compensate for their very short growing season! In SoCal, you can plant cabbages year round – just select the right varieties for each season. If you want them to be done so you can plant summer plants starting Feb/March, you can plant smaller fast growing varieties as late as early December for delicious results! They do better in cooler fall/winter weather though.

Cabbies are heavy feeders producing all those leaves! They like rich soil and steady attention! Composted manure, Chicken manure, timed-release vegetable ferts are terrific. Cabbages need steady weather and regular watering for steady growth. Too much N (Nitrogen), too much water, makes the plant tender and weak – susceptible to pests like aphids. 1 to 1.5 inches of water per week does the job if it doesn’t rain. But an Alaskan planter says her cabbages will take a gallon of water on a long hot day when fully growing. Depends on where you are, how long your days are, and how big your plant is. She grows giants.

Here’s her cabbage soil planting hole recipe! Peat moss (holds water), a pail of sand (if soil is heavy remove some before mixing), 2 cups bone meal, 4-6 cups of composted steer manure, 2 cups wood ashes, a couple heaping tablespoons of Epsom salt (Magnesium) & powdered milk (calcium), maybe a little lime (to raise pH to deter clubroot). Your soil is likely different and you aren’t likely growing giants, so do your own formula, but if you are raising giants, be generous, they are going to need it plus feedings!

After she plants… When it’s all watered and settled sprinkle a good cup of wood ashes around the new stem and nearby. This helps with bugs early when plants are at first weaker. Then I sprinkle Blood meal around in the moat off and on all summer, as it’s a quick nitrogen fix. I also use a little composted manure soaked in the water can and generous amount of fish emulsion in the summer watering. Fish is a slower acting fertilizer but cabbages seem to love it!

Here’s a tip from UK giant grower David Thomas: Water lodging in the base of the leaf? Rather than removing a huge leaf that contributes to your plant’s growth, his way around this is to simply poke a hole in the lowest part of the leaf (not through the main vein) to let the water drain away .

Cabbage Weigh Off 2013 Alaska State Fair Keevan Dinkel 10 yo Winner

Alaska State Fair Giant Cabbage Weigh-Off 2013 winners (with placards, left to right): Scott Rob (92.1 pounds), Keevan Dinkel (92.3 pounds) and Brian Shunskis (77.4 pounds). The growers are joined by the cabbage fairies, a group of women who for 15 years have volunteered at the cabbage competition. BTW, Keevan was 10 years old at that time and called the ‘new Kid King of Cabbage!’ And the cabbage’s name is ‘Bob.’ Photo by Clark James Mishler  See more!

SPACING If you are planting minis, 2 to 2 1/2′ spacing is good. Mine grow that big. If you are going for giants, 8′ spacing may be needed! If you want maximum size, give them plenty of room. Crowding stunts plants as they shade each other out. Depending on the variety you plant, done right, in 82 days (3 months) you can get a 30 to 50 lb cabbage! In 2012, Scott Robb of Palmer, Alaska, broke the world record for heaviest cabbage at 138.25 lbs! He holds five current world records for his large vegetables.

Select your seeds. Remember, AAS, All America Selections winners are prime! 2016’s cabbage winner is Katarina F1, an early maturing green 4″ mini, container variety – but you can plant it in the ground too!

Get transplants from your local nursery. Locals are better than box stores because they select varieties that do well in your area and they want your success and your repeat business means a lot to them. Transplanting tips from David Thomas: I tear off all of the roots that are swirling around in the shape of the pot, this sounds a bit drastic and I would never treat a pumpkin plant in this way but on a cabbage it actually increases root growth. I plant the cabbage up to the base of the lowest leaf, the buried stem will also send out roots.

Plant smart! Succession! Plant seeds and transplants of minis and bigger longer maturers at the same time to have a grand succession of fresh cabbages for your table. Plant two or three rounds in case of crop failure and/or to have continuous crop if all goes well!

PESTS

Water regularly, less if it rains. But, too much watering makes for a soft plant that invites sucking pests like those aphids. Keep a look out for any curling leaves. Get in there and look, top and undersides of leaves, and in the new leaf zone in the center. Hose them away immediately and keep doing it day after day until they are gone. If you see ants about tending the aphids sprinkle cinnamon around. When you water, the ant colony may rush out carrying eggs. Let them. When a lot of them are out, sprinkle them generously. That will substantially reduce your ant population and save your plants. Aphids can totally runt your plants, they often don’t recover, so don’t ignore ants and just hope they will go away. See all about them UC – IPM

  • Pick off any yellowing leaves that attract whiteflies that get into your other plants. UC – IPM  Worm castings work well against whiteflies.
  • Slugs love getting into the lower outer leaves of cabbage heads. The slugs are so protected in there. Grrrr…. Early on lay on a Sluggo like pellet to stop them before they get started! When your cabbage head is right around its maturity date and the head is good and firm, harvest it! When a plant is past prime it dries, loses that bursting flavor, diseases, pests and birds start doing their own harvesting.
  • Holes in cabbage’s leaves are a sure sign that cabbage worms or cabbage loopers may be attacking your plant. Look for these camouflaged green pests on the underside, along ribs of leaves and pick them off.
  • Tiny holes? Flea beetles – Dust with wood ash or flour dust.

SIDEDRESSING If you think they need it, give your cabbies a feed when they start to head up. It may be that if you put a ring of granular nitrogen around cabbage, broccoli and cauliflower plants, you will be able to grow bigger heads of vegetables than you would without the nitrogen. Usually though, your soil will be ample unless you are growing giants.

HARVEST promptly! I put the plant date and days to maturity on my plant id tags so I can check to see when to expect mature heads. The squeeze test tells you if it is firm and ready. Storing them on the plant a short time is okay, but otherwise the slugs, etc., get to them, the leaves start losing their verve, the head dries a bit, loses its shine, and doesn’t have that bursting fresh feel! If you wait too long, or water irregularly, the head may crack or split. If it cracks, take it immediately and salvage what you can. Cut the heads off, don’t bruise them by pulling them.

STORE your cabbies in the fridge! Anthony Reyes at FarmScape Gardens says: Remove any loose surrounding leaves and keep just the compact head. It is important to note that the quality of the stem diminishes after being stored and tends to get slightly woodier the longer it is stored. Therefore, if you would like to eat the stem (which is delicious!) do so before freezing/storing for prolonged periods (it will still be good to eat, just a little bit woodier and sometimes stringy). Place in a paper or plastic bag with some holes in it to let moisture escape. This is important as you want to keep an aerobic environment to prevent excess moisture, condensation from transpiration, and mold from forming.

Brassica Bok Choy BoltingSEEDSAVING Cabbage must be kept separated from other cole crops by a mile to prevent cross-pollination. That is impossible in a community garden. Better there to buy new seed each year. Another factor to consider is cabbages are mostly self-infertile. For seedsaving purposes they need to be planted in groups of at least 10 or more. For most of us that isn’t going to happen. Then, you need two years to do it! Cabbages, like all the Brassicas – broccoli, cauliflower, kale, Brussels sprouts – are biennials. So unless you have some extreme weather shifts, and they flower early, you wait overwinter. A week of hot weather and these cabbages above left quickly bolted from no heads yet to flowering stalks. If you have had the opportunity to save seeds, lucky you! They are viable 2 – 4 years.

Red Cabbage bolting in second year

Red Cabbage bolting in second year.

In normal conditions, after overwintering, in spring, new cabbage shoots burst strangely out of the unharvested cabbage heads, flower stalks form, then seeds are made in their second year. The seeds are easy to harvest, but get them before the birds do! Poke some holes in a plastic bag. Pop the bag over the drying seed pods and wait until they are entirely dry. Collect the dry seed pods. In a baggie, rub them between your hands to pop them open to release the seeds.

DELICIOUS WAYS TO EAT CABBAGE!

In one recent study (post undated), short-cooked and raw cabbage were the only types of cabbage to show cancer-preventive benefits – long-cooked cabbage failed to demonstrate measurable benefits.

Fresh Coleslaw is best! Make it your way! Your recipe might mix red cabbage, pepper, shredded carrots, onion, grated cheese, pineapple, or apple. Your dressing could be a vinaigrette, mayonnaise, sour cream or cream with celery seed added. Slaw shapes are different – finely minced pieces, shredded strips, or even small squares! Buttermilk coleslaw is a southern United States treat! Or you just might top your salad with a few shreds of red cabbage!

Boiled! If you don’t like that sulfur smell, do it quick! Cut into thin 1/4″ slices or wedges, drop into boiling water, simmer 10 to 15 minutes until just tender ~ or steam. Drain and serve right now! Or if you don’t need it right away, chill in ice water, drain, wrap for later. The European Sour version is to cook your cabbage in apple juice, cider, white wine or water and wine vinegar, using just enough liquid to cover the cabbage. You let the liquid cook away leaving tender richly flavored cabbage! When cooking red cabbage it will normally turn blue. To retain that marvelous red color add vinegar or acidic fruit.

Put chunks in soups & stews, stuff leaves filled with whatever your heart desires, pickle, do classic Sauerkraut or super healthy Probiotics!

I love the subtleties of cabbage. Their colors. Writer Edna Ferber says ‘…always, to her, red and green cabbages were to be jade and burgundy, chrysoprase and porphyry.’ Cabbages more or less ‘sit’ compared to other veggies, collecting power from the ground up, expanding slowly and quietly from the inside – called hearting up.’ They are working astonishingly hard making so many leaves! Each leaf harmonizes completely with the leaf next to it so the head is firm.

In the night the cabbages catch at the moon, the leaves drip silver, the rows of cabbages are a series of little silver waterfalls in the moon.  Carl Sandburg

Updated 10.27.22

^Top


Love your Mother! Plant bird & bee food! Think grey water! Grow organic! Bless you for being such a wonderful Earth Steward!!

The Green Bean Connection started as correspondence for the Santa Barbara CA USA, Pilgrim Terrace Community Garden. Both of Santa Barbara City’s remaining community gardens are very coastal. During late spring/summer we are in a fog belt/marine layer area most years, locally referred to as the May grays, June glooms and August fogusts. Keep that in mind compared to the microclimate niche where your veggie garden is.

Read Full Post »

Feed Your Veggie Garden!

Purposes for Feeding, Sidedressing

General well being – Compost is the best general feed. It is rich with nutrition, has great water holding capacity, especially needed in summer and drought areas. Here are some possibilities. Pull back your mulch, scatter and lightly dig in a little chicken manure. If you prefer organic granulated fertilizer sprinkle it around evenly. At the same time, and/or lay on a ½” of tasty compost, topped with some worm castings. Or you can water on some fish emulsion. Water well and gently so things stay in place. Pull your mulch back in place. See more

Up production, extend harvests – Again, compost is a great pick-me-up. It’s gentle, balanced, and free if you make your own. Plants you have from saving seed are adapted to your special blend and just keep getting better! Some gardeners dig it in a bit, no deeper than the top 6″ for most summer veggies. Others simply pull back the mulch, lay on an inch of compost, water, then recover with the mulch. No need to cover an entire area if you are short on compost. Do only out to the dripline.

Less leaf/more blossoms – Studies show the ideal ratio of nutrients for flowering plants, tomatoes, squash, beans, peppers, melons, eggplant, is an NPK of 3-1-2. (That’s 3% Nitrogen, 1% phosphorus & 2% potassium.) So look for that ratio on the label of packaged fertilizers; anything close to a 3-1-2, a 6-2-4 or a 9-3-6 does the job. If you are getting way too much leaf, few to no blooms, no fruit, water like a fiend to wash away the too much N (Nitrogen) your soil has. Plus, though N makes for beautiful leaves, too much inhibits flowering and fruiting. You can add fertilizers high in Phosphorous for blooms, but at this point it needs to be super easy for quick uptake by your plant.

More foliage – Lettuce, chard, kale can use more N. They are doing nothing but make leaves and for those plants we don’t want flowers! They are good with higher ratios of N. Liquid fish and seaweed mix is good if you don’t have predator animals frequenting your garden! Fish and kelp have a nice balance of the basic nutrients and lots of essential trace elements. Pour some into your watering can, dilute it as directed and water it into the soil around the root zone to the dripline. If you prefer granulated stuff, pull back your mulch, sprinkle the granules around evenly, about 6″ from the plant stem. Lettuce thrives on chicken manure scratched into the top 2″, does wonders, especially in summer when your plants are working hard. Cover your mix or scratched in manure with compost or soil for faster uptake, and water in. Put your mulch back in place.

Green up the leaves – a super quick fix is to give your plants a tad of blood meal. It is easy for your plant to take up, and leaves get back to their beautiful Nitrogen rich dark green asap! Blood meal is an expensive high nitrogen fertilizer, 12-2-0, a very high number for a natural product, as are fish meal (and fish emulsion), horse and poultry manure ie chicken manure. Use it sparingly because it can burn flowers and foliage due to the ammonia content. And, remember, too much N inhibits flowering and fruiting. Blood meal is also toxic to animals.

Disease and Pest Resistance! Worm castings are tops! Raise your own worms or buy castings in a bag or fresh and potent at a local organic nursery!

Foliar Feeding - rose upturned

Foliar Feeding – Leaves

Not everyone can always get down on their hands and knees and dig about under their veggie plants. Maybe making compost, worm casting and/or manure teas will work for you! There are various methods, some simple, others time consuming and complex. Either way, they work! If you take the easy route, all you do is mix a handful of castings, a handful to a cup of compost, handful of manure, stir and let them soak overnight in a bucket. In the morning, swoosh it around in the bucket one more time, let it settle, then strain the top liquid into your long neck watering can, the one with the up turning rose. If you don’t have predators like skunks, stir in liquid Fish Emulsion, 6 tablespoons per gallon of water/Kelp, ¼ to ½ teaspoon per gallon of water, mix, and drench your plants! That’s a mix they won’t forget! Get a watering can that has a rose (spray end) that will swivel upward so you can apply that tasty mix to both the undersides and tops of the leaves, the whole plant. Since it has been found foliar feeding is in some cases more efficient that soil feeding, it makes good sense!

Teas have no drawbacks. They can be applied to good avail every couple of weeks if you wish.

Peppers, Toms, Eggplant & ROSES respond really well to Magnesium Sulfate (Epsom Salts) foliar feeding. Apply it when they are seedlings, when you transplant.

  • Magnesium is critical for seed germination and the production of chlorophyll, fruit, and nuts. Magnesium helps strengthen cell walls and improves plants’ uptake of nitrogen, phosphorus, and sulfur.  Magnesium deficiency in the soil may be one reason your tomato leaves yellow between the leaf veins late in the season and fruit production slows down.
  • Sulfur, a key element in plant growth, is critical to production of vitamins, amino acids (therefore protein), and enzymes. Sulfur is probably the oldest known pesticide in current use. It can be used for disease control (e.g., powdery mildews, rusts, leaf blights, and fruit rots), and pests like mites, psyllids and thrips. Sulfur is nontoxic to mammals, but may irritate skin or especially eyes.
    x
    CAUTION Sulfur has the potential to damage plants in hot (90°F and above), dry weather. It is also incompatible with other pesticides. Do not use sulfur within 20 to 30 days on plants where spray oils have been applied; it reacts with the oils to make a more phytotoxic combination.
  • Epsom Salts are easy to do!  Buy some Epsom Salts, what you soak your feet in, at the grocery store, mix a tablespoon per gallon, foliar feed! Foliar feeding is simply sprinkling leaves with your solutions, and works better than applying to the soil! Get a long snouted watering can that has a turnable sprinkler head. That long spout comes in handy, reaching well into your plant! Turn the head so the water shoots up under the leaves then falls back on the tops! The long arc of the handle gives lots of maneuvering ability and saves your back! Feed your plants once when they bloom, and again ten days later. The results, attributed to magnesium in the salts, are larger plants, more flowers, more fruit, thicker walled peppers! I use this mix on all my Solanaceaes: eggplant, pepper, tomato, tomatillo. Roses love it too!

Broad Fork Garden Baby Blue!Soil Feeding – Roots

Plants have lots of little feeder roots near the surface of the soil, at least out to their dripline. When you cultivate or scratch up the soil, those little roots are broken and they can no longer feed your plant. Scratch up the soil on two sides only at most. Leave plenty of undisturbed soil so the feeder roots can continue to feed your plant. Your plant may even slow down after a feeding until it grows more feeder roots back. Give it a little time for recovery.

Seedlings need to be fed close to the plant because they don’t have an array of feeder roots yet.

Lettuces love a bit of chicken manure, but ixnay for strawberries. They don’t like the salts.

If you enjoy making those tea/fish/kelp mixes, and want to feed your plants but minimize damage to their roots and soil structure, get yourself a spade fork, or if you have a lot of territory, a broad fork like in the image! Push it down into the soil, rock it back and forth slightly to make holes, pour in your soup! You will hear the soil organisms dancing!

Know your guanos! Besides being expensive, bat and Seabird Guanos are not a quick fix; they take awhile to break down. Some say they are better applied as foliar teas, but still, the release time per Colorado University Extension is FOUR MONTHS even for powdered guano! Guanos vary hugely in NPK percents! Adding guanos high in P, Phosphorus, at planting time helps your plants continue to bloom late in the season! Jamaican bat is high P phosphorus (blooms) 1-10-0.2. But Mexican bat is high N (leaf growth, plant vigor) 10-2-1. Peruvian seabird is high in N and P (leaf and bloom) 10-10-2.

Worm castings?! OH, YES! Though they are not nutrients they do cause seeds to germinate more quickly, seedlings to grow faster, leaves grow bigger, more flowers, fruits or vegetables are produced! Vermicompost suppresses several diseases on cucumbers, radishes, strawberries, grapes, tomatoes and peppers, according to research from Ohio State extension entomologist Clive Edwards. It also significantly reduced parasitic nematodes, APHIDS, mealy bugs and mites. These effects are greatest when a smaller amount of vermicompost is used—just 10-40% of the total volume of the plant growth medium is all that is needed, 25% is ideal!

Up production, extend your growing time, enjoy seeing your plants’ radiant health, and be blessed with scrumptious meals!

See also Soil Building!

Read Full Post »

Older Posts »