Feeds:
Posts
Comments

Posts Tagged ‘roof’

Self Mulching Delicious Summer Edible Landscaping 2020!

Self Mulching Delicious Summer Edible Landscaping!

In view of COVID-19, many of you want to start growing 100% fresh organic food right at your own doorstep! Here are some great tips to get you going!

Fast Plants to Grow Indoors or Out! Clearly, you need that food soonest! Fast has a very different meaning when you are talking about growing veggies! Here is a mini list of days to maturity to give you the idea:

  • Arugula | Rocket | 20-40 days
  • Beets | 40-70 days | tops and roots, harvest when small
  • Broccoli Raab/Rapini/Rabi | 40-60 days| leaves and tops are edible
  • Kale | 30-65 days | the baby greens are much more tender than mature kale
  • Leaf lettuce | 40-60 days
  • Mesclun Greens | 30-45 days
  • Onion greens | 40-50 days | grow micro-onion greens, baby bulbs, or onion stalks
  • Peas | 50-60 days | pea shoots are sweet and delicious! (Winter in SoCal)
  • Radishes | 21-30 days | Radish tops are mild and add nice flavor to salads
  • Spinach | 30-55 days
  • Swiss Chard | 30-60 days
  • Turnips | 35-50 days | Leaves and root are edible

Of course these timings vary per location and climate! In SoCal we have more leeway and many crops can be grown year round. However, if you are in the desert, a lot of community gardens close for the summer – just too hot. With careful management and lighting, you could do indoor container gardening. Try a walapini, a dug out earth shelter greenhouse! It’s cool in summer, warm in winter!

Greenhousing is an art! In super cold winter areas others of you may also need to rely on indoor container gardening and installing lighting, and well insulated greenhouses. For ideas and tips:  Greenhouses – the Six Weeks Advantage!   Heating Greenhouses Without Electricity!

If growing your own is too daunting, do support your local CSA, Community Supported Agriculture! Many are organic and you can ask if they deliver. Many do, especially now. You might start with this post on Santa Barbara County CSAs! I didn’t see a date for the post, so some of the info may be out of date, but you get the idea. Also great places to support are the Santa Barbara area Farmer Markets!

Combining supporting CSAs and Farmer Markets AND your own gardening will give you the best of the best while you are learning! Farmer Markets are a great place to ask your very local gardening questions! First, ask where their farm is! It might be in a different climate or a town or even further away. Sometimes there are Master Gardener question tables at Farmer Markets! Sign up for their events or get on their email list!

CONSIDERATIONS BEFORE YOU START

There will be water expenses.

6-8 Hours of Full Sun really is best. Shade is slow, disappointing production, small size results, plants can just fail.

Soil matters. A lot. Urban soils have often been abused or neglected. Maybe you have limited location choices with accessible water. If you are super fortunate, you may have a place with great soil for veggie gardening. Slightly alkaline loam is terrific. Do some soil testing before you get started to see if any adjustment is needed.

You may want to build a raised bed on a lawn. Raised beds can be rather instantaneous wooden boxes or an area piled with nutritious premade booster soil, compost, manure, worm castings. No need for digging. Raised beds can be built in place layer by layer, composted in place. That might be done in the fall for spring planting. You can do both, the quick one first, the spring one in progress. Actually you can start a composted raised bed anytime and continue building it forever! Add kitchen waste, cover with a 1/2″ layer of straw, repeat, repeat, repeat! If you want to plant in your unfinished pile, open a hole, throw in compost, a little manure, whatever amendments make you happy and plant!

However, when you are getting started, there is no need to immediately make compost or hunt for manure. You can buy it inexpensively, safely processed, in convenient bags at the nursery! Once you get your plants growing, if you want to, you can add composting to your talents, find SAFE manure sources.

Container Vegetable Living Gift - Lettuces Edible Flowers
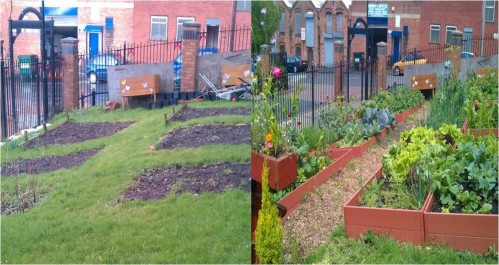
There are plenty of places to grow veggies once you have decided to give it a go!

– At home indoors or out, wherever there is the most sun. You might replace part of your lawn if it is the sunniest location or comingle veggies and landscape plants – edible landscaping!
– In a Greenhouse, on the roof!
– Share space with a neighbor
– Start a container garden in your home, on your patio, your balcony, porch – best directions are East, South, West facing.
– Join a Community Garden. Some of them have waiting lists, so get on the list ASAP. You can always refuse a plot if you change your mind or have found other garden space by the time your name comes up.

If you have little space, go Vertical! Use trellises and cages, pallets on their sides, fences, hanging baskets, towers, strawberry pots, shelves, the roof! Vertical Gardening, a Natural Urban Choice!  Vertical Veggie Garden in a 55 Gallon ‘Drum!’

Gardeners start their plants from seed, just like their parents and grandparents did, or go to the local nursery and get transplants! Transplants are the fastest choice; seeds get you varieties not available at nurseries. Be a little careful at box stores because they don’t always sell plants in season for your locality or part of town. For example, Santa Barbara has cooler beach front properties and hot, dry foothills properties that can be hot in day, cold at night, desert like!

Seeds can be planted at the same time you install transplants to get you a continuous supply for your table. Read the seed packets carefully before you purchase them, and if you buy them, again at planting time! Buy from reputable seed houses, preferably organic. Be sure they are appropriate to your location at the time you would like to plant them. Ask around. Talk with your neighbors, local nursery people knowledgeable about veggies, your farmers market.

Heirlooms? You may think heirlooms are the virtuous way to go. It depends on the plant, your location, the condition of your soil. If you are unsure, go with hybrids. Nothing wrong with hybrids. Some of them are well bred, have set a high standard, and worth the money! Mother Nature does her own hybridizing! Here are mind opening surveys that were conducted by Mother Earth News on Tomatoes & the Most Productive Garden Crops! They concluded: ‘Many respondents declared an “heirlooms only” stance on tomatoes, especially in climates that are kind to tomatoes. Disease-resistant hybrids won more favor in stressful growing situations. Additionally, our survey showed that interest in better disease resistance increases with years of tomato-growing experience.’

Edible Landscape Tomatoes and Flower Companions! (1)
SELECTING YOUR PLANTS!

Best if you like that plant or you will not treat it as well or even somehow neglect to harvest it. But it is a good choice to select some plants others in your household like even if you don’t!

Think of Nutrition. Though you may not like a particular good-for-you plant in the most popular ways, see if there might be a way you could fix it that you would enjoy. I’m not a kale fan, but I eat it happily added to soups and stews! I like shredded beets and their greens stir fried! 

Smart choices may involve choosing plants high in production per square foot! SoCal in Summer: Zucchini, Green Beans on a trellis, Fordhook Giant Chard, Kale, Tomatoes. In winter, kales and broccoli with greens planted underneath, elegant Chard, and colorful carrots thrive with trellised peas.

Quickest to Harvest! The fastest are radishes, lettuces, arugula, spinach, greens of all kinds, chard. Beets and turnips are two for one crops – you can eat the greens and the roots!

For soonest production select mini varieties, like baby carrots, small beets or cucumbers, eggplants, cherry tomatoes. Select bush varieties of beans and tomatoes. They mature more quickly. At the same time plant pole and vining indeterminate tomato varieties for all season production to follow.

Companion Planting Set, excellent use of space!
Marvelous GARDEN DESIGN!

If you need a lot of food in a small space then Companion Planting is the number one technique and makes terrific sense! You can combine helping plants and herbs for greater health and output. See more Herbs to support your garden.

Here is a super SUMMER companion list! 

  • Alyssum is a great old fashioned pretty border plant, an understory living mulch. And WHITE Alyssum repels the cabbage butterfly.
  • Basil repels several unwanted insects, is great near tomatoes but not in the basin with the tom. The tom needs less water. Plant the Basil beside the tom basin. The deeper tomato roots will get water used to water the Basil!
  • Beans, Cukes, Dill, Radish Combo! Cukes and Beans are great on the trellis, one high, one low. Dill to go with pickling cukes. Radishes to deter Cucumber beetles.
  • WHITE Potatoes with Zucchini & Cukes to repel squash bugs.
  • Radish with eggplant, cukes & zukes act as trap plants for flea beetles and to repel cucumber beetles.
  • Carrots love being with cilantro and chamomile, and chamomile improves the flavor of any neighboring herb!
  • Calendula traps aphids, whiteflies, and thrips!
  • Chamomile is a love! Pretty, great tea, known as the “plant doctor,” chamomile has been known to revive and revitalize plants growing near it. That’s especially good to know for plants that are susceptible to diseases. Plant it by plants that are wilts susceptible, like your tomatoes & cucumbers .
  • Cosmos is for pollinators! More at SFGate
  • Marigolds are brilliant and called the workhorse of pest deterrents!
  • Lettuce and carrots make a great understory below larger plants – in summer peppers, eggplant, in winter below Broccoli and Kales. They act as living mulch! Leave a little open space to lightly dig in some compost or manure later in the season. If you already have enough lettuce and carrots, scatter a living mulch, soil feeding legume seed mix under those plants. At the end of the season you can turn it all under – aka Green Manure. Or remove the larger plants, open up spots in the living mulch and put in winter/summer plants! See much more – Living Mulch/Green Manure!

Tasty WINTER Companions!

– Brassicas! That’s biggies like our broccoli, kale, cabbage, cauliflower, collards, Brussels sprouts.

  • Cilantro makes brocs grow REALLY well, bigger, fuller, greener!
  • It is said lettuces repel cabbage moths. Install transplants on the sunny side under big plants. As the plants get bigger remove a few lower leaves if needed to let sun in; put a few between cabbages.
  • Aphids and whitefly love Kale, and other Brassicas, so along with that Cilantro, plant garlic and chives among your Brassicas! Remove yellowing Brassica lower leaves that attract whiteflies.
  • Though this is a pseudo companion idea, research has shown there are less aphids when you alternately plant different varieties of brocs together! 

Peas and Carrots, NO onions, onion family, within several feet. Onions stunt peas. Carrots enhance peas!!!

Somewhere along the line, do add some flowers for beauty, pure joy, and your pollinators! Some flowers are edible! Calendula See Grow a Pollinator Meadow at Home in Your Veg Garden!  “I perhaps owe having become a painter to flowers.”  ~ Claude Monet 

Garden Layout is Totally Individual Choice! Other than planting tall to the back, short to the front, so everyone gets sun, the sky’s the limit! Get some terrific ideas here!  Summer   Winter

For continuous harvests, sow or transplant your favorites or the fastest-growing crops every two weeks. That’s called succession planting. Adjust that as you find out what works for you and that plant, you and your family, your soil, sun/shade and temps!

If you are starting on a low budget, as many are, also see Veggie Gardening for NO $ at All! for some super tips and tricks!

Know that many have started gardening with no one to help them, trial and error their only teachers. That works but it can slow you down… If you have neighbors, elders that remember their gardens, ask questions! Get online and check several authors’ posts on the same topic – be sure to read the comments and threads! Often the best answers are in them! Make sure they are in your part of the country or have a climate like yours. Ask at your local nursery and farmer market! Their businesses depend on doing it right and giving you the right answers. It may sound a little crazy this early in the game, but start your own garden blog! When you teach others, you have to learn it to know what to say! Your knowledge will expand exponentially! Many will thank you!

Congratulations on your new venture! Happy Gardening!
.


Love your Mother! Plant bird & bee food! Think grey water! Grow organic! Bless you for being such a wonderful Earth Steward!

The Green Bean Connection started as correspondence for the Santa Barbara CA USA Pilgrim Terrace Community Garden. All three of Santa Barbara’s community gardens are very coastal. During late spring/summer we are often in a fog belt/marine layer most years, locally referred to as the May grays, June glooms and August fogusts. Keep that in mind compared to the microclimate niche where your veggie garden is.

Read Full Post »

Greenhouse Henry Ford Hospital Michelle Lutz

Michigan’s Henry Ford West Bloomfield Hospital upgraded the condition of its food by adding a greenhouse. Michelle Lutz oversees production of vegetables, fruits and herbs, used in preparations such as braised romaine salad. / Photos courtesy of Henry Ford West Bloomfield Hospital

Greenhouse seedlings, transplants are ready six to eight weeks early and you can grow Out-of-Season Treats in winter! Pest and disease free equals greater production! For institutions like hospitals, greenhouses are workhorses! A greenhouse is a most valuable part of a productive home garden. Seedlings are ready for earlier planting. Hospitals want the best food possible for the health of their patients, and can’t afford to be weather dependent.

As a home gardener in coastal SoCal areas you may question the need for a greenhouse. Though unheated, ours at our mile-from-the-beach community garden is well used! We often run out of space for everyone’s seedlings as we get closer to planting time or the weather warms! Even unheated, an enclosed space is heated by the sun during the day and doesn’t get so cold at night, no chilling winds or late freezes in there! Seedlings are protected from marauding pests, birds, walkabout creatures. Foothills and inland gardeners get more heat and more COLD! They really can use greenhouses to advantage.

Greenhouse Long CucumbersIn addition to starting preseason transplants, in a heated greenhouse you can grow out of season tomatoes, peppers, lettuces, cucumbers, beans, eggplant, zucchini, cantaloupe! Herbs, chard, raspberries and strawberries! And winter crops too if you just have too much snow outside!

Your greenhouse doesn’t need to be huge or showy. It just needs to do the job.

Super options!

Our land is flat, but yours might have slopes and you could choose to have an earth shelter space complete with indoor shower! See also Heating Greenhouses Without Electricity!

Greenhouses come in a vast variety of shapes from squares to pillowdomes! Buy a premade kit or design and build it yourself entirely to your specs.
You can have a 2′ wide up against the chimney mini to a palatial entire rooftop greenhouse with an elegant view!
You may have a built in the ground greenhouse cousin, a cold frame, or an indoor kitchen window box.

Materials vary from hoop frames to the fanciest filigree and glass, cob or strawbale! They can be spanking new, made of have-arounds, or be recycled from demolition sites! Covering materials can be poly films, panels, glass and glazing. There are so many new products, techniques, new research, all the time, and each person’s needs are so different, it is wise to check these things out for yourself. Talk with several ‘experts’ on each topic. Read up online. Compare. See what you really want. See what will do the best job for your needs.

Barclay Daranyi Greenhouse Hoop House High Tunnel Farming in Norwood CO! Photo by Barton Glasser

Barclay Daranyi uses hoop houses for growing, storage and raising chickens at Indian Ridge Farm in Norwood, Colorado. Photo by Barton Glasser

If you have space for a larger greenhouse, consider gardening some of your crops in it! Hoop houses, or high tunnel farming is a recent invention. They are certainly the larger version of traditional row covers! There are huge commercial installations. Yet home made hoop houses can be no bigger than 8X8, so easy to put up a child can do it! Check out Rodale’s HOOP HOUSES 101

  • Season extension is the #1 advantage. 30 days on the front end and 30 days on the back end of the growing season is equivalent to moving your farming operation 400 miles to the south!
  • Yields increase when your plants are protected from excessive rain and wind. When a more ideal growing temperature is maintained, a reduction in temperature-related stress, fruit set, fruit size increases.
  • There is no bolting, so no loss of your plant’s production.
  • Because temperatures are maintained, you can plant when you want to, not have to wait until conditions are favorable.
  • Soil conditions are more controlled, less moist, less to no fungi – wilts, blights.
  • No pests, no pesticides! No birds, small mammals.
  • Plus, they are movable!

Greenhouse Energy Efficient Attached Lean To
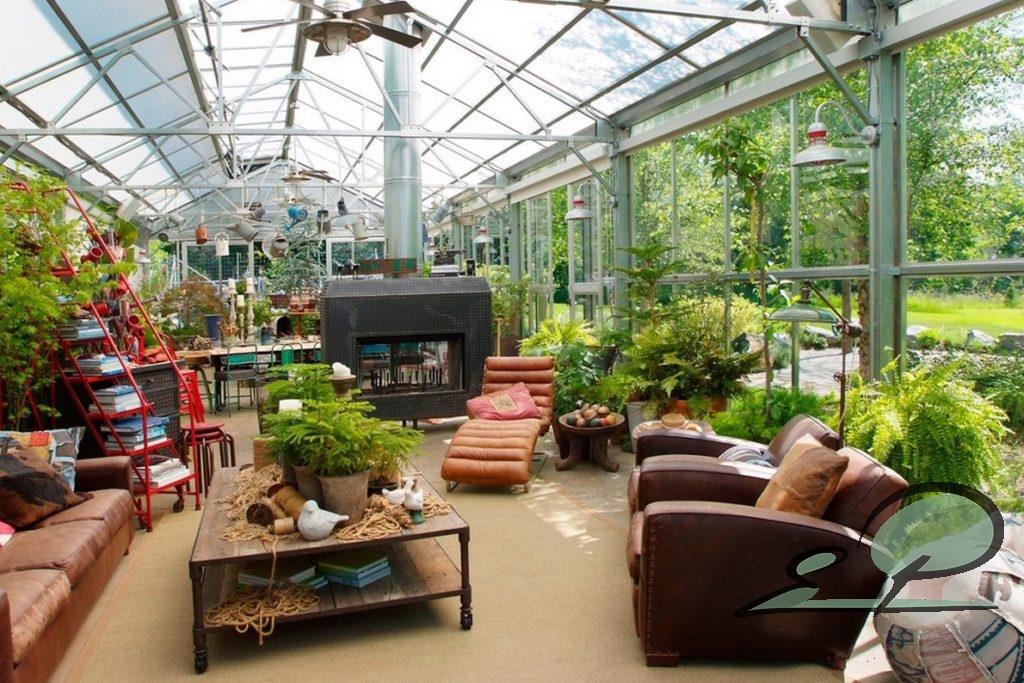
Energy efficient attached greenhouses make a lot of sense. The home, and these bricks, help heat the greenhouse for free! Some attached greenhouses are beautiful walkin sunrooms, garden rooms, conservatories!

If you decide to build a greenhouse yourself, first check on local ordinances and with your neighbors. Place it conveniently, near electrical and water access if possible. Choose a location with a winter angle for maximum light, as much sun as possible. Use trees for windbreaks if necessary.

Know your prevailing wind direction, be sure it is well anchored. Use concrete blocks with eye hook attachments, sink posts or anchoring stakes, or use sand, not rocks, on the windward base cover.

Your roof choice tells us what kind of weather you have! Steep slopes and insulated lower areas tell us you are in high cold country with snow and need to decrease your heating costs. Medium slopes with rounded shoulders are good in windy and rainy areas. An extended slope on one side that faces the sun tells us you may get a lot of shade from trees on one side.

Doors make a difference. If you are in a windy area, you might choose sliding doors that can be secured and weather stripped versus velcroed flaps, zippers or swing out doors that blow away or animals could get through.

Ventilation is key! Hot days are hot! In two shakes a greenhouse can to get up to 110 degrees! Doors and windows can be the vents if intruders are not an issue, otherwise, ceiling vents are best. Solar devices can be set to open when temps hit a high level. Fans may be needed.

Greenhouse sloped for lots more Solar energy!
Electrical!

Get advice from a greenhouse experienced professional because of the extreme conditions: heat, wet, cold. Make sure that person knows local codes
Consider solar lights, vent openers, fans or simply long sloped sides to have lots more solar energy as in the image!
Growlights? Yes!
Night light to see by
Computer monitor

Irrigation tips! Put your timer OUTSIDE! Make & see your adjustments without getting wet! Mini drop down sprayers or foggers at varying adjustable heights along an overhead line are fabulous! Consider recycling your water – is it legal to use grey water where you live? Collect rainwater.

A word about Damping Off. Damping off is a common problem with seedlings started in containers, indoors or in greenhouses. Per Planet Natural: ‘Several fungi can cause decay of seeds and seedlings including species of rhizoctonia, fusarium and phytophthora. However, species of the soil fungus pythium are most often the culprit. Damping off typically occurs when old seed is planted in cold, wet soil and is further increased’ by poor soil drainage.

Disease Cinnamon Damping Off PreventionThe super simplest prevention is Cinnamon! Just sprinkle it on the soil! Sprinkle on plant injuries and they will heal. It is a rooting hormone. Mildew, mold, fungal diseases? Mix 4 tablespoons cinnamon in a half gallon warm water, shake it vigorously, steep overnight. Strain through a sieve or coffee filter and put it in a spray bottle. Add ¼ teaspoon liquid dish soap as a surfactant, lightly spritz your plants, undersides and tops of leaves! (In Santa Barbara area buy it in big containers at Smart & Final.) Also, it repels ants!

Pathway and Flooring best for your plants and feet! Have a sturdy pathway that stands up to wheelbarrow use. A non muddy pathway saves your greenhouse floor. A raised flooring keeps you from having a muddy mess. Drainage is necessary so there is no rot or mold. Heated flooring is the best. There are great options, more and less expensive! Concrete, rubber matting saves your feet. Dirt, my last choice, and/or pavers. Decomposed granite, pea gravel, raised wooden slats, pallets, straw, chips – use weed mat underneath! Use pest protection wire under weed mat and soft flooring choices. No gophers, no mice, squirrels, bunnies or snakes, thank you.

Greenhouse Shelving FanShelves and Worktable

Make your work table a good working height for you!
Shelving needs to be safe and well supported
Construct your shelves wire covered like the top shelves in the image, or like the lower shelves, out of spaced boards so water drains, the boards dry, there is no mildew or mold.
Enough space between boards makes it easy to clean
Or use open wire metal shelving that allows drainage and dries
If there is lower shelving, slant it down from back to front

  • so you can see what is in the back
  • It is easier to get items in back out – keep heavier items to front
  • No water clings to it – stays dry, no rot or mold

OR some say don’t have bottom shelves so there is no nesting space for mice or chipmunks – they WILL eat your plants! You want to be able to SEE the ground! Depends on how critter secure your house is.

Rather than just the greenhouse, consider a 4 part working complex! A storage shed, the greenhouse, a covered work area and hardening off area.

Tool & Gear Storage could hold your tools and supplies!

Wheelbarrow, all tools – shovel, rake, pitchfork, spade fork
Small tools – trowel, clippers, sprayers
Bags of compost, potting mixes etc
Plug trays, biodegradable containers, labels
Gloves, apron, work boots, jacket
Greenhouse gear & replacement materials

Greenhouse Support Supplies!

Heating gear – heaters, heating mats
Cooling systems – fans
Irrigation, misting items
Lighting – grow light, night light
Thermostat, humidity (no mold), temperature   devices, CO2 generators
Secure, safe-for-children and pets, dry storage containers

Your Workspace needs a sun shade top and wind screen side. It would be a good place for your composter, worm bin and might be a good place for your rain collector barrels

Care and Maintenance

Seasonal checks, reset watering needs, replace brittle coverings
Routine cleaning inside and out
Equipment
Sterilize propagation area
Ventilation – Heat, condensation. Insulation – Frost
Deal with pests and diseases immediately!

Greenhouse Reused Doors and WindowsGreenhouses made of reused doors and windows are much more green than recycling!

Sustainable Greenhouses are often compost or solar heated!
They have heated benches and floor because root zone temperatures are more critical to plant growth than leaf temperatures. By maintaining an optimum root zone temperature, greenhouse air temperatures can be lowered 15° F!
LED’s balance good light, cooler temps
Hydroponics (preferably aeroponics) remove excess heat and water vapor
CO2 is recycled by breaking down old plant debris in a digester
Soluble components of the plant debris can be incorporated back into the nutrient solutions.

If you have the budget and inclination, get a fancy beautiful prefabricated greenhouse with all the tricks including that solar activated shade screen, fans and irrigation on a timer!

White Greenhouse

The Ultimate, perhaps, would be greenhouse living, live-in green space!

Зимние сады — проектирование, изготовление, остекление — Елена Федосова
This greenhouse is in Philadelphia, Pennsylvania. Photo courtesy of Groundswell Design Group, by Top Kat Photo

Sustainable Sources to stir your thinking!

  1. Eco-Friendly Greenhouses
  2. Sustainable Architecture, Greenhouse Book & Video List
  3. Kiva’s straw bale greenhouse – the time & money it takes

Rooftop greenhouse with a view of the city! Germany Fraunhofer UMSICHT

Fresh City Tomatoes, Any Time! On his way home from the office, the computer scientist harvests tomatoes from his company‘s rooftop greenhouse. No food miles! Why not produce lettuce, beans and tomatoes where most of the consumers are to be found: in the city? The flat roofs of many buildings are well-suited for growing vegetables. Rooftop greenhouses can also make use of a building‘s waste heat and cleaned waste water. Solar modules can do the rest. This uptown rooftop greenhouse urban garden is in Germany. Image courtesy of Fraunhofer UMSICHT.

Greenhouse Conferences! Tradeshows, sustainable, educational. Local, international! If you love greenhouses, might want to do urban agriculture business, just want to get involved, check these out online. There are different sponsors, different locations each year!

Whatever your special connection is, in SoCal, before our winter rains and cooler weather, late summer, early fall are perfect for getting your very own fine greenhouse up and running! If you miss that window, very early in the new year is good so you can start seedlings for early March plantings!

You might decide to sleep in it the first night!

See also Heating Greenhouses Without Electricity!

Updated 11.26.21


Love your Mother! Plant bird & bee food! Think grey water! Grow organic! Bless you for being such a wonderful Earth Steward!

The Green Bean Connection started as correspondence for the Santa Barbara CA USA Pilgrim Terrace Community Garden. All three of Santa Barbara’s community gardens are very coastal. During late spring/summer we are often in a fog belt/marine layer most years, locally referred to as the May grays, June glooms and August fogusts. Keep that in mind compared to the microclimate niche where your veggie garden is.

Read Full Post »

Thomas Jefferson was a gardening enthusiast, but his passion for growing food went beyond his own backyard. Apparently he believed that America was incapable of true democracy unless 20 percent of its citizens were self-sufficient on small farms. This would enable them to be real dissenters, free to voice opinions and beliefs, without any obligation to food producers who might hold their survival at stake. ~ Katherine Martinko

Container Carrot Patio Planter Haxnicks

x

x

You can start with any container you wish right outside your door, upstairs or downstairs, on the roof, for the freshest tasty organic veggies! (Haxnicks container)

x

x

x

x

x

xVegTrug Stand Up Gardening bed for people with disabilities

Winner of the 2012 Green Thumb Award for Outstanding New Product, the Vegtrug’s back-saving design allows you to garden while standing. Bad knees, bad back? No problem! Get outside, raise your spirits, improve your health! There are no age limits to veggie gardening!

x

Container Wall Cans! Any fence or wall will do!

x

x

x

Any wall or fence will do! Be creative!

x


x
x

x
Creative Container gardening on your Balcony!x

x

Garden anywhere! The Balcony is perfect! Every which way but loose!

x

x

x

x
On the ground Strawberries Pallet Gardenx

x

x

x

Strawberries in Pallets on the ground…

x

x

STRAWBERRIES, LOTS OF STRAWBERRIES! Overhead planted in rain gutters!x

x
…to Rain Gutters overhead!

x

x

x

x

x
x


Residential Tower Gardeningx
X


Grow Fast food in space saver Tower Gardens at home, to feed the homeless, at the office or hospital!

x

x

x

x

LA Veggie Roof Garde, architect Norman Millar’s Arkhouse

x

x

At owner/architect Norman Millar’s Arkhouse in the Los Angeles area, the rooftop veggie garden gets plenty of SoCal sun in between polycarbonate panels. Photo: Robin Horton.

x


It’s a “liberating DIY revolution,” as writer Megan Mayhew Bergman calls it. In her article “Democracy needs gardeners!” which is an inspiring call for Americans to dig up their lawns, convert empty spaces, and utilize available windowsills, Bergman urges Americans to start gardening as an act of patriotism.

The Back 40 or a gorgeous Food Not Lawn front yard! Do it!

Food Not Lawn Vegetable Garden Front Yard

Guerrilla Gardening has changed the face of many a landscape, raised neighborhood pride, and often feeds many!

Neighborhood Guerilla Garden Before After

Started in 2009, Seattle’s 7 acre, 2.5 miles from downtown Seattle, Beacon Food Forest includes an Edible Arboretum with fruits gathered from regions around the world, a Berry Patch for canning, gleaning and picking, a Nut Grove with trees providing shade and sustenance, a Community Garden using the p-patch model for families to grow their own food, a Gathering Plaza for celebration and education, a Kid’s Area for education and play and a Living Gateway to connect and serve as portals as you meander through the forest. It’s all done by volunteers and the food is free for foraging!

Small to large, Community Gardens, often urban, but not always, give landless apartment dwellers, children, disabled and seniors the blessed and grateful opportunity to garden, enjoy the outdoors, events – weddings, concerts, art exhibits, share friendship, learning and beauty with each other!

Urban garden, Fort Mason Community Garden, San Francisco, CA

Urban Community Garden, Fort Mason, San Francisco CA

Per the GrowNetwork.com: Only a few generations ago, our recent ancestors all kept their own seed supplies. I’m not talking about ancient history… I’m talking about your great-grandparents. They traded their favorite seeds with their friends and neighbors, and they passed on the best seeds to their children. In doing so, they bred vegetable varieties that were tailor-made for their local climates. And they maintained a healthy level of genetic diversity in their food supply.

Seeds Jars SeedsavingIt’s important we do the same! SeedSaving is as simple as collecting seeds from your best plants. Over the fence seed trading has always been done. These days it can be buying from online seed houses, seed exchanges, like Southern Exposure that intend to preserve heirloom plants. You might trade seeds online like at Seed Exchange – GardenWeb! You may want to contribute to a Seed Library 
or get started with free seeds from a Library. Santa Barbara CA’s Foodbank offers free seeds and instruction to people in need to help them grow their own food! Local annual Seed Swaps are usually held in January so gardeners can plan their gardens, have plenty of time to start seedlings for spring planting.

Seeds are a precious resource. Take good care of them. In any natural disaster, they are the first thing I would take with me other than my dog! If you are political, work to secure our right to have non GMO seeds and the right to collect our own seeds.

National Heirloom Exposition Santa Rosa CA 2016

Uncommon and common EVENTS! Local and international festivals, presentations, symposiums, exhibits and more! From Permaculture to rainwater catchment – graywater, soil building, seed gathering trainings, garden design, container gardening to farming, community gardens, vertical gardening, local food, edible flowers, bees, pests & diseases, organic, perennial vegetables, sustainability, to research! And then there are your favorite veggie & fruit festivals, the Gilroy Garlic Festival, The Avocado Festival, Pumpkins, Apples, Strawberries, Tomatoes! All bring out our very best and inspire more conscious gardening!

In the US, the National Heirloom Exposition in Santa Rosa CA is September 6th, 7th & 8th, 2016. There will be over 100 national and internationally acclaimed on-topic speakers. You can learn and grow with some of the top names in the pure food movement and young people speakers from age 17 up! Three Day Pass only $30, kids 17 and under free! 3 Days isn’t really enough! Three proud sponsors include the City of Santa Rosa, Baker Creek Heirloom Seeds and Mother Earth News!

The terms Permaculture, then Food Forests/Forest Gardening, have come into use. They have changed the ways gardeners approach gardening and their interactions with each other! Simply put, permaculture is the development of agricultural ecosystems intended to be sustainable and self-sufficient.

Forest gardening is a low maintenance sustainable plant-based food production and agroforestry system based on woodland ecosystems, incorporating fruit and nut trees, shrubs, herbs, vines and perennial vegetables. Making use of plant guilds, companion planting, these can be intermixed to grow in a succession of layers, to build a woodland habitat. Forest gardening is a prehistoric method of securing food in tropical areas. In the 1980s, Robert Hart coined the term “forest gardening” after adapting the principles and applying them to temperate climates. (Wiki)

The keyword here is sustainability! It’s a contribution to the planet. It makes living here a good quality option for our children. This is a revolution that makes sense and is well worth fighting for! Plant seeds today!

San Francisco Permaculture Guild Man with outspread arms standing in Mustard taller than he is!SAN FRANCISCO PERMACULTURE GUILD BLOG

Take super good care of yourself and your loved ones. Fuel your body, mind and Spirit with the very best!

Back to Top


The Green Bean Connection started as correspondence for the Santa Barbara CA USA, Pilgrim Terrace Community Garden. We are very coastal, during late spring/summer in a fog belt/marine layer area most years, locally referred to as the May grays, June glooms and August fogusts. Keep that in mind compared to the microclimate niche where your veggie garden is. Bless you for being such a wonderful Earth Steward!

See the entire July 2016 GBC Newsletter!

Read Full Post »

Vegetable Gardening Gone Vertical - Trellis of beans and cucumbers!Beautifully done bean, eggplant and cucumber container combo from digginfood! On the ground, use a bigger trellis and weave those cukes up on the trellis, get them off the ground, and/or lay in 1″ deep straw mulch, to avoid wilts, reduce insect damage, and have clean harvests. Plant radishes in front to deter Cucumber beetles!

It seems like there is never enough space for Summer Veggies! Depending on how and where you go Vertical, plan ahead, think it through! Your water source, and how water will be delivered. Will electricity be available for a timer, will you set up a self watering system, or is it you and your hose? What about sun and shade, rain and wind? How much space will each mature plant take?

When choosing your materials, details to know:

  • Peas have tiny tendrils that grab onto things, even other plants that grow upright. Beans have no such constraints! The entire vine will grow around and through openings. If you want something that serves for both kinds of plants, choose something wiry and small so the peas can live there too!  Peas are SoCal winter plants; beans are summer.
  • Oh, and think about harvest – can you get that cucumber through the opening? A lot of wire fencing just doesn’t have openings a size you can conveniently get your hands through to tend your plant.  Think remesh.

Trellises & Cages! The old fashioned standards! Stick them in the ground or in your container, or across several containers! Anchor well, plant beans, peas, cucumbers, tomatoes, even melons, to your happiness! Cucumbers below, beans growing through them to the remaining trellis space above! Trellises can be A-framed, or bent to an inverted U shape – run your melons up and over it, plant summer lettuces in the shade underneath! Cages can give a lot of support to big plants like indeterminate tomatoes. And you can buy them pretty now, in vibrant colors! Or, buy 2 panels of 4′ X 7′ remesh and bind them together lengthwise into a 2′ diameter cylinder. Or stagger and bind them together to make a taller trellis lengthwise.  Those will hold a lot of plant, one huge indeterminate tomato or a passel of pole beans or peas, so anchor them well in case of a major wind.

Fences – a sunny openwork fence is the next best thing to a trellis, and you don’t even have to anchor it; it’s already up! If the fence is not openwork, use some ‘S’ hooks and hang some remesh or wire fencing for your plants to climb. When the season is done, carry the remesh or whatever you got as a climbing frame, over to the compost pile and remove the finished plants. Put that wire right back up and plant again!

Arches & Arbors These are lovely, providing cooling shade over your patio or deck, or adorn the entrance to your home or garden area. Grapes are classic and oh, so, tasty! But you can do all kinds of fancy, pretty, specialty gourds as well. Add a couple of climbing roses for scent and beauty! A scarlet runner bean or two are superb accents!

Containers! Tons of options!
  • Put tall plantings in raised pots behind medium and short plants in graduated sizes in front.
  • Railings of balconies or decks are terrific for those specialty boxes made to fit. Concerns are water rotting the wood, or what the water drips on. You could put flowering herbs there, Mediterranean plants that need less water. Keep them trimmed by using them frequently, for yourself, and for gifts.
  • Traditional hanging container gardens – baskets, pots, boxes, but nowadays, reused plastic bottles too! Be sure they are wind secure, won’t damage any nearby structures. Know where the water is coming from and where it is going! Put water lover plants under the hanging containers to receive overflow from above. Water more frequently due to drying out sooner. Anticipate that a large plant will shade others when it grows bigger….
  • Vertical grow columns! These come in many forms. Be sure they are well anchored. Install your water and feeding system, soil, plants, and grow, grow, grow! Great for lettuces and strawberries.

  • See these superb examples! Container Gardening, Garden Anywhere!

BioWalls! In a manner of speaking, a wall garden is nothing more than a fancy container garden! Make your structure with openings the size to accommodate your plants’ containers. Set in your water and feeding system. Put in containers that fit into the openings! Add your planting mix, and plant! Voila, a vertical wall garden! You can take containers out to conveniently tend your plant, exchange for another. Clearly, there needs to be enough space between plants so they don’t damage each other when you take them out, return them. Make them your height so you can easily reach them to tend them. If your biowall is going to be a feature, know it will need a little more tending to keep it attractively vibrant.

Shelves are simple! No saggies! Use adequate support and use materials that won’t endanger your plants by sagging half way through the season. Instead of using one wide board, lay on 3 to 5 narrow boards side by side, on edge if possible, about an inch apart – that’s for drainage and drying so your wood doesn’t warp and rot out. Or, tilt the shelf/shelves slightly, down in front, away from the wall of your house if you are doing the shelves against your home, so the water drains off and away from your home. Leave a little airspace between the shelf and your home for air circulation. Wire racks, like old refrigerator shelves, make terrific shelving. Drier conditions keep mildews, molds, bacteria and fungi from forming. Keep your plants disease and pest free for successful harvests.

Untreated pallets! What fun! Usually you can get them for free! Stand them on edge, throw in some peat and soil, maybe some straw, plant both sides! Put them where you want them. Move them anytime, per season, or not at all! True space savers. Planting in Pallets! Why and How!

Roof! How vertical can you get?! Be safe. Water is heavy. Can the structure support it? Is it ok with the owner. Where will excess water go? Anchor plants well – no flying plants!

As one blogger says, ‘…believe me, with a little love plants can grow just about anywhere and on anything.’ Tis true.

Updated 11.13.20

Back to top


Love your Mother! Plant bird & bee food! Think grey water! Grow organic! Bless you for being such a wonderful Earth Steward!

The Green Bean Connection newsletter started as correspondence for the Santa Barbara CA USA, Pilgrim Terrace Community Garden. All three of Santa Barbara city community gardens are very coastal. During late spring/summer we are in a fog belt/marine layer area most years, locally referred to as the May grays, June glooms and August fogusts. Keep that in mind compared to the microclimate niche where your veggie garden is.

Read Full Post »

February! SOIL & SEED Month!

Please see February 2010 for tips on aphids/white flies, slugs/snails, gophers, soil, seed starting basics! 

When there are warm days, it is ever so tempting to plant up summer veggies!  Don’t do it.  Not yet.  Start seeds. 

Depending on how much space you have, plant a last round of your very favorite winter crops – lettuces, beets, broccoli, cabbage, carrots, cauliflower, celery, chard, kale, kohlrabi, potatoes, radishes, turnips.  Bare-root asparagus and artichokes.  I forgot to tell you last month, you could start zucchini!  At Pilgrim Terrace Community Garden we had an elder gardener who always started his in January, early February, and had great zucchini way before everyone else!  Other than zuchs, really look at those days to maturity, and add the number of days you expect for harvest duration.  If you plant a long maturing plant that would be harvested for some time, think if you would rather have that space for an early round of a summer veggie you love more.  Choose mildew and disease resistant varieties for your late peas.  

Keep sidedressing your producing plants, protect your tasty lettuces from slugs and snails.  Keep watch for aphids, and, if you disturb your plant and a little cloud of white things fly off, you have white flies.  Spray those little buggers off asap so they don’t spread to your other plants or someone else’s!  Keep up with your harvesting.  Wait until it warms up some more to prune frost damaged plants.  Even wait until next month to fertilize.  

But do prepare your soil for March summer veggie planting.  Dig if you must – I’m a no-dig, no weed person who leaves the living soil structure intact [see Gaia’s Garden, 2nd edition, chapter on soil].  Instead, prepare your soil by layering good stuff on top, called Lasagna Gardening, sheet composting, composting in place, or on-the-ground composting!  Garden smart!  If it is already there, you don’t have to move it from the compost pile to where it is needed!  Build your soil in place or in your new raised beds!  If you are putting raised beds on top of your lawn, lay down several layers of heavy cardboard first, to stop the grass and weeds, thoroughly soak it, then layer, layer, layer!  When they get there, your plant’s roots will easily poke their way through the cardboard.  Definitely attach gopher proof wire mesh to the bottom of your raised bed frame before you start filling it, unless you are creating your garden on top of concrete or a roof.  If you are container gardening, check out Patricia Lanza’s book Lasagna Gardening for Small Spaces: A Layering System for Big Results in Small Gardens and Containers: Garden in Inches, Not Acres. 

Healthy layering should be 2 dry/Carbon to 1 wet/Nitrogen. 

Carbon – carbon-rich matter (like branches, stems, dried leaves, peels, bits of wood, bark dust or sawdust, shredded brown paper bags, coffee filters, conifer needles, egg shells, hay, peat moss, wood ash) gives compost its light, fluffy body.
Nitrogen – nitrogen or protein-rich matter (manures, food scraps, leafy materials like lawn clippings and green leaves) provides raw materials for making enzymes. 

  • Lay twigs or straw first, a few inches deep. This aids drainage and helps aerate the pile.
  • ADD dry materials – straw, leaves and wood ashes. If you have wood ashes, sprinkle in thin layers, or they will clump together and be slow to break down.  Fine chopped, smaller materials decompose faster.
  • Lay on manure, green manure ( clover, buckwheat, wheatgrass ) or any nitrogen source. This activates the compost pile and speeds the process along.  Put on rinsed seaweed for minerals, scatter some yarrow sprigs to further speed decomposition, and, of course, your kitchen food waste. 
  • Think how that pile is going to decompose lower and lower.  Build enough layers to get the amount of soil you need.  Could be 18” high.
  • If you like, sprinkle some microbe rich topsoil over it all to ‘inoculate’ with living soil organisms that will immediately go to work.  Add a few handfuls of red wriggler compost worms.  Add any other amendments that make you happy.
  • Install some pathways.  Don’t walk on your oxygen rich breathing brew and squeeze the life out of it, or crush your worms and soil structure!  Keep things fluffy for good soil aeration and water absorption.   
  • If you need to, for aesthetic reasons, cover the compost with a pretty mulch that will break down slowly.  Spread it aside when you are ready to plant.  It could be down leaves; if you need your soil in that area to be slightly acidic, cover with pine needles (strawberries).
  • If things get stinky, add more carbon.
  • You want to plant NOW, or the same day you layer?  Can do!  Or your instant soil wasn’t so instant?  OK, here’s the instant remedy.  Make planting holes in your layers, put in some compost you purchased or have on hand, mycorrhizal fungi, and plant!  The rest will catch up, and the heat from the composting material underneath will warm your plants!  You WILL have a fine garden!  

If you do also need a traditional compost pile for spot needs, consider “No-turn” composting!  The biggest chore with composting is turning the pile from time to time. However, with ‘no-turn composting’, your compost can be aerated without turning.  The secret is to thoroughly mix in enough coarse material, like straw – little air tubes, when building the pile. The compost will develop as fast as if it were turned regularly, and studies show that the nitrogen level may be even higher than turned compost.  With ‘no-turn’ composting, add new materials to the top of the pile, and harvest fresh compost from the bottom of the bin.

So here are 3 ways to save garden time and your back!  1)  No digging!  2)  Compost in place, no moving it.  3) No compost turning!  Uh huh.

Read Full Post »

First of two posts!   See 2nd post, 4.22.10
Clever Space Saving Strategies for Your Urban Garden!             

To some, a 10′ X 20′ Community Garden plot is daunting, to others it is not near enough space!  To get a tasty variety and enough production to keep your table steadily supplied all year, to have some to put in the freezer or can, here are some tips we Community Gardeners have learned to up our production!          

Plan Ahead for Scrumptious Returns!

Plan ahead for 3 seasons, maybe even four:  a cool-season crop, a warm-season crop, and then finishing with another cool-season crop. Careful attention to days to maturity for each crop grown will establish the ideal rotation period.

Raised beds without framing—plant on top and sides. Higher yield than on flat ground.  

Companion Planting—some plants actually kill others or stunt their growth. Onions stunt peas, but others thrive with each other, i.e. carrots enhance peas!   

Stacking—does your plant serve multiple functions, table food, fiber, dye, herb.   

Layering—  

  • Put plants under each other at different levels, lettuce that may need summer shade under a taller plant, or used as a trap plant for Brassicas.
  • Classic radish, carrots combo—short fast growing radishes dovetail nicely with long slow growing carrots!
  • Start plants that will succeed another, for example, beans after peas, while the peas are finishing, you plant your beans at their bases.
  • Interplant fast maturing crops such as lettuce, spinach and radishes with slower crops such as beans, squash and melons. By the time the slow crop grows to fill the space, the quick crop will be harvested. Or beans, radishes, green onions, spinach, or leaf lettuce may be planted between rows of tomatoes, peppers, cabbage, or corn. 

Go Vertical!  

  • Trellising, cages, staking, using fences – peas, beans, cucumbers, melons.
  • Pole beans versus bush beans = more beans for a longer time!
  • Plant different varieties of the same plant that mature at different times, or entirely different kinds of plants, on either side of your trellis. They can grow simultaneously, but give a more continuous supply from that area of your garden.

On the other hand, for more variety, today’s gardener can also choose select bush varieties of beans, cucumbers, melons and squash that require much less space than standard varieties. For example:  

  • Little Leaf Cucumber: This compact plant variety got its name because its leaves are only half the size of regular cucumber leaves.
  • Burpee’s Butterbush Butternut Squash: These plants only need 1/4 the space that traditional sprawling winter squash varieties need. About nine square feet is as much space as this plant will need in order to produce its bell-shaped fruits. This variety also matures relatively quickly and produces 1 1/2 pound butternut squashes about 75 days after you seed it. 

Maximum production will require that you disregard standard row and plant spacing and utilize wide rows or beds for planting. For instance, seeds of many crops, such as leaf lettuce or beets, can be broadcast in a bed 1 to 3 feet across and thinned to obtain proper spacing—tasty little greens for your salad! Other crops, such as cabbage or broccoli, can be planted closely in wide rows so that their outer leaves will touch one another when the plants are about three-fourths mature. These tender thinnings can be stir fried or steamed! These methods reduce space wasted as aisles, and often provide such dense shade that weed growth is inhibited and evaporation of soil moisture is reduced.   

Container Garden, a Plot in a Pot! Hang baskets in tiers, on hooks on your fence, hang window boxes on your balcony, from a balcony – see images! On your roof, up your wall, on your deck. Grow lettuce and herbs in your windows! Use shelves. Espalier fruit trees. Mix veggies among ornamentals around your property. Although tomato and cucumber plants are the ones most commonly grown upside down, a wide assortment of plants can benefit from upside-down gardening, from vegetables to herbs and a variety of flowers.  

Hay Bale Garden
  • Consider a Hay Bale Garden!  One gardener says ‘You can grow so much in a hay bale garden – lettuce, peas, flowers, strawberries and much more.  Don’t limit yourself to planting just the top – tuck edible nasturtiums, creeping thyme or fragrant alyssum into the sides.’  Total instructions by Rose Marie Nichols McGee, co-author of Bountiful Container! 
  • Although tomato and cucumber plants are the ones most commonly grown upside down, a wide assortment of plants can benefit from upside-down gardening, from vegetables to herbs and a variety of flowers.

Plant smart!  May you have many healthful and muy delicioso meals! 


Read Full Post »