Feeds:
Posts
Comments

Posts Tagged ‘alfalfa’

Climate Crisis Food Occidental Arts & Ecology Center Sonoma CA US

The Occidental Arts & Ecology Center (OAEC) is an 80-acre research, demonstration, advocacy and organizing center in Sonoma County, California. We live in a time of profound challenges that require immediate, courageous and strategic responses. We are confronted by global ecological and climate crises… OAEC supports diverse communities to design their own regenerative systems at the regional and local scale. OAEC supports change makers and communities to design for a resilient future.

There are other organizations like this one that are helping us plan specifically for our areas. Sometimes the processes of one situation can be used as a template, adapted for another area, the basic premises, sequences holding across the board.

July 2019 Kollibri Terre Sonnenblume’s latest article was published. The title reads: Our Veggie Gardens Won’t Feed us in a Real Crisis As things stand right now, for most of us he’s right.

As Veg Gardeners we are emissaries to all who would grow food! In a serious crisis, our skills may be called on to feed many people. Kollibri’s provocative article makes you think about how important our growing can be in these times of extreme climate situations.

Some of you may be permaculturists, already knowing about collaboration with the land, sustainability, self-reliance, having multiple support/backup systems. Others of you may be rank gardening beginners. Most of us are in progress. We need you all!

Kollibri’s experience is his. There are many stories to be told, many responses possible. Some of my thoughts and responses include:

  • Select safe land for your growing space carefully for the long term. Anticipate what changes you can, timing as possible. Have a backup plan in mind. Yes, there will be unanticipated events – a microburst storm, a devastating foreign insect coming through, huge hail where it hasn’t happened before, others.
  • Change your diet. In a crisis you might expect to let go of meat, diary, and grains, or reduce your intake dramatically. Instead of beef, raise fish or other animals, perhaps. Maybe your choice will be animals that provide milk and fur. How about chickens? They poop manure, scratch, eat insects, make eggs!
  • Learn about soil. Check out the soil chapter in the book Gaia’s Garden!
  • Plant efficient per square foot plants. Our small 10X20 Community Garden plots teach us that. Those plants can be high producers like zucchini, plants that produce prolifically all season long, or cut and come again types like lettuces and kales. In summer string beans are super producers – broad beans and long beans give you more bean for the space they take up!
  • Plant Perennial plants, like Tree Collards, for continuous crop all year and year after year.
  • If you have cold winters, plant potatoes that store well. In summer plant winter squashes that store well in winter. Set up an in-the-ground greenhouse to equalize seasonal temps.
  • Learn about Succession Planting. While one plant is growing, plant another round. Some plants are started every week.
  • Learn about Seed Saving so you allow time and space for that type of production as well.
  • Plant year round habitat for birds to keep pests down, and for bees and other pollinators to keep pollination going.
  • Check out what the indigenous ancestors in that area survived well on. Restore some of that process. It could be an efficient food/garden forest. Could be ‘Tending the Wild,’ using edible native plants, as Kat Anderson writes about. If your land is hilly, terracing is a phenomenal and beautiful technique. If your land is flat, build bioswales to collect water, hold moisture.
  • Plant plants that have over-the-top nutritional value like fast grower Garden Purslane, pur·sluhn, aka Verdolaga south of the border.
  • If you are planting for a family, consider the special food needs of children, people who are ill, elders. Plant herbs for medicine.

The Gardener’s New Emergency Kit Bag!

SEEDS  A gardener’s emergency kit bag is a little different! It likely includes important select seeds for all seasons in an airtight container! Select some productive fast growers, like lettuce and radish (has edible leaves too), and ones of plants that produce all season long. Select bush and pole beans, determinate and indeterminate tomatoes. Select heat, drought and cold tolerant plant seeds. Some will grow earlier crops that produce in cool weather! Some survive heat, grow later and more healthily in fall. Some will survive frosts, even freezing. Be sure to have seeds for all seasons. Some areas, especially flooded areas, it isn’t recommended to grow edible plants there for at least one full season, so you need access to fresh soil and to be prepared for every season. Remember, you won’t be the only hungry people. Take as many seeds as possible. Seeds for flood soil restoration. Seeds for sprouts!

SOIL  If you anticipate you would need ‘soil,’ whether you would be able to leave in a vehicle or intend to stay where you are, keep a couple or more bags of fresh clean compost around at all times. You can plant directly in compost. Remember, kitchen scraps can be processed to be used to make more compost. Think about including a lightweight folding shovel in your emergency kit.

What if you live in an apartment? Growing food in a north facing window system would be a challenge – not enough sun. If you have power, set up some grow lights. These days, thoughtfulness about your directional window placing could become vital. Install  window solar power devices for when your power is off! Many a fine container garden has been planted in windows, on balconies, along the stairs, on the walls, a pallet leaning against the wall, in hanging baskets, on trellises made of strings or wire. Creativity abounds! Also grow tasty high protein sprouts!

Weather Crises are now unpredictable. The modern survivor needs to be prepared for any kind of emergency at any location, at any time.

IN a Crisis situation, burning heat, a water wipe out, an extended freeze, it’s over. What do you do? In a worst case scenario, there may no longer be a nursery or transplants at it. Most crops planted from seed take two+ months to get into production. Lettuce/Microgreens are really fast, but even they take about two weeks minimum. Radish, an incredibly fast grower, takes about a month. Transportation may be an issue. You may need to migrate to land that has plants to forage. Carry your lettuce plantings with you – wagon, cart, bicycle, grocery cart, sleep with them to protect them. You may become vegan for a while. You may not be happy, but you won’t die, probably will lose some weight! Succession planting becomes a necessity.

Always have an emergency backup supply of dry food for until your new plants become available to eat. Be sure your food supply takes up little space and weighs little. You want to be able to carry it comfortably if need be. In airtight/waterproof bags pack: Jerky, nuts, the least bulky dried vegs and fruits. Make a trail mix of nuts for protein and dried fruits that are high in Vitamin C: Raisins, Peaches, Pears, Bananas, Apricots, Longans, Litchis, Cranberries. Include trail bars that don’t melt or freeze. Keep a ready lightweight waterproof backpack.

Heat – Maybe Drought, Fire

In a serious heat situation you may need to migrate north to a cooler higher land or coastal land with access to clean water. Plant right away in a sheltered, perhaps shaded area, use shade cloth if you can get it, branches if you can’t. Choose a north facing slope for less sun. If there is no slope, build one as you can. Put up porous windbreaks to slow drying wind. If the soil is sandy, compost, compost, compost for water holding capacity. Bring seaweed from the ocean if you are coastal. Mulch to cool down the soil. If it is windy, put shade cloth, heavy branches, stones or other cover to hold the mulch in place, especially if your land is sloped. The Zuni used ‘gravel,’ handpicked pebbles as ‘mulch’ in their waffle spaces. Use the old Zuni humble technique of Waffle gardeningThey knew how to garden in heat! If planting in trenches, make them deeper and at right angles to the Sun’s path to take advantage of the shade the sides of the trenches make.

Simplest and cheapest is to set up an underground greenhouse to equalize seasonal temps. Make it the right size for your needs. Dig it right into the side of a hill or slope if possible. You want that shade and shelter for both you and the plants. Check online for the pros and cons of building bank barns for your animals. Bank buildings can be improvised to suit a temporary immediate need, or planned to the inch if built for long term use… Fastest and next cheapest are Hoop houses! See Growing Super Veggies in HOT, Drought, Desert Areas!

In the most urban situations like New York City, use those balconies, the rooftops, a window! Just be sure the balcony or roof will support the additional weight of soil and water. Whenever you rent choose a place that has 8 hours of sunlight. Wherever you plant, choose highly productive plants per square foot. Pole beans on a trellis! Bush Zucchini. Cut-and-come-again plants like chard, celery, lettuce/microgreens, kales. Chard, celery and lettuce need a lot of water. Otherwise, choose plants that are heat and drought tolerant.

Greenhouse Walipini Pit Interior

Walipini Pit Greenhouse! How a Walipini works and how to build one!

Great tips here: Underground Greenhouse Ideas: What Are Pit Greenhouses

In the long term, plant more trees like fast grower legume trees that feed the soil and cool the Earth. Plant them in Bioswales that hold moisture. The trees make shade, hold even more moisture, secure the soil with their roots. If possible, start where there is an initial water supply.

Climate Crisis Food Bioswale Duarte CA by BlueGreen Consulting

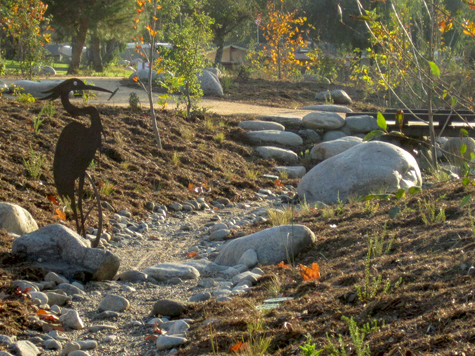
Beautiful Nature Walk Bioswale at Dawn, Duarte CA by BlueGreen Consulting

Flood

This is no longer new to us, but it’s a dramatic example. 7.23.19: Less than a month after New York City declared a climate emergency due to a heat wave, the reality of the crisis came crashing home Monday as streets across Brooklyn and Queens were inundated with dirty water flash flooding a day after power went down in three boroughs. These New Yorkers aren’t going to be growing much of their own food right now. But, do what you can! Use those balconies, the rooftops, a window that receives sun. A LOT can be grown in small spaces! Choose apartments wisely – sun facing in case you need that sun.

Climate Crisis Food Flood NYC July 2019

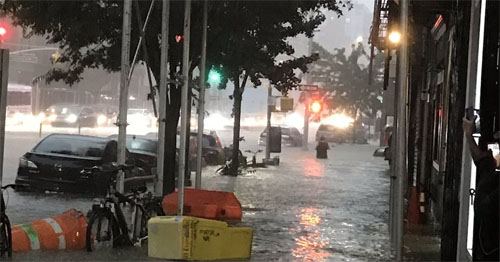
July 2019 NYC: Heat Wave, Blackouts, Flood back to back.

Some consider floods to be worse than droughts. Flood soils are dangerous, mask and gloves needed when you do remediation. You may not be able to grow edible plants there for at least a season.

You don’t want to plant in low areas after a flood. There are sewage, oils, plastics, garbage, disease in that water – likely Giardia, sometimes dead animals and humans, their fecal matter, fecal matter from nearby animal/chicken farms. Afterwards there are decaying materials. The soil that remains may be infected for a long time to come. Your first tactic would be to plant quick growing detoxing grasses, sunflowers and other plants that remove crud. Grow plants that reach deep into the soil and loosen its structure. Turn the soil to off gas toxins and so dangerous soil organisms will dry and die. Incorporate fresh clean compost. See more ideas

If your veg garden got flooded, here are some important tips. Shasta CA Master gardener Leimone Waite gives good 2023 information! West Virginia U Extension Horticulture Specialist Lewis Jett has further advice. Adapt these informations to your area.  

Planting in lowlands, below dams or water barriers, may not be the wise choice these days. An unusual amount of fast high water can blast right through these structures. The face of agriculture is changing. Grains and corn may become unprofitable choices, equaling less beef, higher prices. Water may bring silt and fertile soil or fast flooding may wash away all the topsoil leaving nutritionless, even dirty, soil. For your personal situation, choose higher land. If needed, protect it with terracing, done with a combination of bioswales and Hugelkultur. Choose the cleanest soil you can find to plant in.

Soil Restoration Please see this List of Phytoremediation Plants Used to Clean Contaminated Soil. Alfalfa grows quickly. Sunflowers take longer but are pretty. Willow trees. Per Anita B. Stone ‘Indian Grass is one of nine members of grasses that assist in phytoremediation plants. When planted on farmland, the reduction of pesticides and herbicides is significant. This list also includes Buffalo grass and Western wheatgrass, both capable of absorbing hydrocarbons from the land.’ Be sure to grow grasses appropriate to your location, native grasses if possible. Put some alfalfa and grass seeds in your emergency kit!

Three things are important! 1) Install a ground cover of water absorbing plants to detox the soil if you must replant in areas that have flooded. 2) Plant quick growing legume soil feeding plants and trees to feed and restore the soil. 3) Include plants that will grow deep and break up that soil, that make breathing airways for soil organisms that will help clean up the soil. Oats are good.

Climate Crisis Food Cincinnati's Rapid Run Park Bioswale Slow Sink Spread Water

Rapid Run Urban Bioswale, Seven Hills Neighborhood, Cincinnati OH  The learning curve was steep…

In the long term, in non-urban areas, or urban areas that are interspersed with land, build bioswales that interrupt stormwater flow and divert it to areas that need water! Interrupt flooding with many bioswales – just like in nature. Remember these words: Slow, Sink, Spread! Put rough big materials in the bottom to slow that water down so it has time to sink. Cleverly make that bioswale curvy – install ‘S’ curves, to slow that water down! Make side branches, bulges along the way, and deltas to spread that water. Again, make generous stormwater retention ponds along the way.

A big 2¢ worth from Cornell! Woody Shrubs for Stormwater Retention Practices

China is building 30 ‘sponge cities’ that aim to soak up floodwater and prevent disaster

Freezing or an Extended Period of Exceptional Cold

Climate Crisis Food Freeze Extended Exceptional Cold

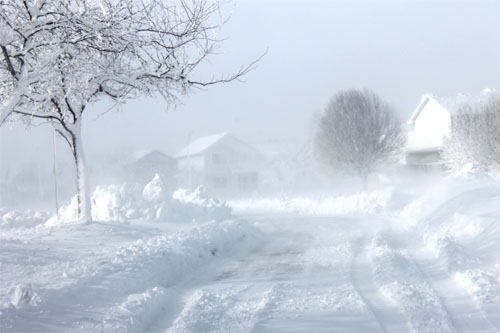
There may be no snow plow, cell service; electricity may be out. It’s not safe outdoors for humans or pets, farm animals, livestock. Fishing at the lake through an ice hole may be all that’s left, IF you have a lake, if it has fish…

In an immediate situation, a southern migration may be in order, preferably to land with a clean water supply. If you stay, go Vegan, at least temporarily. Building a greenhouse may be a challenge. We want warmer, to reduce wind chill. The ground may be frozen, so no underground greenhouse yet. But you can build along a south facing slope, even a snowbank! If there is no slope, build one. Gather and pile up any materials at hand. Make the face from wood panels, plastic sheets, old windows, even logs and branches can do the job. At each side put up permeable wind barriers that make a U shape with your ‘greenhouse’ and let the area inside the U warm up. Use any reflective materials you can find to reflect heat onto your greenhouse.

In the long term, well in advance, build a greenhouse. Such a greenhouse can be built in the ground during summer months when the soil can be worked. Homesteaders in -40° weather, used their garage and came to two prime conclusions. #1 is Insulation! No surprise. #2 was their water tanks, a thermal mass that kept their water buckets near the tanks from freezing solid! They needed water for their plants! You can put in stoves, showers, sleeping quarters! Store foods you want to be cold well away from the stove area. Clearly, light is needed. That’s why a greenhouse against a slope or a mound you make is a practical idea. The south facing side can have light allowing material slanted against it steeply enough the snow falls down. If you want to collect it to make water, all the easier. Depending on what you want to do, snow can act as insulation. See excellent tips at SF Gate: How to Keep a Greenhouse Above Freezing. When you can, install a self-sufficient Solar Power System for energy to keep your plants warm, lighted and growing.

Green Sprouts in the Canadian Arctic A unique “Green Igloo” project is helping grow fresh vegetables in a remote Inuit community! The 42-foot growing dome, built in modular sections, can handle seven feet of snow and winds up to 110 miles per hour.

Keep extra bags of compost/manure, to plant in while soil isn’t available. Grow cold-tolerant crops that can even tolerate a freeze. Harvest frugally. Plants grow slowly when it’s cold. Grow plants that regrow – like lettuces/microgreens, bunch onions, spinach, chard, Kales. Plant successively to keep supplies coming. While one plant is regrowing you can harvest another area.

We have now discussed Greenhouses for both heat and freeze temps needs. Underground greenhouses accommodate both situations with less difficulty. Just be sure to make them safe from flooding or snowmeltBioswales work well with planting more trees and diverting water, making more space for the natural flow of water.

Climate Crisis Many Sprouts are surprisingly High in Protein!

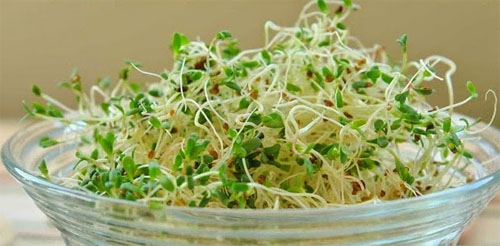
We haven’t talked about SPROUTS! Technically, growing sprouts isn’t gardening, but it’s a relative! In all cases, Heat, Flood and Freeze they can be grown easily and super quickly, 2 to 5 days, in light weight containers. Select seeds that have plenty of protein! Make a fast growing mix and a slower mix. Mix in some spicy seeds for tasty results. You do need water to rinse them and they need to be kept warm. You could carry them in your jacket when it’s cold. In the diagram below, particularly note the grams of Protein!

Climate Crisis GROW SPROUTS!
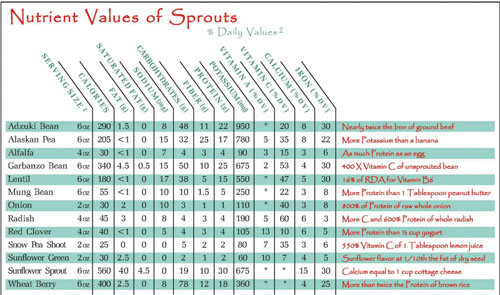
Please right click on image, select ‘Search Google for image’ to see a more clear image.

If you are starting over, you might consider a Food Forest. If you have enough land with good soil, they have special advantages, including the possibility of mitigating crisis situations. Same goes for the use of Permaculture techniques, which might include a Food Forest. Food Forests often start with, may already have trees you want in place. They can provide shade and windbreaks. Wood for winter. Food Forests provide high density production per square foot, a variety of foods and living needs in a much smaller space! It would serve you well to read up on both and possibly modify your long term plans for a safer, more sustainable and comfortable life.

Not everyone likes or wants to garden. If you are evacuated, right away select a food person. Could be an experienced veg gardener who knows how to get things going again. They will work intuitively and be innovative on their feet as needed. Select someone who has a natural inclination. If no one in your group likes gardening, appoint someone responsible and practical to do it anyway. Give them your support by working side by side with them as much as possible. It’s a start. Some people don’t yet know they would like to garden! Show them what you are growing; give them a few samples of your 100% fresh organic food with no packaging! That full bodied taste and fresh texture makes a huge difference! Someone who loves gardening enjoys the work it takes. A greater amount of fresh food will need to be grown to meet initial crisis needs.

Some of us Community Gardeners are considering meeting together if there is a serious crisis and we would evacuate together if need be. We could help people with the food situation. Local permaculturists might form a team to help our community in extreme circumstances. They might train for different kinds of climate situations. We need Permaculture First Responders on staff! Farmers might join an advocacy association to train key gardeners about mass production techniques. Neighborhood associations could create a seat on the council for a person to get knowledgeable and take charge of crisis food needs. Certain centrally located secure homes could be appointed as gathering places. Homeowners that already have veg gardens could be assisted to produce more.

We have been talking about temporary survival fixes in extreme circumstances. The important key to all is responsible land stewardship toward regenerative agriculture. See about Crater Gardens! Sepp Holzer has one! Do read the comments at this page. Create your own to suit your space and needs!

Climate Crisis Regenerative Agriculture

Plan and support Regenerative Agriculture!

This post is intended to be provocative in its own way. Please think about it, let us know your ideas, make comments, ask questions, share your experiences. This has been in the back of my mind for some time and is still in progress. Our solutions now will undoubtedly change as circumstances change, unfold. It will take all our collective genius. People who have lived alone will find themselves suddenly thrust into collaborating. Life will be changing for all of us. We’re in it together.

Be safe, be well, tend your future just as you would your garden ~ it is a garden of another kind!

Updated 3.25.23

Sharing is Caring! Let’s get the word out!

^Top


Love your Mother! Plant bird & bee food! Think grey water! Grow organic! Bless you for being such a wonderful Earth Steward!

The Green Bean Connection newsletter started as correspondence for the Santa Barbara CA USA, Pilgrim Terrace Community Garden. Both of Santa Barbara City’s remaining community gardens are very coastal. During late spring/summer we are in a fog belt/marine layer area most years, locally referred to as the May grays, June glooms and August fogusts. Keep that in mind compared to the microclimate niche where your veggie garden is. Bless you for being such a wonderful Earth Steward!

Read Full Post »

Use Cover Crops to Improve Soil

By the esteemed Barbara Pleasant!

Cover Crop Pleasant Crimson Clover Batchelor's Buttons

Colorful companion cover crops such as bachelor’s buttons and crimson clover will not only improve soil, they’ll beautify your garden beds [and feed the bees].

Intro! Legume cover crops are more than pretty, they improve your veggie garden soil, a lot! There are informed choices to be made. Cover crops are in the same categories as Living Mulch and Green Manure.

I’m copying the beginning of Barbara’s wonderful post and will link you to the rest. She says…

There are three main ways to improve soil: grow cover crops, mulch the surface with biodegradable mulches, and/or dig in organic soil amendments (such as compost, grass clippings, rotted manure or wood chips). All have their advantages and none should be discounted, but cover cropping is the method least likely to be practiced in home gardens. There is a reason for this: Information on using cover crops is tailored to the needs of farmers who use tractors to make short work of mowing down or turning under cover crops. But when your main tools for taking down plants have wooden handles and you measure your space in feet rather than acres, you need a special set of cover crop plants, and special methods for using them.

How Cover Crops Help

A cover crop is any plant grown for the primary purpose of improving the soil. Since the early 1900s, farmers have used cover crops to restore fertility to worn-out land. In addition to helping bulk up soil with organic matter, cover crops prevent erosion, suppress weeds, and create and cycle soilborne nutrients using the power of the sun. Recent advances in soil biology have revealed two more ways cover crops can improve soil.

Rhizodeposition is a special advantage to working with cover crops. Many plants actually release sugars and other substances through their roots. They are like little solar engines, pumping energy down into the soil. With vigorous cover crop plants, this process goes on much more deeply than you would ever dig — 6 feet for oats and rye! If you are leaving your garden beds bare in winter, you are missing the chance to use cold-hardy crops such as cereal rye or oats to solar-charge your soil. Thanks to this release of sugars, the root tips of many plants host colonies of helpful microorganisms, and as the roots move deeper, the microbes follow.

But so much for scientific talk. If you’ve experimented with cover crops, perhaps you have dug up young fava beans or alfalfa seedlings to marvel at the nitrogen nodules on their roots, or watched a stand of buckwheat go from seed to bloom in four weeks flat. Or how about this one: It’s April and the soil is warming up and drying out. After loosening a clump of fall-sown wheat with a digging fork, you pull up a marvelous mop of fibrous roots and shake out the soil. What crumb! The soil’s structure is nothing short of amazing! These are the moments an organic gardener lives for.

Cover Crop Root Channels for New Plant Roots Bio-drillingBio-drilling is what happens when you use a cover crop’s natural talents to “drill” into compacted subsoil. For example, you might grow oilseed or daikon radishes as a cover crop where their spear-shaped roots will stab deep into tight subsoil. Bio-drilling action also takes place when deeply rooted cover crop plants penetrate subsoil and die. Then, the next crop grown may actually follow the rooting network mapped out by the cover crop. Maryland researchers were able to track this process using special camera equipment (a minirhizotron), which took pictures of the interactions between cover crop (canola) and crop plant (soybean) roots. As the canola’s deep roots decomposed, soybean roots followed the trails they blazed in the subsoil, hand in glove. In addition to reduced physical resistance, the soybean roots probably enjoyed better nutrition and the good company of legions of soil-dwelling microcritters, compliments of the cover crop.

Dozens of plants have special talents as cover crops, and if you live in an extremely hot, cold, wet or dry climate, you should check with your local farm store or state extension service for plant recommendations — especially if you want to use cover crops under high-stress conditions. Also be aware that many cover crop plants can become weedy, so they should almost always be taken down before they set seed.

How to Take Cover Crops Down

Speaking of taking down…  Continue reading!

From here, Barbara talks about how to take the cover crops down, then, which cover crop to use, what time of year to start it in which zone, the pros & cons of each, her experiences, research.

Or, you may not want to take down your cover crop. If you planted a short ground cover type legume, late in the season you may simply want to remove the larger plants, open up spots in the living mulch and put in winter plants! Your cover crop will keep on working as the older plants die naturally and feed your soil.

Two for one and save time and money! If you choose edibles as a cover crop under larger plants, you get living mulch and food! If you choose legumes, they are working at the same time you are growing your large edible plants! I do hope you consider this 100% natural organic method of restoring or improving your soil, improving space you won’t be using right away! You will have less disease, less pests, less amendment expenses. Plant with flower combinations like Crimson clover to make habitat for wild bees/pollinators, and beneficial predatory insects, for simple beauty!

  • Spring and Summer, cover crops also act as living mulch while feeding your soil. Toss seeds around and under bigger plants.
  • In SoCal and southern areas, Fall and Winter, use cover crops as green manure to restore and improve your soil for spring ~ summer planting.

The better your soil, the more handsome your harvests. To your health and happiness!

See also Living Mulch! When, Which and Why?!

Back to top


The Green Bean Connection newsletter started as correspondence for the Santa Barbara CA USA, Pilgrim Terrace Community Garden. All three of Santa Barbara city community gardens are very coastal. During late spring/summer we are in a fog belt/marine layer area most years, locally referred to as the May grays, June glooms and August fogusts. Keep that in mind compared to the microclimate niche where your veggie garden is. Bless you for being such a wonderful Earth Steward!

Love your Mother! Plant bird & bee food! Think grey water! Grow organic!

Read Full Post »

Mulch Living Missoula Montana Permaculture Sustainable FarmLast month we looked at Leaf Mold, Mulch or Compost. That’s from the end of life of tree leaves. This month I would like you to take a think about Living Mulch! It is by contrast, an ongoing sustainable green process that produces more and more Nitrogen right where you can use it. It’s generally a faster process by far! You may be a little challenged to figure out how to use it in your specific garden, and you may choose not to, but it may be a perfect option for many reasons.

I use it for my strawberry patch each year. When weather cools and the berries produce little, I pull them, plant my living mulch, green manure, close to Oct 1 for mid January bareroot berry planting. If I have a soil area that is producing less than spectacularly, I plant that area about Dec 1 in time to be ready for early spring planting mid March. Clearly, if you are in northern snow zones, you may need to rotate areas, plant living mulch in an area every three years maybe. In SoCal you might forego planting a ‘winter’ garden and instead plant living mulch. It will need watering, but while it’s working hard to make great soil, you can have a wee rest.


Looking to find what plants to grow as a Living Mulch under Rat’s Tail Radishes started my inquiry! I was delighted to find this permaculture farm site with these terrific details based on experience with references to university (non commercial) research. It’s the real deal since their income depends on successful sustainable growing near Missoula, Montana in a northern short season!

Living mulch can easily be done by planting closely and letting the leaves of the plants completely shade your soil keeping it cool and moist. In summer, living mulch might look like beets or carrots, or differently colored lettuces planted a little more densely on the sunny side under a larger plant like peppers, or at the base of your bean trellis. In SoCal winter it could be cilantro, beets, carrots and lettuce under your broccoli or surrounding your kale, at the feet of your pea trellis. Or if you can’t eat that much, you could toss a mix of legume seeds under your plants to feed your soil as well!

What else could you do? You might like to prepare your current pathway for crop rotation – using it to plant in next season. Maybe you have an area you would like to convert to a veggie garden, or you have a patch where you want to restore the soil before planting again.

When you read this, you will think like a farmer! After you’ve got it, then think how to apply this info to your own garden. These excerpts from http://www.veganicpermaculture.com/agroecology.html have some more technical language and information, but take it slowly. Sometimes I have to read one paragraph at a time, several times, when I’m taking in new dense information. It’s worth the read. You won’t be the same afterwards, and there are some surprises. Go directly to their page to get the whole read, see all the backup images and videos! But read this too, because I’ve made comments for home gardeners and SoCal timing along the way and at the end….


You can grow your own fertilizer with living mulches. Living plants used as mulches have an advantage over dead mulches, such as straw and hay. They affect soils both above and below the ground. They grow with and around main crops and are usually green, succulent, and full of nutrients, with a well-developed root system. This root system works its way into the earth, opens up the soil, and feeds the soil food web all season long, if living mulches are managed properly.

Over time, living mulches improve soils and build the skeletal framework which holds plant nutrients so that they are available when plants need them. This is because living mulches add organic material into the soil without disturbing it. When mowed regularly or tilled into the soil, living mulches add plant nutrients for free, including the big three: nitrogen, phosphorus, and potassium, as well as sulfur, calcium, and micronutrients. When compared to plants grown without mulch in bare soil, legume living mulches produce higher vegetable yields. Leaf cover and yields of bush green beans was higher when planted into a killed stand of hairy vetch. Corn yields were higher in red clover that had been killed in strips. Though fruit maturity was delayed, yields of tomatoes grown in hairy vetch were higher and fruit weights were greater than in bare soil treatments.

Soil organic matter acts like a big sponge soaking up water and releasing it slowly when needed. However, in the short term, most living mulches steal soil water from crops when both are actively growing, especially early spring through early summer. Living mulches hold onto and recycle soil water when NOT actively growing. In one study, corn grown in mowed hairy vetch struggled for water during the first 1 to 4 weeks after planting. But, by two to four weeks after planting, soil moisture levels were the same as in bare soil treatments. Soil water levels were higher than in bare soil after four weeks. In other words, over time living mulches can conserve moisture in your garden, but in the short term, especially right after planting, they compete with crops for soil water.

Living mulches provide diversity and a legume crop rotation which is the foundation of disease suppression in all organic gardens and farming systems. In my 17-year living mulch vegetable production system, disease problems simply dropped off the radar, including cabbage worms. In a 2- year study, we discovered that the living mulch was providing a home for many kinds of predators who were controlling cabbage worms in our commercial plantings of broccoli, cabbage, and Brussels sprouts.

IMPORTANT to know! In cold, wet soil, living mulches may encourage disease and some pests such as slugs or snails. Researchers from South Dakota found lower seedling emergence and survival and higher amounts of disease-causing fungi in clover and hairy vetch mulched fields, when crops were planted during cool weather. But many other studies indicate that several insect pests are controlled in living mulch as compared to bare soil plots. Several species of both specific and generalist predator and parasite populations [the good guys] have been shown to increase in living mulch plots.

When hairy vetch and rye residues covered at least 90% of the soil in one study, weed density was decreased by 78%. Living mulches can fight weeds by “smothering” them, and by utilizing all the water and nutrients so that weeds are starved and cannot invade. Combinations of grasses and legumes are best for smothering weeds.

When to plant your Living Mulch – There are 3 kinds!

  1. ANNUAL LIVING MULCHES. Plant in the spring. In cold climates they are killed by below freezing winter temperatures.
  2. BIENNIAL LIVING MULCHES Plant in the spring. Will grow foliage the first season, overwinter and then flower, set seed, and die the next growing season.
  3. PERENNIAL LIVING MULCHES Plant in late summer/early fall or in spring

You want to read this! For fascinating details on which plants to plant at which times and details about each so you make the very best choice, see their page.

Important points! Once you have chosen the right living mulch for your particular area and need, develop a management plan. You can keep living mulches from becoming too competitive by mowing, lightly tilling, rolling, or keeping them dry (withholding irrigation).

  • Mulches should be mowed and left to sit on the soil surface for two days to two weeks before incorporating into the soil. Your management timing affects pest management.
  • Keep mulches short in wet, humid weather to avoid disease.
  • Mow mulches if annual weeds begin to pop their heads through in order to avoid weed seed production.
  • For FAST plant nutrient cycling, till living mulches into the soil in late spring 2-4 weeks before planting.

Ok, so when you plant living mulch, say for your annual mid Jan bareroot strawberry patch…here’s the schedule:

  1. Oct 1 plant your living mulch – put this on your garden calendar! Be sure to get the right inoculant for them and apply it to your seeds at planting time. See more about inoculants at Peas If Bell beans are in your seed mix, or are your choice, they take a couple months to mature.
  2. About Dec 1 chop down/mow, chop up your living mulch and let it lay on the surface two weeks. If Bell beans are in the mix, chop the mix down and into small pieces when the beans START to flower and the stalks are still tender. Keep your chopped mulch moist, not wet, until it is tilled in. Being moist aids decomposition.
  3. Mid Dec till in your living mulch for mid January bareroot planting. The little white balls on the roots are like a beautiful little string of pearls. Those are the Nitrogen nodules legume plants make that we are growing them for! At this time add any other amendments you want. Strawberries like slightly acidic soil, so I add store bought Azalea/Camellia acid compost. It’s fluffy and adds water holding capacity.

I am so happy you are on a soil feeding mission! If you start late, You can plant faster growers like clovers and vetch. Or, the part of the schedule best ‘cheated’ on is the length of growing time. You can chop them down a bit early, no problem. The part you never cheat on is letting what you chopped down lay on the surface 2 weeks or a tad more. That time is essential for the nodules to release their Nitrogen into the soil after the plants have died. Also it’s easier to chop younger plants down. Letting the Bell Beans (a smaller variety of Fava) just start to bloom is just that. You don’t need to wait for them all to bloom or bloom a lot – we’re not looking for a food crop. They get really tough to chop, and later their roots are tough to chop when it’s time to turn them under. Trust me, LOL!

If you are preparing for early SoCal spring planting mid March, that translates to planting your living mulch, again based on your choice of plant(s), right about Dec 1. If you miss that window, plant a faster grower! Clovers and vetch grow quickly and vigorously, or ask your local nursery, feed store person or farmers what they have or what plant will do the job in your area.

Legumes are prime living mulch choices because they make (fix nitrogen from the atmosphere) for other crops. But, they only give up that fixed nitrogen when they die or are tilled into the soil, or over time if they are mowed and the residue is left on the soil surface as a mulch. Actively growing legumes do not USE as much nitrogen as non-legumes, but they do not GIVE UP nitrogen to the soil or other plants when they are actively growingLegumes do not fix nitrogen at equal rates, or under all conditions. Nitrogen fixation rates are decreased by low (< 40 to 50o F) soil temperatures and stop at freezing temperatures. Nitrogen fixation rates vary among legume species. For example, clovers, sweet clovers, medics, and vetch provide 0.1 to 2.5 lbs of nitrogen per 100 sq ft. Alfalfa provides six pounds of nitrogen per 100 sq ft.!

I use Island Seed & Feed’s Harmony mix – Bell beans, Austrian Peas, Vetch and Oats. Oats grow deep into the soil opening air and water channels, bring up nutrients. Get the inoculant that goes with it. After you broadcast your seeds, roll them or if a small space, lay down a piece of plywood or a board and press them into the soil so the seeds have good soil contact and will stay more moist longer when watered. Water gently overhead with a fine spray so soil isn’t washed away and soil contact lost, seeds aren’t swooshed to a low spot, subsequently too close together. Immediately cover with raised aviary wire, or your choice of material, to keep them from being bird food! How quickly that can happen! Keep them moist, especially if there is hot weather.

You can plant living mulch at any time, depending on your climate, among your existing plants. Living mulch plants shade the soil, some suppress weeds, while they are living, then feed the soil when you till them in after your plants are done. Just choose ones for the right time of year. Plant your garden pathways with ones that can stand being walked on. Till that in and plant there next season!

HOW AND WHEN TO CONTROL YOUR LIVING MULCH

The way living mulches are managed in our [Montana] gardens determines what benefits we derive from them. Legumes contribute most to soil fertility if they are mowed or tilled into the soil. Nutrient release is much slower if the living mulch is mowed and not tilled in. But, some studies indicate that nitrogen, calcium, magnesium, and potassium levels are best increased in the soil over the long term when crop residues are left on the surface, rather than tilled into the soil. Nitrogen release by cover crops depends on temperatures and humidity levels. The warmer the weather, the more quickly residues will release their nitrogen. Studies at North Carolina State indicate that 75% of the nitrogen in some legume cover crops is released within seven to ten weeks after mowing if residues are left on the surface. If the residues are tilled under, nitrogen release is quicker and may be accomplished within four to eight weeks. In cooler weather, nitrogen release can take much longer. In my experiments in Montana in a very microbially active soil, nitrogen release occurred 2 to four weeks after tilling red clover into the soil. There is a lag time of at least two weeks during which nitrogen and phosphorus will be tied up in the soil food web digesting wheel (This lag is called immobilization because soil microbes are using the same nutrients that plants need and thus immobilizing them, or making them temporarily unavailable to plants). Plan for this and wait two to four weeks after mowing or tilling the living mulch before planting main crops. Waiting at least two weeks to plant will also reduce the chance of increased disease organisms, which can be favored by an addition of fresh (particularly succulent and green) residue.

Mowed cover crop residue left on the surface to decompose needs to be kept moist (but not wet!) for at least the first five to seven weeks after mowing to enhance decomposition.

Some living mulches may need light tillage. Light tillage equates to walking your rototiller quickly over the surface of the living mulch. Do not let the tiller tines go into the soil more than one to two inches. If residue is buried deeper than several inches below the soil surface, decomposition time will be longer and anaerobic conditions may occur. Remember that soil microorganisms require oxygen to do their job.

Cover crops can also be managed with a rake. Rake the cover crop vigorously until the soil is exposed. Cornell University research indicates that disturbing living mulch cover crops by using light tillage is most successful in July. This is also the time when most summer crops are particularly resource demanding and hence it is a time when living mulches are most likely to compete with crops.

RIGHT INOCULANT FOR YOUR LEGUME COVER CROPS

Inoculation of legume cover crops is suggested. Inoculants consist of species-specific bacteria that associate with legume roots and fix atmospheric nitrogen. Use the correct inoculants for the cover crop. Alfalfa and yellow and white sweet clovers share the same inoculants; true clovers share another; peas and hairy vetch share a third; garden beans and field beans share a fourth. Purchase inoculants when purchasing seed.

Super important!

What is an Inoculant? Special notes about planting pea, bean, fava, clover, LEGUME seeds. First, we read that legumes take Nitrogen out of the air, fix Nitrogen nodules on their roots, feed themselves, don’t fertilize them or they will go all to leaf. That is true, but only if there is ample Rhizobium leguminosarum, a nitrogen fixing bacteria, available to them. Be sure to use the right inoculant with your seeds if your soil needs it. If a successful crop has grown in the location before, the bacteria are there and you don’t need more inoculant. Actually, the bacteria ‘infect’ your plants and cause them to make the nodules. If there is none in the soil, seeds may even be unable to start. Even if you presprout to start your seedlings, they will live, but not have the ability to fix the N they need, are feeble, struggle and produce little. That lack can be why. See also Peas!

You can see how important it is to know this if you are planting a soil feeding legume cover crop/living mulch! If you have a lot of seeds, like when you are planting an area to a soil feeding cover crop, an easy way to inoculate is put your seeds in a plastic bag, add a teensy amount of water, you want your seed to be only barely wet, add the right amount of inoculant, mush the seeds around in the bag. The water and inoculant will make a slight slurry. Plant immediately. With large areas, the seeds are usually broadcast, flung about. Some gardeners poke large seeds like bell beans/favas just into the soil for more contact so they won’t dry out before sprouting. Keep the seeds moist by heavy misting, a fine overhead spray – no flooding that would wash the inoculant away from the seed or cause the seeds to puddle too close together. You can tell how your plants did by pulling a couple up. If there are no little white pearly nodules, the N fixing didn’t occur. If you got nodules, simply clip the plants off – don’t pull up, removing the nodules from the soil. At the right time, chop the cover crop down. The N in the nodules isn’t released to your soil until about two weeks after the plant dies.

Water! Since Legumes, many short rooted, have that symbiotic relationship with Rhizobium leguminosarum, the nitrogen fixing bacteria, you can see how crucial it is to keep their roots moist to keep your plant in healthy production. Be steady and even with watering, not flooding.

Some living mulches are allelopathic. This means that they biochemically inhibit the growth of other plants. Mustard family types, such as rape and black mustard, are good examples of allelopathic living mulches. Allelopathy can be used to help control weeds; on the other hand, crops can be adversely affected, particularly seeded crops [meaning seeds don’t germinate well or at all].

Seeded crops, like lettuce, can be inhibited by some living mulches, such as mustard, but usually only if the living mulch is tilled into the soil and a crop seeded immediately after. The allelopathic reaction dissipates in time. For example, the compound in plants from the mustard family [includes Brassicas] that is most responsible for its allelopathic reaction loses 80 percent of its punch within two weeks. Plant main crops three to five weeks after mowing or turning under any living mulches suspected of exhibiting allelopathy.


Living Mulch is a superior choice. Give it some thought. Carefully read up on it. Keep your notes. Every gardener’s situation is different – what you grow, your weather, how much time you have, how much production you need. Living mulch is a sustainable choice.

There are two SoCal standard times to plant living mulch to do soil restoration. One is early October to be in time for January bareroot strawberry and berry vine plantings. The other is December/January for early spring plantings. Or you can opt to not plant an area for production that year and plant living mulch anytime if you live in an area that freezes in winter.

In Santa Barbara area, Island Seed & Feed carries legume seeds and mixes by the pound and the inoculants you need. Plus, it’s a fun place to visit! They also carry LOTS of other seeds and local organic seeds as well! (Pet supplies too!)

You don’t need to do a large area. Do a test run. This year try a pathway with living mulch you can walk on instead of a board, concrete steps or straw! If you do a pathway, mound it up before you plant so when it compacts as you walk on it, it will stay level rather than dipping lower and collecting water, making mud. Restore an area where you will grow heavy feeders next spring. When you are eating bigger tomatoes right off the plant you will be happy and feel quite virtuous.

Excerpts from http://www.veganicpermaculture.com/agroecology.html

Updated 10.04.21

Back to Top


Love your Mother! Plant bird & bee food! Think grey water! Grow organic! Bless you for being such a wonderful Earth Steward!

The Green Bean Connection started as correspondence for our SoCal Santa Barbara CA USA, Pilgrim Terrace Community Garden. All three of Santa Barbara city community gardens are very coastal. During late spring/summer we are in a fog belt/marine layer area most years, locally referred to as the May grays, June glooms and August fogusts. Keep that in mind compared to the microclimate niche where your veggie garden is.

Read Full Post »

I love Val Webb’s image and she and I both love COMPOST!  She says:  There’s an irresistible alchemy involved when you can start with garbage and end up with a wildly nutrient-rich substance that has been likened to Ghirardelli chocolate for earthworms.

Composting is EASY! Start Now!  Get your soil fat!  The sooner you plant, and plant in tasty soil, the sooner you get a great harvest!

There’s compost and vermicompost, hot and cold compost, compost in place, trenching, to name a few.  You have options!

Compost is decayed organic matter – poops – that’s manures, dry leaves and straw/alfalfa, wet grasses and kitchen wastes. Compost has a variable amount of Nitrogen in it depending on what has been composted and how the compost was made. Some studies show unturned compost has more Nitrogen than turned compost. Homemade compost can be up to 4 N, as is fish emulsion and chicken manure. Steer is 2, horse 1.7. If you need a quick boost for a yellowing N starved plant, go for bat guano, or easily assimilable blood meal, both at 10 N! Be careful with that bat guano, it’s hot and can burn your plants. And both are pricey. Get just the amount you need at Island Seed and Feed’s bulk bins.

Vermicompost is worm poop. Politely, worm castings. Simple as that. Red wriggler worms are easy to raise, will eat lots of things but do best with tender stuff, your green kitchen waste. They love cantaloupe and melon rinds, nesting in avocado shells, egg shells keep their pH neutral. Wrigglers are surface feeders not earthworms. If you put wrigglers in the soil, they die. Worm castings (vermicompost) have negligible N, about .05, are NOT A FERTILIZER, but do a lot of other good things for your plants. Highly recommended.

Hot compost has to be made carefully, have just the right mix, be tended like a baby, and defies many attempts to get it hot! If you don’t get the combo of your materials right, you are cold composting. The advantage of hot composting is it is fast, kills bad creatures and weed seeds. Also kills the good guys. But. Only in the parts of the pile that actually get that hot. The whole pile never gets that hot, like the outside of the pile. Even if you turn it so the outside goes inside, it’s hard to guarantee it will all get that hot, so be advised. It’s pretty cute to see all those little plants that spring up in the pile….

Cold compost is just throwing your done plants or trim, preferably not diseased or pest infested, into a pile or your compost enclosure, layering with some wet or dry material as needed. It might get hot, it likely won’t. It will decompose if you keep it moist. If not you have dead dry stuff, no nutrients.  Some studies have shown that cold compost is more nutritious than hot compost.  Makes sense since you aren’t burning off Nitrogen and other goodies including beneficial insects and microorganisms.  If your stuff doesn’t turn black and fluffy and smell good when it is decomposed to unrecognizable pieces, you don’t have compost. Perhaps you could use it as mulch?

Composting in place, sheet composting, Lasagna Gardening, is a time saver, no moving later. Chop and drop on the spot, add dry/wet materials as needed, amendments, red wrigglers, let nature do the work.  Especially add some chicken manure before you add your layers, because decomposition uses Nitrogen!  If you are starting on top of turf, using cardboard as your bottom layer, be sure to SATURATE the cardboard.  Don’t rush this part.  Really saturate it.  You want it to last long enough for the grass underneath it to die, to keep the grass from growing up through your pile; you also want your cardboard to decompose so your plants’ roots can grow through it when your pile sinks as the pile decomposes.

Trenching kitchen trim is traditional – cover it and forget it! Crushed eggshells, torn tea bags, coffee grounds. Six inches deep is all you need to do. Cover with the soil, water as usual, your stuff will disappear in about a week! Don’t put in meats or oils that attract digging predators, or grains or cereals that will attract mice. Leave out citruses and spicy foods.

Start Now! 10 Easy Steps to Make RICH COMPOST!

Make the most out of your finished plants or trim; use them for compost, organic fertilizer! A compost enclosure is a fine garden investment! Keep it humming! Dig your compost in around your plants, plant IN your new compost! Surface compost Nitrogen just off gases, so put a layer of soil over your compost to keep the Nitrogen right where you need it, in the soil feeding your plants.

1. Get or make your enclosure, a good working size for you, then layer, layer, layer! Half inch layers are ideal, but do what you can.  A pile 3′ by 3′ is your best minimum if you want a hot pile.  Enclosures can be free pallets on Craigs List tied together, plastic beehive types to keep the rats and mice out, the circular hard black rubber kind, to expensive rolling types, garbage cans with bottoms removed, holes made in their sides!  Do what works for you!
2. Dry stuff first so it will get wet from the stuff you put on top.  That’s ‘brown’ – dry ingredients such as dead leaves, wetted newspaper or cardboard, alfalfa/straw.  The formula is 2 dry, brown to 1 wet, ‘green.’
3. Layer up with your kitchen waste you saved, undiseased green waste from your garden or greens recycle bin. Avoid hard woody stems and seeding weed plants. Cut up large items, halve whole items like apples, potatoes. Tear teabags, crush eggshells.
4. Lay in a few yarrow leaves to speed decomposition. Grow yarrow by your composter for handy use.
5. Inoculate with a sprinkle of soil, living micro organisms, that multiply, munch and speed composting.
6. Sprinkle your layers with aged manure (keep a bucketful next to your composter) to enrich it.
7. Keep layering up to 3’ high or until you run out of materials.
8. Keep your composting materials moist, to keep them live and decomposing.  Don’t let them dry out – dry is dead, nothing happens, nutrients are lost, time and space wasted.
9. Cover with a large piece of *folded heavy mil black plastic to keep your compost moist, and dark so any worms that take up residence work up through the whole pile, to the top .
10. Keep adding to it, stir or turn often to oxygenate, weekly if you can.  Composting organisms need lots of air to operate.  Keep it moist but not drippy and drowning.  Some studies show compost is more Nitrogen rich if you DON’T turn it!  Hmm…read on.

If you are not able to do that much heavy turning or don’t want to take the time, simply, push a long stick into your compost, several times, in different places, to let oxygen in.  Or, if you are inclined, at intervals in your pile, as you build it, you can insert, horizontally or vertically, 2″ PVC pipes, that have had holes drilled in them every 6″ for aeration.  If you are going to insert horizontally, make your holes on one side only; put the holes side down to keep them from clogging.  Make sure both ends stick out so there is air flow through the pipes.  If you insert vertically, drill holes all around the pipe.  If you use a larger diameter, line it with wire mesh to keep it from filling with debris.  Once made, you can use your PVC over and over.  Other alternatives are to make wire mesh cylinders or tie a bundle of twigs together.

Your compost is finished when you no longer recognize the individual materials that went into it. If you are have a small compost batch, when ready, lay out your *folded plastic cover, pitchfork the still decomposing stuff on top of your pile onto your plastic.  Use that good stuff at the bottom where you want it. Or plant in the nutrient rich spot where your composter was!  Put your composter in a new spot, fork the stuff still decomposing back in, add new materials, recover, do it again!  The process slows down in winter, speeds up in summer, generally you have some compost in 6 to 8 weeks.

If you have time, throw a cup or so of compost in a bucket, fill with water, let sit overnight, voila, compost tea! Soak your seeds in it before planting!  Pour it round your plants or use your watering can to spray it on their leaves, both tops and bottoms – foliar feeding.  Your veggies will thrive!  If you have a lawn, make aeration holes with your spade fork and pour the tea down them.  You soil will start to live again!

Your soil and your plants thank you!

Back to top

Read Full Post »

Food Not Lawns is all about raising veggies not grass.  Studies show they both take about the same amount of water, but veggies pay back sustainably with fresh highly nutritious food on your table and no-food-miles or pollution.  Plus they make seeds for their next generation, adapting to your microclimate niche!  http://www.sbfoodnotlawns.org

  • Do I have to rip up my lawn?  You can do lasagna gardening/sheet composting right on top, start with cardboard/newspaper. 
  • Do I have to do a major portion of my lawn?  You can do any part you want, big or small, your call!
  • But I don’t want to do my front lawn.  You don’t have to!  It’s yours, do what makes you happy!  You only need 6 to 8 hours of sun to grow veggies, any space, corridor that has that, works.
  • Is it really hard work?  Using the lasagna/sheet composting method is no harder than gathering the materials to do it!  There is NO DIGGING!  And you don’t have to build raised beds.  Building soil on top of your lawn can make a lovely undulating landscape.  Frameless raised beds have plantable sloped sides!  
  • Is it ugly?   Could be, but how you do it is up to you!  It can be integrated along/among border landscaping plants, you don’t have to have raised beds at all.  If you want to though, you can make really attractive raised beds with beautiful materials, ie a lovely rock wall, terracing.  You can  cover an unsightly area like the edge under a south facing deck.  There are so many lovely options! 
  • I don’t want to wait months before I can plant!  You can plant the same day!  Just pull back a planting hole,  throw in compost, bought or made by you, plus any amendments you want, just like usual, and plant NOW!  No waiting at all!

                            Sheet Compost/Lasagna Garden Layers                           

Mulch or Tarp or not
Optional – Compost, Sprinkled Soil
Repeat layers until 18” to 2’ deep
Greens – Garden chop & drop
Browns – twice as deep as greens
Greens/Wet – kitchen veggie scraps, garden trimmings, grass, manure
Browns/Dry – leaves, straw for air circulation, alfalfa for Nitrogen
Well wetted Cardboard/Newspaper
Existing surface – Lawn

Wet green layers go above dry browns so the juicy decomposing stuff seeps down, keeping the brown stuff moist!  Straw is good in a brown/dry layer because air can pass through it, keeping the pile aerated!  Throw in some red wriggler worms to work the pile, make castings!  Maybe toss in some soil to ‘innoculate’ the pile with soil organisms.

Don’t worry overmuch about exactness of ingredients in your layers as you chop and drop greens from your garden/yard.  In fact, you can mix them up!  But do put in manures for Nitrogen (N).  Decomposing plants use N to decompose, so add a little so your growing plants will have an adequate supply.

If you can, make your pile at least 18” high; it is going to sink down as it decomposes.  Thinner layers, or layers that have been mixed, and smaller pieces, decompose faster.

If you like, cover the whole pile with some pretty mulch when you are done!  Or tarp it to keep things moist until ready for use.

When you plant, especially in ‘new’ soil, sprinkle the roots of your transplants with mycorrhizal fungi!  The fungi make micro filaments throughout your soil that increase your plants’ uptake of minerals, especially phosphorus that builds strong roots and increases blooming, fruiting!

Anybody can lasagna garden/sheet compost in any garden, any part of a garden, any or all the time!  It’s a time honored soil building/restoration technique!  Happy planting!

Read Full Post »