
Since 1990, City Farmer and the City of Vancouver have held worm composting workshops for City of Vancouver residents who live in apartments. For $25 participants get a worm bin, 500 worms (1 lb), Mary Appelhof’s book “Worms Eat My Garbage”, a trowel, bedding and a one-hour class. Now that’s a deal!
Worm Castings are true BLACK GOLD to your garden soil, and high quality store-bought castings are just about as expensive! For good reasons. Worm castings are literally living! Worm castings host ten to twenty times as much microbial activity than plain soil! They cause seeds to germinate more quickly, seedlings to grow faster, leaves grow bigger, more flowers, fruits and vegetables are produced. Castings contain 5 times the available nitrogen, 7 times the available potash and 1 1/2 times more calcium than that found in 12″ of topsoil. These nutrients are also water-soluble and immediately available to the plant. Most potting soils have a nutrient life for 2 to 5 days, where worm castings will last up to 6 times as long.
Vermicompost suppresses several diseases on cucumbers, radishes, strawberries, grapes, tomatoes and peppers, according to research from Ohio State extension entomologist Clive Edwards. It also significantly reduced parasitic nematodes, aphids, mealy bugs and mites. These effects are greatest when a smaller amount of vermicompost is used—just 10-40% of the total volume of the plant growth medium is all that is needed, 25% is ideal!
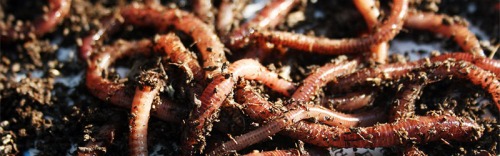
The right kind of worms are RED WRIGGLERS, Eisenia foetida! They forage on debris at the surface. They are smaller than earthworms that live IN the earth. Fishermen use them for bait. Ask your fellow gardeners to give you a handful to get started, go to the bait shack, ask at the farmers market, or support your local organic worm dealer! The little guys live 1 to 2 years. My clew (colony) has been going strong for 15 years now.
Worms are easy to raise or you can use a complex system. You can start them anytime, indoors or out depending on temps. Here in SoCal Santa Barbara mine live outside all year in full sun, brief freezes. They are more active when they are warmer. Soy inked newspaper is often used for bedding to start a clew. Worms are 90% water, so keep the bedding moist. My worms get all the moisture they need from the juicy kitchen bits I feed them and I cover them with their black plastic blankie inside the container to keep them moist! If your bin is stinky, you may be overfeeding or watering too much. Maybe increase the size of the air openings or put your bin where there is more circulation, or out of the shade into a sunny area.
Though you can start your worms anytime, two good times to start them are January and July. January will give you a well established clew and supply of castings for spring plantings starting in SoCal March. July gives a good supply for September, October fall plantings.
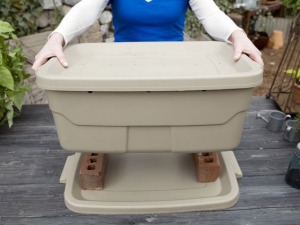
Housing! This bin is great for at home gardeners or children’s school projects! The worms are safe from predators, access is easy, any liquid, leachate, worm tea, drains into the lid below. I use a longer bin about the same height.
Since Red Wigglers, Eisenia Foetida, are surface foragers, these worms need width, not depth. Mine live in a low 4′ by 2′ opaque dark grey storage container. I put holes in the bottom to allow the leachate to drain out and from time to time I move the bin to another location to enrich the soil there, each area getting some of that good stuff! I put holes about 6 to 8″ apart along the sides near the top. The wormies get air flow and on hot days hot air vents out. Inside the container I cover them with a large heavy mil black plastic bag to keep it moist and dark for them. They feed all the way to the top because they feel safe in the dark where no birds can see them!
I do have a shaped-to-the-base piece of 1/4″ hardware cloth, a wire mesh, around the bottom of my box to prevent predator pests like mice or rats from gnawing into the holes in the bottom of the box. Worms are gourmet for them! Sprinkle cinnamon about if you have ants.
How to Start! Select your container or system.
- If you choose a container, get one made of opaque material, a dark color if it is available. Worms like dark, just like under the leaves, in the topsoil, in nature. Make 1/4″ or less diameter holes in the bottom and near the top of the sides or as needed. If you put holes in the container lid, rainwater will go in, perhaps flooding your worms. A hot stove flame heated very large screwdriver blade is quick and perfect for making holes in plastic containers. Push the screwdriver in and twist. If your container will be indoors, you will need a tray underneath to collect drippings.
- Put in 4 to 6″ of moist shredded soy ink newspaper bedding, no bleached office papers. Soak the paper overnight, then wring it out so it is moist like a wrung out sponge, fluff it up. Add some leaves if you have them, and what kitchen trim you might have been saving. If the kitchen stuff is a little funky that’s best because your worms feed on bacteria!
- Add your worms!
- Feed your worms slowly at first. As your worms multiply, give them more chow. Bury or keep your food scraps in a covered container to keep fruit flies away until you give them to your worms.
- Your worms want dark and moist. Cover them inside their container with cardboard or another material so they will feed to the top. If it is light, they think the birds will get them and they stay away from the top! I tuck them in with a large black plastic garbage bag to keep them moist. If they get TOO moist, take the internal cover off/move it to one side, add shredded paper and don’t moisten the paper.
- Mist the paper in as needed to keep it from drying out.
They like decomposing kitchen waste…
YES! Things cut into smaller pieces decompose faster. We just had a rainy winter, moist conditions day after day. In this case I didn’t cut the pieces up so decomposition would be slower and I fed them less. In this colder weather they slowed down and the added kitchen stuff started to rot rather than be eaten. I removed a few forksful and put them in the ground to reduce the moisture and restore balance. Since it was ‘muddy,’ I included what worms were in it. They are now off on new adventures in a different kingdom! The soil there will be extra rich!
My worms do love avo shells and nest in them. Crushed egg shells keep the pH neutral – you don’t need very many. Go wild with potato and carrot peelings, carrot tops, funky lettuce, squash, and, a favorite, melon rinds for dessert. The pulp from fruit/veg drinks. Fridge clean outs are perfect for your worms! If you have doubt about an item, don’t. Moderation is a good word.
NO to harder or tougher items that take a long time. No grape stems, corn cobs, avocado, cherry or mango pits. Avoid harmful spicy, salty, acidic citrus, sulfuric onion. Dairy makes the bin smell, oils and meats are too tough – bring predators if your worms are outdoors. Cooked rice, bread, pastas and pizzas bring mice to outdoor worm bins. No junk food. Coffee filters, grounds in moderation, lightly ripped teabags are good – the nylon kind don’t decompose. But not too many of those teabags/coffee grounds because they are acidic, and veggies like things a tad alkaline.
Rather than laying new food on top of the worms, I use a pitchfork or potato fork, small tines, little damage to worms, to gently lift my worms from one side of the bin to the other. I lay in half their new food, then move some of the worms back, mix them with the new food, then covering the new mix with the rest of the worms. Then I do the other half. The new food will decompose faster when mixed in and covered.
You can easily see when they have run out of food. Feed them sooner than that, or they might be hungry a few days, even die. They eat the bacteria on what you give them. They can’t eat raw food until it decomposes a bit, so feeding them sooner is crucial. If you find yourself wondering about how they are doing, check them ASAP!
Once your bin is started, there is absolutely no reason to continue to feed them newspaper or cardboard. The quality of what you feed your worms is the health of your worms and the quality of your castings. Real nutrients – kitchen scraps, plant trimmings – like the organic wastes of nature, give you excellent castings in return. Worms will eat non nutritious cardboard and lots of other things, but why? Better to recycle that in other ways.
If you are an indoor gardener, keep your clew small. If you are an outdoor gardener, you may be hard pressed to produce enough castings! Hit up your friends that juice and make smoothies for a steady supply of high quality fresh organic veg and fruit trims and bits. I have dedicated recycle friends who bring plastic bags and wide mouth containers of veggie trim. They tie bags loosely so it’s easy for me to open and feed to the kids. I, in turn, share veggies when I have extra, sometimes planting a little more, or one of their favorites for them.
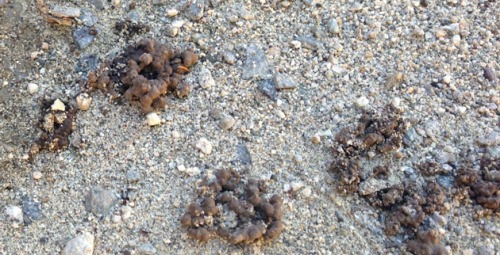
Harvest the bumpy like little castings – they look like fluffy coffee grounds. You’ve seen them, often after a rain…earthworms push them up in little piles. I use an old coffee container with a handle. Take the ‘blanket’ off your worms. Give them about 5 minutes to dive out of the light. Gather the castings at the top. Wait a few more minutes for them to dive again, then gather some more. Only the castings are taken; the worms are the workers!
Oh, are you spooked because worms are ‘slimy?’ They aren’t really, but get some thin rubber gloves. No problem.
At times you will see little yellow eggs, cocoons among the castings. Each holds 4-6 1/2″ long teensy baby worms and hatches in about 23 days. It’s crazy to try to separate them all out. Nevermind. Some of them will hatch in your garden and you will have a small population of red wigglers there too! Do they mate? Yep, they have to so they can make eggs. Lucky for us, they are hermaphroditic and can mate with any other worm they meet!
Feeding Your Plants ~ Optimum growth is in a soil ratio of 1:4, that’s 25% castings, 75% soil. However it has been shown that even 10% of wormcast shows significant difference in plant growth. Using over 40% castings, plant growth performance is stunted and may even appear worse off than having no wormcast at all. A wise gardener knows more is not always better. And, your precious castings will go further.
I walk about my garden to see who might need some castings, or where I plan to plant next. Scratch out a shallow area on one side of your plant, leaving as many tiny surface feeder roots intact as possible. Most veggie annuals do all their root growing in the top 6 to 8 inches of soil. Spread some castings in, cover them with the soil you dug out. After you have used all the castings, water the areas lightly so the castings stay covered and moist. It’s like making and giving your plants worm tea in place! Remember, 25% is the ideal ratio.
How Castings Work! Castings are not exactly a fertilizer, ie their available N, Nitrogen, content is only 1.80 – 2.05 %, yet their NPK value is much higher than soil! NPK are the main minerals your plants need. The NPK in castings is locked in the cast, and slowly released as micro-organisms break it down. This is much better for plants, because it takes time for them to uptake nutrients. They can’t do it all at once. What they do uptake, they can do easily and immediately.
Vermicompost nutrients and minerals are significantly higher (with Nitrates up to 9 times higher) than garden soil. This creates electro-conductivity, in turn creating more salts in vermicompost. When there is too much salt in soil, it sucks water from plant roots resulting in the ‘burning’ of plants. Although there aren’t enough salts in vermicompost to do that (it is much more common in chemical fertilizers), using too much wormcast can stunt plant growth.
Worm castings have much higher percentages of humus than either soil or compost, which helps the castings hold more water and stay aerated, while also providing binding sites for micronutrients that would otherwise wash out of soil during heavy rains. Mineral clusters that castings form combine in such a way that they can withstand water erosion and compaction, and, increase water retention! Castings hold 2 to 3 times their weight in water! If you are in a drought area, especially add them when you add compost or Sphagnum peat moss. All three increase water holding capacity. In summer, mulching keeps your soil moist also!
Per Rodale, ‘One excellent use of castings is in a liquid plant tonic. Put 1 pint/2 cups of castings in a bucket. Add a gallon of warm water and a spoonful of molasses. Stir this well, and stir it frequently over the course of 24 to 48 hours. Dilute the resulting liquid at the ratio of 1 part tea to 4 parts water and use it to water container plants and fruit trees. You can use it in your vegetable beds, but they should already be well nourished by compost and thus don’t need it as much. It’s best to use all of your worm tea in a week or so.’ Another simple way is 1 cup Worm Castings for every gallon of water and wait 1 week.

A good tip! If you enjoy making worm castings, compost, fish/kelp tea mixes, and want to feed your plants but minimize damage to their roots and soil structure, get yourself a spade fork, or if you have a lot of territory, a broad fork like in the image! Push it down into the soil, rock it back and forth slightly to make holes, pour in your soup! You will hear the soil organisms dancing!
Plant recovery testimonial! L.A. Times, 5/27/00, Julie Bawden Davis: “Convinced that nothing could help a whitefly infested hibiscus in my garden that had been struggling for two years, I spread a one inch layer of worm castings around the plant. A month later I noticed that the whitefly population had dwindled. Three weeks later there were absolutely no whiteflies on the plant. It’s now back to its healthy self and producing lots of blooms.”
To my delight, visitors often wonder if I have named my worms! We all laugh and I show them more worms! Oh, and how do you get more worms?! Worms are hermaphrodites, meaning each worm has both male and female reproductive parts. The worm does have to mate in order to reproduce, but, every worm they meet is a potential mate. When a worm gets to be about six weeks old it forms a white band around its head, called a clitellum, this is where their reproductive organs are located.
Under ideal circumstances, worm populations can double in a month. They begin breeding at 2 months old, are capable of producing 96 babies each month. Worms have a brain and five hearts. Worms breathe through their skin. They have neither eyes nor ears but are extremely aware of vibrations such as thumps or banging on the composter. Please try not to disturb them unnecessarily. Worms are odorless and free from disease.
Keep the depth of your clew between 6 and 8 inches. If you reach capacity, give some to friends starting vermicomposting, feed some to the chickens, or just turn ’em loose in nature. But, another way to put your worms to work is to add handfuls to areas where you are composting in place or right into your composter! I keep my compost pile covered with thick opaque plastic amendments bags so the worms will work at the top of the pile too! Them and compost speeding herbs like comfrey and yarrow will perk your compost right up. Just keep the pile or area moist.
Those little yellow lemon-shaped beads are worm cocoons. Your worms are happy and breeding. Decomposers – mites, pot worms and tiny black beetles -may join the family. That’s good. They’re all doing the same work, and the worms don’t mind the company.
Vacation?! Feed them well, and add fresh bedding if they need it. That will hold them for a couple weeks.
Worm Economics and Education! Vermiculture has become common practice. Private Worm Farms abound! Universities and schools have educational programs, cities have programs, zoos, private organizations proudly tell their story. Websites assist you about raising your own or starting your own business.
Depending on how much waste you need to reduce, and how quickly, if it is a lot and you want it gone, consider using BSFL, Black Soldier Fly larvae aka maggots! I know, ewwww! But actually they aren’t so bad afterall. Plus, they are incredibly fast! There are pros and cons. See Maggots in your Compost?! Two Surprising Answers!
Buying Castings! No time for one more thing to do?! Get your castings from a reputable organic seller, support local worm cast sellers. There are many great companies with high quality castings today. Don’t confuse an amendment with castings in the ingredient list, with a bag or bucket of pure castings. Remember, a little bit of the right stuff goes a long way. Give them to your indoor plants too.
Whether for prevention, abundant growth, recovery or economics, worm castings are fabulous. Worms work for free, and are permaculture sustainable! They can consume about 1/2 of their weight each day, turning our food waste into a high quality powerful garden amendment!

I love Anna de la Vega’s site name, The Urban Worm! The name reminds us everyone can raise worms, whether at your garden or in a special system in your kitchen! Castings can be used outdoors or in your favorite indoor container plantings! Your plants will be healthier, blooms prolific!
I was more than surprised to find myself raising worms! But the rewards are wonderful and I have come to cherish the amazing little creatures! If you have hovered over the thought of becoming a worm steward, perhaps now is a good time to start!
Names or not, love your worms!
Updated from time to time…
Love your Mother! Plant bird & bee food! Think grey water! Grow organic! Bless you for being such a wonderful Earth Steward!
The Green Bean Connection newsletter started as correspondence for the Santa Barbara CA USA, Pilgrim Terrace Community Garden. All three of Santa Barbara city community gardens are very coastal. During late spring/summer we are in a fog belt/marine layer area most years, locally referred to as the May grays, June glooms and August fogusts. Keep that in mind compared to the microclimate niche where your veggie garden is.


